Step 10 - The Example Application
June 27, 2023
Updated Dec 18, 2025
-
![]() Thomas Jungbauer
-
4 min read
(754 words)
Thomas Jungbauer
-
4 min read
(754 words)
If you read all articles up to here (congratulations) you know that we always update the README file of "The Application". But what is this application exactly and how can we update it like in a real-life example? The Globex UI application is built with Angular and was prepared for this journey. It is a quite complex application and requires Kafka to be installed as well. However, since I am not a developer and this tool was already available, I forked and re-used it. The original can be found at Globex UI
Goals
The goals of this step are:
Deploy AMQ Streams Operator
Deploy Globex DEV
Deploy Globex Prod
Verify Deployments
Introduction
The Globex UI, although quite complex, will provide a simple web interface. Since I do not have multiple clusters, I will use the Namespaces globex-dev and globex-prod to distinguish between the two environments. This means, our DEV environment will run inside globex-dev and PROD in globex-prod. Kafka related stuff will be deployed in the Namespace kafka.

The deployment will be done automatically by GitOps. As soon as our Pipeline will be executed and subsequently updates our image in the Kubernetes manifests (see step: Linting Kubernetes Manifests), a new version of Globex UI will be deployed. The production update will follow in later steps in the pipeline.
GitOps will monitor changes in our Kubernetes manifest repository. Here, we use Kustomize overlays to separate between DEV and PROD.
| As a general recommendation: Do everything with GitOps. If it is not in Git, it does not exist. |
Installation
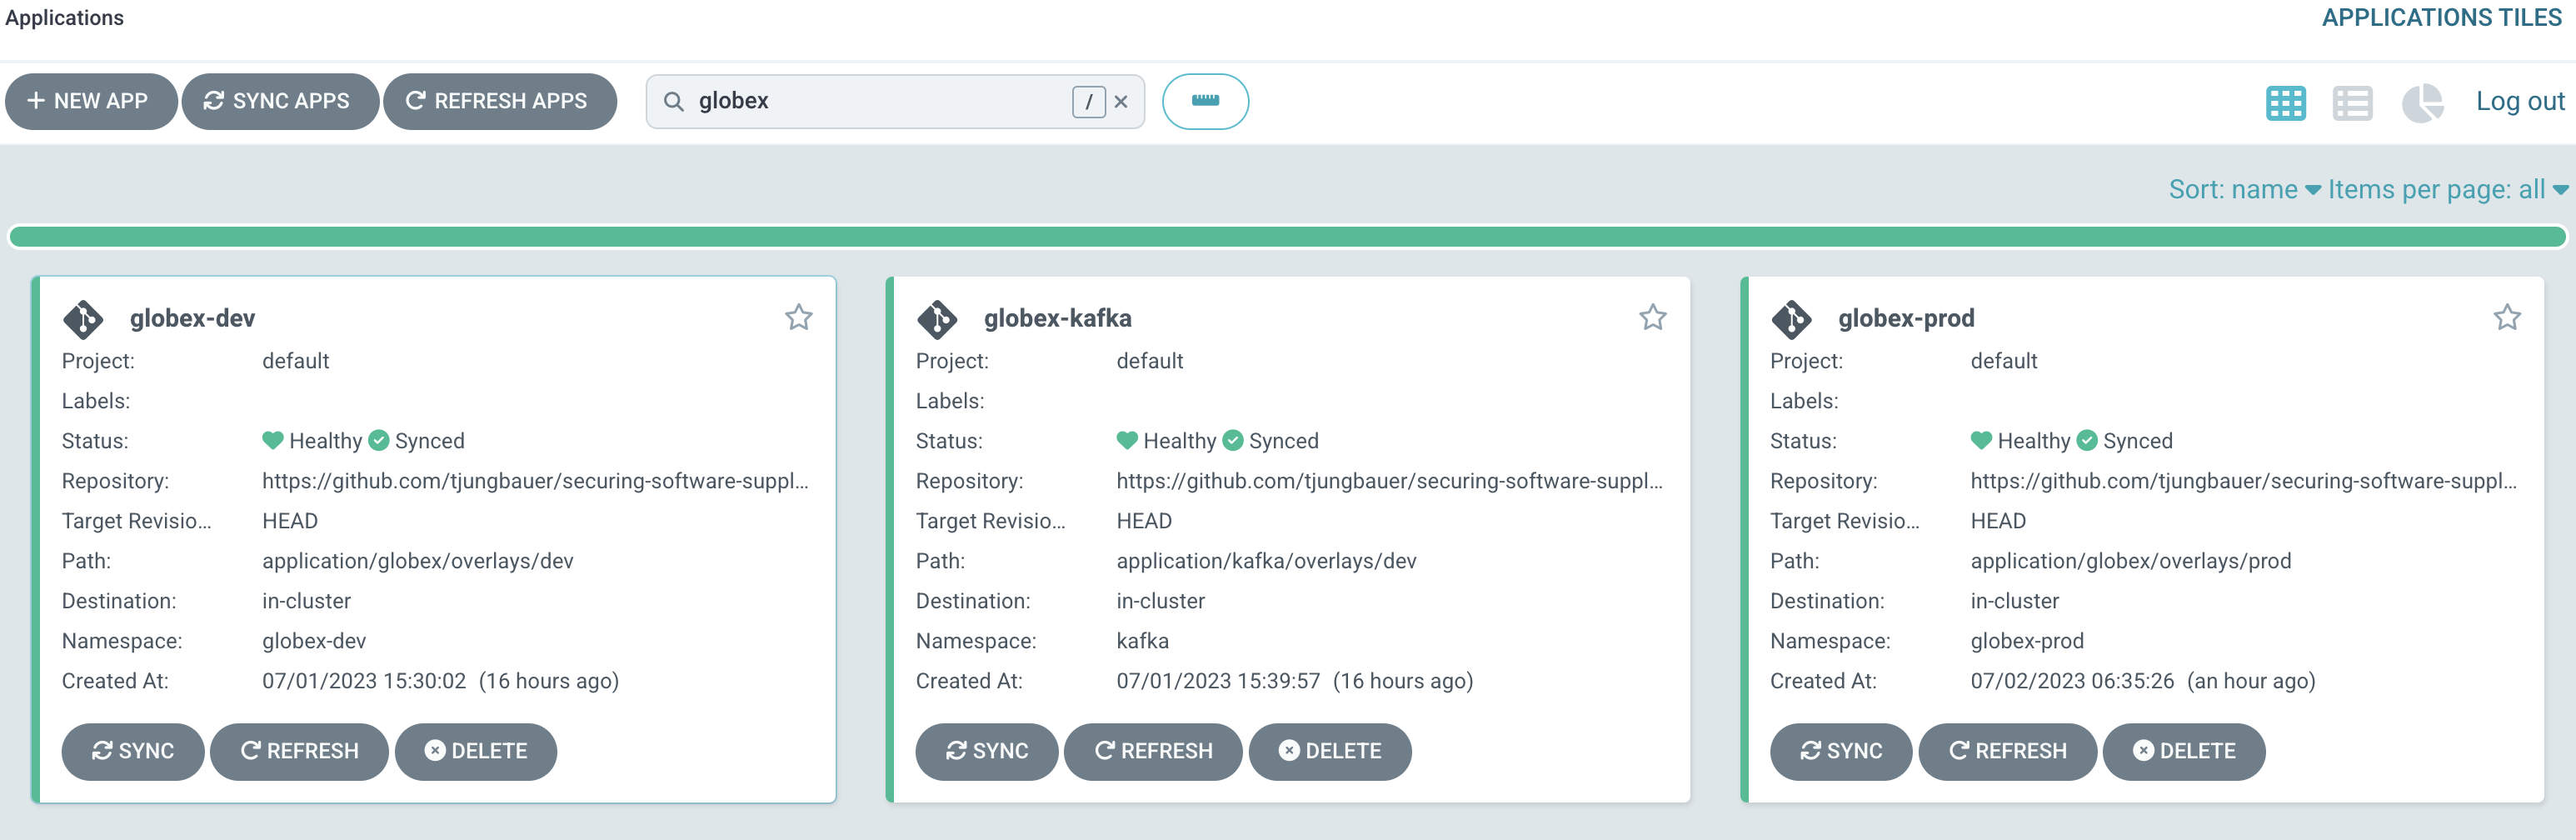
To install all required components, we create several GitOps Applications.
| Although we create these Argo CD Applications by hand, it is recommended to put these definitions into Git also. |
| Since this is just a demo, I am using the cluster instance of OpenShift GitOps. DO NOT deploy customer workload using the default instance, since it has privileged permissions on the cluster. Instead, create a second instance (or multiple) for the developers. |
The following Applications will be created:
Install AMQ Streams Operator
As the very first step, we need to deploy the AMQ Streams Operator. Simply search for the operator in the Operator Hub and deploy it using the default values.
| Also, this deployment could and should be done using Argo CD. For the sake of speed, I have done this manually here. |

Install Kafka for Globex
Now we can deploy all Kafka-related stuff using GitOps. Let’s create the following Application object:
apiVersion: argoproj.io/v1alpha1
kind: Application
metadata:
  name: globex-kafka
  namespace: openshift-gitops
spec:
  destination:
    namespace: kafka (1)
    server: 'https://kubernetes.default.svc' (2)
  project: default
  source:
    path: application/kafka/overlays/dev (3)
    repoURL: 'https://github.com/tjungbauer/securing-software-supply-chain'
    targetRevision: HEAD
  syncPolicy:
    automated: (4)
      selfHeal: true
    syncOptions:
      - RespectIgnoreDifferences=true
- CreateNamespace=true| 1 | The deployment must be done in the Namespace kafka |
| 2 | We install using the local GitOps server instance. |
| 3 | Path/URL to the GitHub Kustomize repository. |
| 4 | Auto-Update in case of changes are detected. |
Install Globex DEV
The DEV installation will deploy the test version of our application into the Namespace globex-dev
apiVersion: argoproj.io/v1alpha1
kind: Application
metadata:
  name: globex-dev (1)
  namespace: openshift-gitops
spec:
  destination:
    namespace: globex-dev (2)
    server: 'https://kubernetes.default.svc' (3)
  ignoreDifferences:
    - group: '*'
      jqPathExpressions:
        - '.imagePullSecrets[] | select(.name|test(".-dockercfg-."))'
      kind: ServiceAccount
  project: default
  source:
    path: application/globex/overlays/dev (4)
    repoURL: 'https://github.com/tjungbauer/securing-software-supply-chain'
    targetRevision: HEAD
  syncPolicy:
    automated: (5)
      selfHeal: true
    syncOptions:
      - RespectIgnoreDifferences=true
- CreateNamespace=true (6)| 1 | Globex DEV instance |
| 2 | Install into the Namespace globex-dev |
| 3 | We install using the local GitOps server instance. |
| 4 | Path/URL to the GitHub Kustomize repository. |
| 5 | Auto-Update in case of changes are detected. |
| 6 | Create the Namespace if it does not exist. |
Install Globex PROD
And finally, the same for the PROD instance:
apiVersion: argoproj.io/v1alpha1
kind: Application
metadata:
  name: globex-prod (1)
  namespace: openshift-gitops
spec:
  destination:
    namespace: globex-prod (2)
    server: 'https://kubernetes.default.svc' (3)
  ignoreDifferences:
    - group: '*'
      jqPathExpressions:
        - '.imagePullSecrets[] | select(.name|test(".-dockercfg-."))'
      kind: ServiceAccount
  project: default
  source:
    path: application/globex/overlays/prod (4)
    repoURL: 'https://github.com/tjungbauer/securing-software-supply-chain'
    targetRevision: HEAD
  syncPolicy:
    automated: (5)
      selfHeal: true
    syncOptions:
      - RespectIgnoreDifferences=true
- CreateNamespace=true (6)| 1 | Globex DEV instance |
| 2 | Install into the Namespace globex-prod |
| 3 | We install using the local GitOps server instance. |
| 4 | Path/URL to the GitHub Kustomize repository. |
| 5 | Auto-Update in case of changes are detected. |
| 6 | Create the Namespace if it does not exist. |
Summary
During this step we have added nothing new to our pipeline, but deployed our example application Globex UI instead, including Kafka. The next steps will now do another verification against ACS and if the transparency logs are available, and then finally prepares everything for production deployment.
Related Articles
Copyright © 2020 - 2026 Toni Schmidbauer & Thomas Jungbauer
Discussion
Comments are powered by GitHub Discussions. To participate, you'll need a GitHub account.
By loading comments, you agree to GitHub's Privacy Policy. Your data is processed by GitHub, not by this website.