The Guide to OpenBao - Authentication Methods - Part 7
March 9, 2026
-
![]() Thomas Jungbauer
-
20 min read
(3949 words)
Thomas Jungbauer
-
20 min read
(3949 words)
With OpenBao deployed and running, the next critical step is configuring authentication. Ultimately, you want to limit access to only authorised people. This article covers two common authentication methods: Kubernetes for pods and LDAP for enterprise directories (in a simplified example). There are many more methods, but we cannot cover them all in this article.
Introduction
Authentication in OpenBao verifies the identity of clients before granting access to secrets. OpenBao supports multiple authentication methods, each suited for different use cases. Among others it supports:
| Method | Best For | Key Features |
|---|---|---|
Kubernetes | Pods running in K8s/OpenShift | Service account tokens, automatic |
OIDC | Human users, SSO | OpenShift OAuth, Keycloak, Azure AD |
LDAP | Enterprise directories | Active Directory, OpenLDAP |
AppRole | CI/CD, automation | Role ID + Secret ID |
Token | Direct access, bootstrap | Simple but less secure |
| The full documentation of the authentication methods and the list of available methods (for example Radius) can be found here: OpenBao Authentication Methods. |
Authentication Workflow
The authentication workflow in OpenBao from a user perspective is as follows:
A client wants to authenticate to OpenBao and provides credentials.
OpenBao validates the credentials against the authentication method. For example: LDAP
If the authentication method (e.g. LDAP) is successful, it will return the required information about the client.
OpenBao maps this result to policies that are mapped to the authentication method.
OpenBao generates a token that is associated with the policies and returns it to the client.
The client can then use this token for further operations.
Prerequisites for Authentication Methods
Before configuring authentication:
OpenBao is deployed and unsealed (Parts 2-6)
You have admin access to OpenBao (root token)
Access to the required authentication backend:
For Kubernetes auth: Access to the OpenShift cluster
For LDAP: Access to the LDAP server
etc.
Set up your environment:
You can set up your environment by using either the CLI or the UI.
Using the CLI
You can use the CLI to interact with OpenBao. In this example we will forward the port locally to the OpenBao server and set the environment variable BAO_ADDR to the local address. With boa login and the root token you can authenticate against OpenBao with full access.
# Port forward (if needed)
oc port-forward svc/openbao 8200:8200 -n openbao &
# Set environment
export BAO_ADDR='http://127.0.0.1:8200'
# You may need the SSL CA too.
# export BAO_CACERT="$PWD/openbao-ca.crt"
# Login with root token
bao login
# List all authentication methods
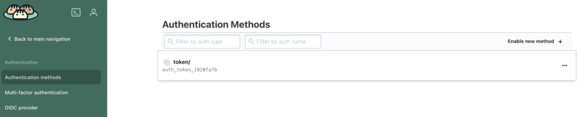
bao auth listThe last command returns a list of the available authentication methods. Currently there is only one authentication method enabled: token.
Path     Type     Accessor                 Description                      Version
----     ----     --------                 -----------                      -------
token/   token    auth_token_1020fa7b      token based credentials          n/a
Using the UI
The UI, if enabled, is accessible via the OpenShift Route (if running on OpenShift and if it was created in Part 3). The password/token is the root token from the initialisation.
The UI has the advantage that it offers more visibility into the configuration and possibilities. For example, at the beginning there is one authentication method token enabled. This is required for the root token authentication.
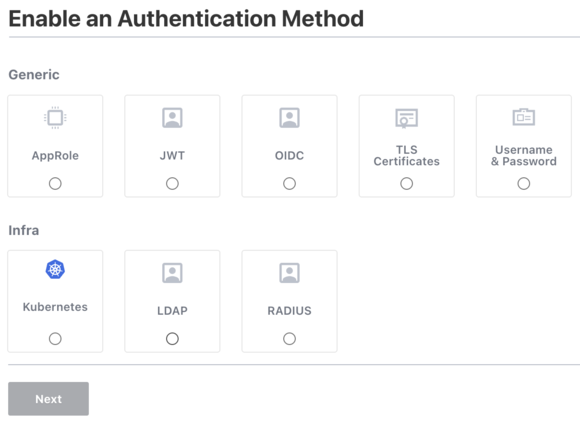
We can enable the other authentication methods by clicking on the Enable new method link to see what options are available.
Understanding Policies
Before you can actually use an authentication method, it is important to understand what policies do. A policy is a way to declaratively define what (which paths) authenticated users can access or not. All paths are denied by default. A policy is mapped to an authentication method. For example, when we look at LDAP, we could configure something like this:
Every member of group "dev" is mapped to a policy named "dev-policy". The policy then allows the user to read the secrets under the path "secret/data/dev/*".
Basic Policy Structure
A policy is a set of path rules. Each rule says: “for this path (or path prefix), the bearer of this policy may use these capabilities.” Paths are tied to OpenBao’s internal API: for example, secrets in the KV v2 engine live under secret/data/<mount-path>/<key>, so a path like secret/data/myapp/* means “any key under the myapp prefix in the KV v2 store mounted at secret/.”
The example below does two things that are typical for an application policy:
Secrets access: It allows read and list on
secret/data/myapp/*.read lets the client fetch the value of a secret at a path (e.g.
secret/data/myapp/database).list is required to list keys under a path (e.g. to discover
myapp/database,myapp/api-key); without it, the client would need to know every path in advance.
Token renewal: It allows update on
auth/token/renew-self. Tokens often have a limited lifetime; this path lets the holder extend their own token without needing the root token or extra permissions. Including it avoids applications losing access when the token expires.
| Policies can be written in JSON or HCL. |
# Example policy: myapp-read-policy.hcl
# Allow reading secrets from specific path (KV v2 engine at mount "secret/")
path "secret/data/myapp/*" {
  capabilities = ["read", "list"]
}

# Allow renewing own token so the app can extend its token before expiry
path "auth/token/renew-self" {
  capabilities = ["update"]
}
The path secret/data/myapp/* assumes you have a KV v2 secrets engine mounted at secret/ and will store application secrets under keys like myapp/database, myapp/api-key, etc. Adjust the mount path and prefix to match your setup.
| The use of globs (*) may result in surprising or unexpected behaviour. Use them with caution. |
Policy Capabilities
Each path defined in a policy must have at least one capability. This provides control over the allowed or denied operations a user may perform. There are several capabilities available:
create- Create new data at the given pathread- Read dataupdate- Update existing datapatch- Patch existing data (Partial update)delete- Delete datalist- List keys at a pathscan- Scan or browse the path for keyssudo- Allows access to paths that are root-protected.deny- Explicitly deny (overrides other grants)
Default Policies
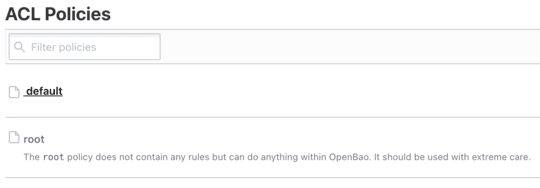
When OpenBao is deployed the first time, there are no additional authentication methods enabled, except for token. This is required for the root access itself. To allow the administrator to access using the root token, there is one default policy called root. This policy is somewhat of a catch-all policy; it allows the administrator to access everything.
In addition to the root policy, there is one other default policy called default. This policy is used for all authenticated users. It allows them, for example, to look up their own properties and to renew or revoke their own token.
Let’s look at the default policies in the CLI:
A quick reminder of how to log in to OpenBao using the CLI when running it against Kubernetes: first open a port-forward, set the variable BAO_ADDR to the local address; if you use HTTPS you may need to set the SSL CA certificate, then log in with the root token. |
You need to have the CA certificate in the current directory, which you might fetch with:
oc get secret openbao-ca-secret -n openbao -o jsonpath='{.data.ca\.crt}' | base64 -d > openbao-ca.crtPort forward, set the environment variables and login with the root token:
# Port forward (if needed)
oc port-forward svc/openbao 8200:8200 -n openbao &

# Set environment
export BAO_ADDR='https://127.0.0.1:8200'

# You may need the SSL CA too.
export BAO_CACERT="$PWD/openbao-ca.crt"

# Login with root token
bao login
Now to list and fetch the current policies you can use the following commands:
# List policies
bao policy list
# Returns something like this:
#default
#root

# Read a policy
bao policy read default
The second command returns the policy content:
# Allow tokens to look up their own properties
path "auth/token/lookup-self" {
    capabilities = ["read"]
}

# Allow tokens to renew themselves
path "auth/token/renew-self" {
    capabilities = ["update"]
}

# Allow tokens to revoke themselves
path "auth/token/revoke-self" {
    capabilities = ["update"]
}

# Allow a token to look up its own capabilities on a path
path "sys/capabilities-self" {

[...]
Again you will see the same policies in the UI. You can also manage them or create new ones using the UI.
Creating Policies using the CLI
Creating a policy, for example using the CLI, is straightforward. You can create a policy from a file or inline. The syntax is either JSON or HCL. The example below creates a policy called "myapp-read" from a file called "myapp-read-policy.hcl". The policy allows reading and listing secrets under the path "secret/data/myapp/*".
# Create a policy from file
bao policy write myapp-read myapp-read-policy.hcl

# Or inline
bao policy write myapp-read - <<EOF
path "secret/data/myapp/*" {
  capabilities = ["read", "list"]
}
EOF

# List policies
bao policy list

# Read a policy
bao policy read myapp-read
Kubernetes Authentication Method
As we work a lot with OpenShift/Kubernetes, this method of authentication will be the first to try. The Kubernetes auth method can be used to authenticate against OpenBao using Kubernetes Service Account tokens. It is essential for pods to access secrets.
Let us try a simple example.
Step 1: Enable Kubernetes Auth
Assuming you are still logged into OpenBao, you can enable the kubernetes auth method with the following command:
bao auth enable --description="Authentication method for Kubernetes/OpenShift cluster" kubernetesThis simply enabled the authentication method and set a description. However, we need to configure it further.
Step 2: Configure Kubernetes Auth
To configure the kubernetes auth method, you need to get the Kubernetes API server address. You can get it with the following command (assuming you are logged into the OpenShift cluster):
The command oc can be replaced by kubectl if you are not using an OpenShift cluster. |
# Get the Kubernetes API server address
KUBERNETES_HOST=$(oc whoami --show-server) (1)

# Configure the auth method
bao write auth/kubernetes/config \ (2)
kubernetes_host="$KUBERNETES_HOST"| 1 | Get the Kubernetes API server address. This will use something like https://api.cluster.example.com:6443 |
| 2 | Configure the auth method with the Kubernetes API server address. |
| When running inside Kubernetes, OpenBao automatically uses the pod’s service account to communicate with the Kubernetes API. |
Step 3: Create a Policy for the Application
Now we need to associate a policy to the authentication method. We could also assign the default policy but we want to provide access to the path secret/data/expense/database and secret/metadata/expense/config for the application.
# Create policy for an example application
bao policy write expense-app - <<EOF
# Read database credentials
path "secret/data/expense/database" {
  capabilities = ["read"]
}

# Read application config
path "secret/data/expense/config" {
  capabilities = ["read", "list"]
}

# Allow token renewal
path "auth/token/renew-self" {
  capabilities = ["update"]
}
EOF
Step 4: Create a Kubernetes Auth Role
As the next step we map the policy to the authentication method. We will further limit the access to the namespace expense and the service account expense-app.
# Create a role that maps Kubernetes service accounts to OpenBao policies
bao write auth/kubernetes/role/expense-app \
  bound_service_account_names=expense-app \ (1)
  bound_service_account_namespaces=expense \ (2)
  policies=expense-app \ (3)
  ttl=1h \ (4)
max_ttl=24h (5)| 1 | bound_service_account_names: K8s service account name(s) |
| 2 | bound_service_account_namespaces: K8s namespace(s) |
| 3 | policies: OpenBao policies to attach |
| 4 | ttl: Token time-to-live |
| 5 | max_ttl: Maximum token lifetime |
| All of the configuration above, created using the CLI, can also be done using the UI of OpenBao. |
Ensure the KV v2 secrets engine is mounted at secret/
| We will discuss secret engines in more detail in the next part of the guide. |
The policy and demo commands in this guide use the path secret/data/expense/database, which assumes a KV v2 secrets engine mounted at secret/. To check and enable it:
Check existing mounts: List enabled secrets engines and look for
secret/with typekv(version 2):# List all secrets engine mounts (requires a token with read on sys/mounts) bao secrets listLook for an entry like
secret/with typekvorkv-v2. If you seesecret/and it is KV v2, you can skip to Step 5.Enable KV v2 at
secret/if missing: Ifsecret/is not listed, or you want to use a fresh mount, enable the KV v2 engine at the pathsecret:# Enable KV v2 secrets engine at path "secret" (requires root or policy with sys/mounts capability) bao secrets enable -path=secret -version=2 kvIf
secret/already exists as KV v1, you cannot change it in place to v2; use a different path (e.g.secretv2/) and update the policy and demo paths accordingly (secretv2/data/expense/database, etc.).
Step 5: Store the database secret in OpenBao (one-time)
Before the application can read it, store the database password (and any other keys) at the path the policy allows. Run this once from a machine that has OpenBao access (e.g. bao CLI and a token).
You must use a token that has create and update capability on the KV path. The expense-app policy is read-only (for the application). Use the root token from OpenBao initialisation, or log in with bao login and use a token that has a policy granting create and update on secret/data/expense/*. If you use a read-only token (e.g. one that only has the expense-app policy), you will get a 403 "preflight capability check returned 403". |
# Store the database secret at secret/data/expense/database (KV v2 path)
bao kv put secret/expense/database password="my-super-secret-db-password" username="expense_db_user"
This creates (or overwrites) the secret at secret/data/expense/database. The policy grants the expense-app role read on this path only; the application cannot create or update it.
Step 6: Create the expense namespace and demo application
Apply the following manifests to create the namespace, service account, optional long-lived token (Kubernetes 1.24+), and a demo deployment that authenticates to OpenBao and fetches the database secret. Adjust the OpenBao URL if your OpenBao is in another namespace or uses HTTPS (e.g. https://openbao.openbao.svc:8200).
| Remember: We have created a policy that allows the service account with the name expense-app in the namespace expense to read the secret at secret/data/expense/database. If you want to use different paths or namespaces, you need to adjust the policy accordingly. |
# full-demo-expense-app.yaml
# 1. Namespace
apiVersion: v1
kind: Namespace (1)
metadata:
  name: expense
---
# 2. Service account used by the demo app to authenticate to OpenBao
apiVersion: v1
kind: ServiceAccount (2)
metadata:
  name: expense-app
  namespace: expense
---
# 3. Long-lived token for Kubernetes 1.24+ (optional; allows pods to use the SA token)
apiVersion: v1
kind: Secret (3)
metadata:
  name: expense-app-token
  namespace: expense
  annotations:
    kubernetes.io/service-account.name: expense-app
type: kubernetes.io/service-account-token
---
# 4. Demo deployment: authenticates to OpenBao and fetches secret/data/expense/database
apiVersion: apps/v1
kind: Deployment
metadata:
  name: expense-demo
  namespace: expense
  labels:
    app: expense-demo
spec:
  replicas: 1
  selector:
    matchLabels:
      app: expense-demo
  template:
    metadata:
      labels:
        app: expense-demo
    spec:
      serviceAccountName: expense-app
      containers:
        - name: demo
          image: registry.access.redhat.com/ubi9/ubi-minimal:latest
          command:
            - /bin/sh
            - -c
            - |
              echo "=== Installing curl ==="
              microdnf install -y curl 2>/dev/null || true
              echo "=== Fetching database secret from OpenBao ==="

              JWT=$(cat /var/run/secrets/kubernetes.io/serviceaccount/token)

              OPENBAO_URL="${OPENBAO_URL:-http://openbao.openbao:8200}"

              RESP=$(curl -s -k -X POST -H "Content-Type: application/json" \ (4)
                -d "{\"jwt\": \"$JWT\", \"role\": \"expense-app\"}" \
                "$OPENBAO_URL/v1/auth/kubernetes/login")

              TOKEN=$(echo "$RESP" | sed -n 's/.*"client_token":"\([^"]*\)".*/\1/p')
              if [ -z "$TOKEN" ]; then
                echo "ERROR: Failed to get OpenBao token. Check OpenBao URL ($OPENBAO_URL), role expense-app, and network."
                echo "Response: $RESP"
                exit 1
              fi

              echo "OpenBao token obtained. Reading secret/data/expense/database ..."
              SECRET=$(curl -s -k -H "X-Vault-Token: $TOKEN" "$OPENBAO_URL/v1/secret/data/expense/database") (5)
              echo "$SECRET"

              PASSWORD=$(echo "$SECRET" | sed -n 's/.*"password":"\([^"]*\)".*/\1/p')
              echo "Database password (data.data.password): ${PASSWORD:-<not set>}"
              echo "=== Demo complete. Pod stays running; exec in to run more curl commands. ==="
              exec sleep infinity
          env:
            # Override if OpenBao is in another namespace or uses HTTPS
            - name: OPENBAO_URL
              value: "https://openbao.openbao:8200"
          resources:
            requests:
              memory: "64Mi"
cpu: "10m"| 1 | Create the namespace |
| 2 | Create the service account |
| 3 | Create the secret (long-lived token for Kubernetes 1.24+) |
| 4 | Authenticate to OpenBao and get a client token (using the Kubernetes JWT) |
| 5 | Fetch the database secret |
The examples above use curl -k to bypass certificate verification. For production, you should adjust this and mount the CA certificate in the pod (see the note earlier in this section on using the openbao-ca Secret). |
Apply the manifests and wait for the pod to be ready:
oc apply -f full-demo-expense-app.yaml

# Wait for the demo pod to be running
oc -n expense rollout status deployment/expense-demo

# View the log: you should see the OpenBao token response and the fetched secret (including the password)
oc -n expense logs -l app=expense-demo -f
The log output shows the application authenticating with the Kubernetes JWT, receiving an OpenBao token, and reading the secret at secret/data/expense/database. The field data.data.password is the database password you stored in Step 5.
Step 7: Test Kubernetes authentication manually
From any pod that uses the same service account (e.g. the demo pod above), you can run the same steps by hand:
# From within a pod using the service account (e.g. oc exec -it deployment/expense-demo -n expense -- /bin/sh)
JWT=$(cat /var/run/secrets/kubernetes.io/serviceaccount/token)

# 1. Authenticate to OpenBao and get a client token (sed works on UBI minimal; use jq -r .auth.client_token if jq is available)
LOGIN=$(curl -s -k --request POST \
  --data "{\"jwt\": \"$JWT\", \"role\": \"expense-app\"}" \
  https://openbao.openbao:8200/v1/auth/kubernetes/login)
TOKEN=$(echo "$LOGIN" | sed -n 's/.*"client_token":"\([^"]*\)".*/\1/p')

# 2. Fetch the database secret (same path the policy allows)
curl -s -k -H "X-Vault-Token: $TOKEN" https://openbao.openbao:8200/v1/secret/data/expense/database
Summary: Kubernetes auth method
A lot of steps were involved to configure the Kubernetes auth method. Let us summarize them:
In OpenBao: Enabled the Kubernetes auth method, configured it with the cluster API server address, created the
expense-apppolicy (read onsecret/data/expense/databaseandsecret/data/expense/config, update onauth/token/renew-self), and created theexpense-approle that binds the Kubernetes service accountexpense-appin namespaceexpenseto that policy.Secrets engine: Ensured the KV v2 engine is mounted at
secret/and stored the database secret atsecret/expense/database(one-time, using the root token).In the cluster: Created the
expensenamespace, theexpense-appservice account, an optional long-lived token Secret (for Kubernetes 1.24+), and theexpense-demodeployment that uses that service account to authenticate to OpenBao and fetch the secret. For HTTPS, created theopenbao-caSecret inexpensewith the OpenBao server CA.Verification: Applied the manifests, confirmed the demo pod starts and logs show a successful login and the fetched secret (including the database password). Optionally ran the same login and read steps manually via
oc execinto the pod.
LDAP Authentication Method
LDAP auth integrates with enterprise directories like Active Directory.
| This is a very simplified example. As a prerequisite you need to have an LDAP server and a service account with the necessary permissions to read the users and groups. This is not part of this guide. |
Step 1: Enable LDAP Auth
To enable LDAP authentication, you need to use the following command:
bao auth enable ldapStep 2: Configure LDAP (Active Directory Example)
In this step you need to configure the LDAP server address, the user and group attributes, the bind DN and the bind password. The example below configures the LDAP server address to ldaps://ad.example.com:636, the user attribute to sAMAccountName, the user DN to OU=Users,DC=example,DC=com, the group DN to OU=Groups,DC=example,DC=com, the group attribute to cn, the group filter to (&(objectClass=group)(member:1.2.840.113556.1.4.1941:={{.UserDN}})), the bind DN to CN=openbao-svc,OU=ServiceAccounts,DC=example,DC=com and the bind password to service-account-password.
bao write auth/ldap/config \
  url="ldaps://ad.example.com:636" \
  userattr="sAMAccountName" \
  userdn="OU=Users,DC=example,DC=com" \
  groupdn="OU=Groups,DC=example,DC=com" \
  groupattr="cn" \
  groupfilter="(&(objectClass=group)(member:1.2.840.113556.1.4.1941:={{.UserDN}}))" \
  binddn="CN=openbao-svc,OU=ServiceAccounts,DC=example,DC=com" \
  bindpass="service-account-password" \
  certificate=@/path/to/ldap-ca.pem \
  insecure_tls=false \
  starttls=false
Step 3: Create the policies used by the group mapping
Before mapping LDAP groups to policy names, create those policies. Below are example definitions: admin-policy grants read/list/update on secrets (e.g. for operators), and user-policy grants read-only access to a limited path.
admin-policy — for members of openbao-admins (e.g. operators who may read and update secrets)
user-policy — for members of openbao-users (e.g. developers with read-only access to a subset of secrets)
Create them with the CLI (run before the group mapping in Step 4):
# Create admin-policy (e.g. from file admin-policy.hcl)
bao policy write admin-policy - <<EOF
path "secret/data/*" {
  capabilities = ["read", "list", "update", "create", "delete"]
}
path "secret/metadata/*" {
  capabilities = ["read", "list"]
}
path "auth/token/renew-self" {
  capabilities = ["update"]
}
EOF

# Create user-policy
bao policy write user-policy - <<EOF
path "secret/data/myapp/*" {
  capabilities = ["read", "list"]
}
path "auth/token/renew-self" {
  capabilities = ["update"]
}
EOF
Adjust paths (e.g. secret/data/myapp/) to match your KV v2 mount and the paths you want each role to access. The default policy is built-in and grants token lookup/renew/revoke-self. Attaching it in addition to admin-policy or user-policy is a typical pattern.
Step 4: Map LDAP groups to policies
Now map the LDAP groups to the policy names. The example below maps the LDAP group openbao-admins to the policies admin-policy and default and the LDAP group openbao-users to the policies user-policy and default.
# Map an LDAP group to policies
bao write auth/ldap/groups/openbao-admins \
  policies="admin-policy,default"

bao write auth/ldap/groups/openbao-users \
  policies="user-policy,default"
Step 5: Test LDAP authentication
Assuming you have a user jdoe in the LDAP group openbao-users, you can test the LDAP authentication with the following commands:
# Login with LDAP credentials
bao login -method=ldap username=jdoe

# Or via API
curl --request POST \
  --data '{"password": "user-password"}' \
  $BAO_ADDR/v1/auth/ldap/login/jdoe
What jdoe can and cannot do (user-policy)
jdoe holds user-policy (and default), so their token has only the capabilities defined there.
What jdoe can do:
Get a secret under
secret/data/myapp/*: after logging in, jdoe can read and list secrets in that path. For example:# After bao login -method=ldap username=jdoe (and entering the password) bao kv get secret/myapp/database # Or via API (use the client_token from the login response) curl -s -H "X-Vault-Token: $TOKEN" $BAO_ADDR/v1/secret/data/myapp/databaseList keys under
secret/data/myapp/to discover available secrets.Renew or revoke their own token (from the default policy) and look up their own token properties.
What jdoe cannot do:
Read secrets outside
myapp— e.g.secret/data/expense/databaseorsecret/data/other-app/*returns permission denied.Create, update, or delete any secret — user-policy grants only
readandlistonsecret/data/myapp/*, so write operations are denied.Access admin or system paths — no access to
sys/, other auth methods, or policies. Only the paths explicitly granted in *user-policy and default are allowed.
Common Practices for Authentication
Use the principle of least privilege - Do not grant more permissions than necessary.
# Bad: Too broad
path "secret/*" {
  capabilities = ["read", "list"]
}

# Good: Specific paths
path "secret/data/myapp/database" {
  capabilities = ["read"]
}
Set Appropriate Token TTLs - Set the appropriate TTLs for different use cases.
# Short-lived for automated systems
bao write auth/kubernetes/role/batch-job \
  ttl=5m \
  max_ttl=15m

# Longer for interactive users
bao write auth/oidc/role/human-user \
  ttl=8h \
  max_ttl=24h
Enable Audit Logging - Enable audit logging to track authentication attempts and other activities.
# Enable file audit
bao audit enable file file_path=/var/log/openbao/audit.log

# All authentication attempts are logged
Regularly Rotate Credentials - Rotate the credentials periodically to reduce the risk of compromise.
# Rotate AppRole Secret IDs periodically
bao write -f auth/approle/role/cicd-role/secret-id

# Revoke old tokens
bao token revoke <old-token>
Common Authentication Patterns
Pattern 1: Application Pods
Pod → Service Account Token → Kubernetes Auth → Policy → SecretPattern 2: Human Users
User → LDAP/OIDC Login → Group Mapping → Policy → SecretPattern 3: CI/CD Pipeline
Pipeline → AppRole (Role ID + Secret ID) → Policy → Secret
What is Coming Next?
In Part 8, we will explore secrets engines, like:
KV (Key-Value) for static secrets
In upcoming parts, I will try to cover common practices for OpenBao operation and maintenance. If there is time and an opportunity to test other authentication methods, I will do so.
Conclusion
Proper authentication configuration is crucial for OpenBao security. Key takeaways:
Use Kubernetes auth for pods
Use LDAP/OIDC for human users (SSO)
Use AppRole for automation
Create specific policies with least privilege
Set appropriate TTLs for different use cases
Enable audit logging for compliance
Resources
Related Articles
Copyright © 2020 - 2026 Toni Schmidbauer & Thomas Jungbauer
Discussion
Comments are powered by GitHub Discussions. To participate, you'll need a GitHub account.
By loading comments, you agree to GitHub's Privacy Policy. Your data is processed by GitHub, not by this website.