The Guide to OpenBao - Standalone Installation - Part 2
February 12, 2026
-
![]() Thomas Jungbauer
-
10 min read
(2015 words)
Thomas Jungbauer
-
10 min read
(2015 words)
In the previous article, we introduced OpenBao and its core concepts. Now it is time to get our hands dirty with a standalone installation. This approach is useful for testing, development environments, edge deployments, or scenarios where Kubernetes is not available.
Introduction
While OpenBao shines in Kubernetes environments, understanding the standalone installation helps you grasp the fundamentals. This knowledge is valuable whether you are:
Learning OpenBao before deploying to production
Running OpenBao outside of Kubernetes (edge, legacy systems)
Debugging issues in containerized deployments
Setting up a development environment
Installation Methods Overview
OpenBao can be installed through multiple methods:
| Method | Best For | Complexity |
|---|---|---|
Package managers (apt, dnf, brew) | Production Linux/macOS systems | Low |
Container images (Podman/Docker) | Quick testing, isolated environments | Low |
Binary download | Air-gapped environments | Low |
Source compilation | Custom builds, development | Medium |
| For this article, we will focus on macOS for local testing with binary and container image (using Podman) and Red Hat Enterprise Linux to set up an example production-ready server. The deployment on the Kubernetes environment will be discussed in the next article. |
Method 1: Package Manager Installation
RHEL/Fedora/CentOS
On RHEL or CentOS, before you can install OpenBao you need to install the EPEL repository. To do so, you first need to enable the Code Ready Repository. The following commands will do the trick. Be sure that your system is registered, in case of RHEL.
| If you get the error "Repositories disabled by configuration." you need to tell the subscription manager that you want to manage the repositories. This can be done permanently or temporarily. You can use the command: sudo subscription-manager config --rhsm.manage_repos=1 to do so. |
RHEL
Enable Code Ready Repository
sudo subscription-manager repos --enable codeready-builder-for-rhel-9-$(arch)-rpmsInstall EPEL Repository
sudo dnf install -y https://dl.fedoraproject.org/pub/epel/epel-release-latest-9.noarch.rpmInstall OpenBao
sudo dnf install -y openbao
CentOS
Enable Code Ready Repository on CentOS
sudo dnf config-manager --set-enabled crbInstall EPEL Repository
sudo dnf install epel-release epel-next-releaseInstall OpenBao
sudo dnf install -y openbao
macOS (Homebrew)
Install OpenBao
brew install openbao
Verify Installation
After installation, verify OpenBao is available:
bao version
# Output:
OpenBao v2.5.0 (bcbb6036ec2b747bceb98c7706ce9b974faa1b23), built 2026-02-04T15:57:17Z (cgo)
The OpenBao CLI command is bao, not vault. This distinguishes it from HashiCorp Vault. |
Start Development Server
To start a development environment, you can use the following command.
| This is NOT suitable for production, it is just a test to evaluate the basic concepts of OpenBao. |
bao server -dev -dev-root-token-id="dev-only-token"This will start the server. The UI is accessible at http://localhost:8200 where you can login using the root token dev-only-token.
Method 2: Container Image
For quick testing or isolated environments, container images are ideal. Luckily, OpenBao offers several types of containers suitable for any environment. We will use the image hosted on quay.io, which is based on RHEL UBI and can be found at: quay.io/openbao/openbao-ubi
Using Podman
The following command will fetch the image and start the container.
| This is NOT suitable for production, it is just a test to evaluate the basic concepts of OpenBao. |
# Run in dev mode (for testing only!)
podman run --rm -d \
  --name openbao-dev \
  -p 8200:8200 \
  -e 'BAO_DEV_ROOT_TOKEN_ID=dev-only-token' \
  -e 'BAO_DEV_LISTEN_ADDRESS=0.0.0.0:8200' \
  quay.io/openbao/openbao-ubi:latest server -dev
# Verify it is running
podman logs -f openbao-devThis will start the server. The UI is accessible at http://localhost:8200 where you can login using the root token dev-only-token.
If you prefer to use Docker, simply replace podman with docker in the commands. |
Dev Mode: Quick Start for Testing
Dev mode is the fastest way to start using OpenBao for learning and testing.
The characteristics in this mode are:
In-memory storage (data lost on restart)
Automatically initialized and unsealed
Root token printed to stdout
TLS disabled
Single server (no HA)
Let’s create an example secret and try to retrieve it again.
Authenticate against OpenBao
export VAULT_TOKEN="dev-only-token"
export BAO_ADDR='http://127.0.0.1:8200'
Create Secret
curl \
  --header "X-Vault-Token: $VAULT_TOKEN" \
  --header "Content-Type: application/json" \
  --request POST \
  --data '{"data": {"password": "OpenBao123"}}' \
  $BAO_ADDR/v1/secret/data/my-secret-password &&
  echo "Secret written successfully."
Retrieve Secret
curl --header "X-Vault-Token: $VAULT_TOKEN" \
  $BAO_ADDR/v1/secret/data/my-secret-password | jq '.data.data'
You should see the password that was created before:
{
  "password": "OpenBao123"
}
Check Status of OpenBao Server
bao statusThis will give you the status of your running OpenBao instance.
Key             Value
---             -----
Seal Type       shamir
Initialized     true
Sealed          false
Total Shares    1
Threshold       1
Version         2.5.0
Build Date      2026-02-04T15:57:17Z
Storage Type    inmem
Cluster Name    vault-cluster-421b2431
Cluster ID      6d42dcd2-e399-211e-999a-49b1874cc8ce
HA Enabled      false
Hardening your System
OpenBao does a good job to secure your secrets, however, memory paging (or swap) can undermine the protection. Your OS should either have swap disabled completely or encrypt the swap space.
As I am testing on macOS, the swap space is encrypted out of the box.
However, OpenBao has documented what must be done for various operating systems at Post-installation hardening
Production Standalone Setup
For a proper standalone installation, follow these steps:
Step 1: Create Configuration File
Create /etc/openbao.d/openbao.hcl:
# Full configuration for standalone OpenBao server

# Cluster name for identification
cluster_name = "openbao-standalone"

# Storage backend using integrated Raft
storage "raft" {
  path    = "/var/lib/openbao/data"
  node_id = "node1"
}

# HTTP listener (for internal communication)
listener "tcp" {
  address         = "0.0.0.0:8200"
  cluster_address = "0.0.0.0:8201"
  tls_disable     = false
  tls_cert_file   = "/etc/openbao.d/tls/tls.crt"
  tls_key_file    = "/etc/openbao.d/tls/tls.key"
}

# API address for clients
api_addr = "https://openbao.example.com:8200"

# Cluster address for raft communication
cluster_addr = "https://openbao.example.com:8201"

# UI enabled
ui = true

# Logging
log_level = "info"
log_file  = "/var/log/openbao/openbao.log"

# Disable memory locking (enable in production if possible)
disable_mlock = true

# Telemetry (optional)
telemetry {
  prometheus_retention_time = "30s"
  disable_hostname          = true
}
Step 2: Generate TLS Certificates
For production, you should use proper certificates. For testing, create self-signed ones:
| This is only for testing purposes. In production, you should use proper certificates. |
First, prepare the TLS directory if it does not exist
sudo mkdir -p /etc/openbao.d/tlsThen create a configuration file for the TLS certificates:
# Create TLS config
cat <<EOF > openbao.cnf
[req]
distinguished_name = req_distinguished_name
x509_extensions = v3_req
prompt = no

[req_distinguished_name]
CN = openbao.example.com

[v3_req]
subjectAltName = @alt_names

[alt_names]
DNS.1 = openbao.example.com
IP.1 = 127.0.0.1 (1)
EOF
1 The IP address of the server. In this case we are using localhost, but you can add your IPs here. Then generate the certificate:
# Generate private key
sudo openssl genrsa -out /etc/openbao.d/tls/tls.key 4096

# Generate certificate signing request
sudo openssl req -new -key /etc/openbao.d/tls/tls.key -out /etc/openbao.d/tls/tls.csr -subj "/CN=openbao.example.com"

# Generate self-signed certificate
sudo openssl x509 -req -days 365 -in /etc/openbao.d/tls/tls.csr -signkey /etc/openbao.d/tls/tls.key -out /etc/openbao.d/tls/tls.crt -extfile openbao.cnf -extensions v3_req

# Set permissions
sudo chown -R openbao:openbao /etc/openbao.d/tls
sudo chmod 600 /etc/openbao.d/tls/tls.key
sudo chmod 755 /etc/openbao.d/tls
Step 3: Create Systemd Service
Create /etc/systemd/system/openbao.service:
[Unit]
Description=OpenBao Secret Management
Documentation=https://openbao.org/docs
Requires=network-online.target
After=network-online.target
ConditionFileNotEmpty=/etc/openbao.d/openbao.hcl

[Service]
User=openbao
Group=openbao
ProtectSystem=full
ProtectHome=read-only
PrivateTmp=yes
PrivateDevices=yes
SecureBits=keep-caps
AmbientCapabilities=CAP_IPC_LOCK
CapabilityBoundingSet=CAP_SYSLOG CAP_IPC_LOCK
NoNewPrivileges=yes
ExecStart=/usr/bin/bao server -config=/etc/openbao.d/openbao.hcl
ExecReload=/bin/kill --signal HUP $MAINPID
KillMode=process
KillSignal=SIGINT
Restart=on-failure
RestartSec=5
TimeoutStopSec=30
LimitNOFILE=65536
LimitMEMLOCK=infinity

[Install]
WantedBy=multi-user.target
Step 4: Start the Service
# Reload systemd
sudo systemctl daemon-reload

# Enable and start OpenBao
sudo systemctl enable openbao
sudo systemctl start openbao

# Check status
sudo systemctl status openbao

# View logs
sudo journalctl -u openbao -f
Initialize and Unseal OpenBao
After starting OpenBao for the first time, it needs to be initialized and unsealed.
Set Environment Variables
| We will do the following commands as root user. |
| Be sure that the hostname is resolvable. In this case I am using the test domain: openbao.example.com. |
# Set the OpenBao address
export BAO_ADDR='https://openbao.example.com:8200'

# If using self-signed certificates
export BAO_CACERT='/etc/openbao.d/tls/tls.crt'
Check Status
You will see that OpenBao is running but not yet initialized. This will be the next step.
bao status

Key                Value
---                -----
Seal Type          shamir
Initialized        false (1)
Sealed             true
Total Shares       0
Threshold          0
Unseal Progress    0/0
Unseal Nonce       n/a
Version            2.4.4-1.el9
Build Date         2025-11-24
Storage Type       file
HA Enabled false| 1 | Not yet initialized |
Initialize OpenBao
Before we use OpenBao, we need to initialize it. This will create the unseal keys and the root token. The unseal keys are used to … well, unseal the OpenBao service. The root token is used as a master key to authenticate against the OpenBao service. This token has access to ALL secrets. Treat this root token with care.
We will initialize OpenBao with default options of 5 key shares and a threshold of 3. This means that we need 3 different unseal keys to unseal the OpenBao service.
bao operator init -key-shares=5 -key-threshold=3 -format=json > /root/openbao-init.json| Store the unseal keys and root token securely! Anyone with these can access all secrets. |
The output looks like:
{
  "unseal_keys_b64": [
    "key1...",
    "key2...",
    "key3...",
    "key4...",
    "key5..."
  ],
  "unseal_keys_hex": [...],
  "unseal_shares": 5,
  "unseal_threshold": 3,
  "recovery_keys_b64": [],
  "recovery_keys_hex": [],
  "root_token": "sbr.xxxxxxxxxxxx"
}
Unseal OpenBao
Now everything is set up and we can use the unseal keys to unseal the OpenBao service.
You need to provide 3 (threshold) different unseal keys:
# First key
bao operator unseal
# Enter first unseal key

# Second key
bao operator unseal
# Enter second unseal key

# Third key
bao operator unseal
# Enter third unseal key
After providing enough keys:
bao status

Key             Value
---             -----
Seal Type       shamir
Initialized     true
Sealed          false (1)
Total Shares    5
Threshold       3
Version         2.4.4-1.el9
Build Date      2025-11-24
Storage Type    file
Cluster Name    openbao-standalone
Cluster ID      d07874ef-df52-e45f-1723-ade333c6d609
HA Enabled false| 1 | Now unsealed and ready |
Now we can login with the root token to the OpenBao service.
Login with Root Token
Since we have not created any users yet, we will use the root token to authenticate.
# Enter the root token from initialization
bao login
Basic Verification
Let us verify the installation works:
List enabled secrets engines
bao secrets listThis lists the enabled secrets engines.
Path          Type         Accessor              Description
----          ----         --------              -----------
cubbyhole/    cubbyhole    cubbyhole_84c3d2a5    per-token private secret storage
identity/     identity     identity_61809171     identity store
sys/          system       system_034ae772       system endpoints used for control, policy and debugging
List enabled auth methods
bao auth listThis lists the enabled authentication methods.
Path      Type     Accessor               Description                Version
----      ----     --------               -----------                -------
token/    token    auth_token_c7feca17    token based credentials    n/a
Create a test secret
bao secrets enable -path=secret kv-v2This enables the KV (key/value) secrets engine at the path
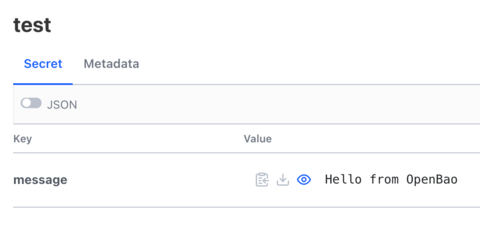
secret.bao kv put secret/test message="Hello from OpenBao"This creates a test secret at the path
secret/test.bao kv get secret/testThis retrieves the test secret from the path
secret/test.
That’s it for the basic verification. You can now start to use OpenBao in your production environment. Let’s see what we can do in the UI.
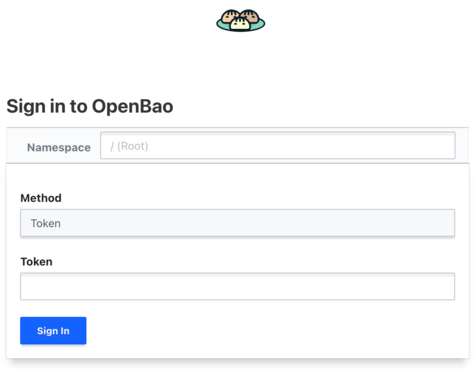
Visiting the UI
If you watched the previous commands closely, you will have noticed that the UI has been enabled in the configuration file:
# UI enabled
ui = true
The UI is accessible at http://openbao.example.com:8200. You can login with the root token from the initialization.
Here you will see several options to explore. For now we are interested in the Secrets Engine section.
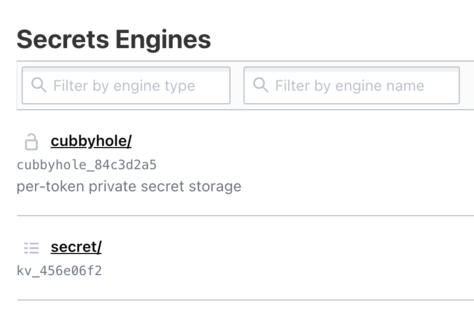
We have created the path "secret" and inside it a secret called "test". We can retrieve it now:
Security Hardening Checklist
Before using OpenBao in production you should always consider the following checklist:
| Item | Recommendation |
|---|---|
TLS | Always enable TLS with valid certificates |
Root Token | Revoke root token after initial setup and create admin users instead |
Unseal Keys | Distribute to different people/locations, consider auto-unseal |
Network | Restrict access with firewall rules |
Audit | Enable audit logging |
Backups | Regular Raft snapshots |
Updates | Keep OpenBao updated |
What is Coming Next?
In Part 3, we will deploy OpenBao on OpenShift/Kubernetes using the official Helm chart. This provides:
High availability out of the box
Kubernetes-native management
Integration with OpenShift security features
Persistent storage via PVCs
Conclusion
You now have a working standalone OpenBao installation. This forms the foundation for understanding how OpenBao operates. While standalone mode is useful for testing and edge cases, most production deployments will use Kubernetes, which we will cover next.
Key takeaways:
OpenBao can run standalone or in containers
Dev mode is for testing only
Production requires proper TLS, initialization, and security hardening
Unseal keys must be stored securely
Related Articles
Copyright © 2020 - 2026 Toni Schmidbauer & Thomas Jungbauer
Discussion
Comments are powered by GitHub Discussions. To participate, you'll need a GitHub account.
By loading comments, you agree to GitHub's Privacy Policy. Your data is processed by GitHub, not by this website.