RBAC Overview — an OpenShift Console plugin
June 10, 2026
-
![]() Thomas Jungbauer
-
9 min read
(1852 words)
Thomas Jungbauer
-
9 min read
(1852 words)
Answering the question "who can do what on this cluster?" usually means juggling oc commands, YAML dumps, and several console pages. RoleBindings live in namespaces, ClusterRoleBindings are cluster-scoped, OpenShift adds Users and Groups on top of Kubernetes subjects, and SecurityContextConstraints have their own authorisation model. For a quick audit before a change window, that is a lot of clicking and I always struggled to find a quick and reliable way to get and overview. For example, I always wanted to see immediately which users have cluster-admin rights or which service accounts are on the privileged SCC.
The RBAC Overview is a dynamic OpenShift Console plugin that pulls these views into one place. This article walks through what it does, how to install or test it, and how I use the tabs in practice. This open source plugin is available on GitHub
Why another RBAC view?
The console already lists RoleBindings, ClusterRoleBindings, Users, and Groups. That is sufficient when you know exactly which resource you need. It is less helpful when you start from a question:
Who has cluster-admin outside the usual system groups?
What can user alice do in the namespace openshift-gitops?
Which groups may get pods in the namespace default?
Which service accounts are on the privileged SCC?
The RBAC Overview plugins tries to fix these questions. Each tab uses the Kubernetes and OpenShift authorization APIs (SelfSubjectReview, ResourceAccessReview, SubjectAccessReview, and list permissions) rather than re-implementing policy evaluation in the browser.
What you get
Navigation: The plugin hooks into the Administrator perspective → User Management → RBAC Overview (entry appears above Users).
As direct URL you can use: <cluster-url>/rbac-overview.
The following tabs are available:
| Tab | Question it answers |
|---|---|
Who can | Who may perform a certain action or whether one subject is allowed to do certain actions. It basically mirrors the |
Cluster admins | Cluster-wide and namespace-scoped bindings to sensitive roles ( |
Namespace access | All bindings that affect one namespace — local RoleBindings and applicable ClusterRoleBindings. |
Subjects | Pick a user, group, or service account and inspect its bindings. This helps to inspect a certain subject and see which roles are bound to it. |
Role access | Pick a ClusterRole and list every ClusterRoleBinding and RoleBinding that references it — the inverse of the Subjects tab when you start from a role name instead of a user or group. |
SCC access | All SCCs with key fields, direct |
Architecture in brief
The plugin follows the usual dynamic plugin pattern:
Webpack builds static assets (
plugin-manifest.json, JavaScript bundles, locales).A container image serves those files over HTTPS on port 9443 (required by the
ConsolePluginAPI).Helm installs Deployment, Service, ConsolePlugin, ConfigMap (
plugin-config.json), and optionally a Job that enables the plugin on the console. (Plugins must be enabled by the console operator.)
The runtime image uses Project Hummingbird (registry.access.redhat.com/hi/nginx). I tried this as they are expected to be super-small distroless images, with the goal to have zero CVEs … and the size of the image is really only 19MB.
The nginx that is used in this image is serving dist/ with a serving certificate injected by OpenShift. There is no application logic in the container beyond static files.
Configuration for sensitive roles on the Cluster admins tab is delivered via plugin-config.json (Helm values → ConfigMap).
Default entries include cluster-admin and admin; you can add names or label ClusterRoles with rbac-overview.io/elevated: "true".
Prerequisites
OpenShift Container Platform or OKD 4.10+ (dynamic console plugins)
For cluster install: Helm 3,
oc, Podman or Docker, and permission to push your image registryFor local development: Node.js 22+, npm, and
oc loginwith a bearer token (not certificate-only kubeconfig)
The plugin is tested against recent 4.20+ consoles. Match the console SDK generation to your cluster (the repository currently targets @openshift-console/dynamic-plugin-sdk@4.21-latest).
Install on a cluster
Install with Helm
Log in to the cluster, then install the chart. The published and public plugin image is quay.io/tjungbau/openshift-console-rbac-overview:1.0.5 (chart version 1.0.5).
From the repository:
oc login https://<api-url>:6443 -u <user> -p '<password>'

git clone https://github.com/tjungbauer/openshift-console-rbac-overview.git
cd openshift-console-rbac-overview

helm upgrade --install rbac-overview ./chart/rbac-overview \
  --namespace rbac-overview \
  --create-namespace \
  --set namespace.create=false \
  --set image.tag=1.0.5 \
  --set image.pullPolicy=Always \
  --wait
Or add the published Helm repository (no clone required):
helm repo add rbac-overview https://tjungbauer.github.io/openshift-console-rbac-overview
helm repo update

helm upgrade --install rbac-overview rbac-overview/rbac-overview \
  --namespace rbac-overview \
  --create-namespace \
  --set namespace.create=false \
  --set image.tag=1.0.5 \
  --wait
The chart defaults to quay.io/tjungbau/openshift-console-rbac-overview; set image.tag only when you need a specific release.
Do not combine helm --create-namespace with --set namespace.create=true. Helm 4 reports an ownership error on the Namespace object. Use --create-namespace and namespace.create=false as shown above. I will clean this up in the future. |
Build your own image
If you prefer to create your own image, for example in an air-gapped environment, you are free to do so. The runtime image is a thin nginx layer on top of webpack output — there is no npm step inside the container. This helps keep the image small and avoids unnecessary dependencies.
From the repository root:
npm install
npm run build    # writes dist/ (plugin-manifest.json, bundles, locales)

podman build --platform=linux/amd64 \ (1)
  -t <your-registry-repository>/:<tag> .

podman login <your-registry-repository>    # if your repository is private

podman push <your-registry-repository>/:<tag>| 1 | Use your own registry, repository and version tag. |
Then point Helm at your image:
helm upgrade --install rbac-overview ./chart/rbac-overview \
  --namespace rbac-overview \
  --create-namespace \
  --set namespace.create=false \
  --set image.repository=<your-registry-repository> \ (1)
  --set image.tag=<tag> \ (2)
  --set image.pullPolicy=Always \
--wait| 1 | Use your own registry and repository. |
| 2 | Use your own version tag. |
The repository also ships scripts/build-install.sh, which runs npm run build, builds and pushes the image, installs the chart, and runs verification checks in one pass:
chmod +x scripts/build-install.sh
QUAY_USER=<your-quay-user> ./scripts/build-install.sh
Override VERSION or PLATFORM when the tag should differ from package.json or when you build on Apple Silicon for a linux/amd64 cluster.
| The script was created due to my own lazyness and it has quay.io hardcoded. |
After install, confirm the plugin is enabled:
oc get console.operator cluster -o jsonpath='{.spec.plugins}{"\n"}'
oc -n rbac-overview get deploy,consoleplugin
Open the console, switch to Administrator, and reload User Management → RBAC Overview.
Local development
If you like to test the plugin locally first, you can do so by running the following commands - no image build required:
# terminal 1
npm install
npm run start

# terminal 2
oc login ...           # must provide a token: oc whoami --show-token
npm run start-console  # console on http://localhost:9000
Open http://localhost:9000/rbac-overview. The console loads the plugin from localhost:9001 while API calls use your oc session.
On Apple Silicon, set CONSOLE_IMAGE_PLATFORM=linux/amd64 before npm run start-console. |
Using the plugin
Who can
The default tab mirrors oc adm policy who-can for namespaced and cluster-scoped resources.
Query mode offers:
Who can — list subjects allowed to perform the action
Can subject — check one user, group, or service account
Set Scope, Verb, Resource, optional API group, Subresource, Resource name, and for namespaced queries a real Namespace.
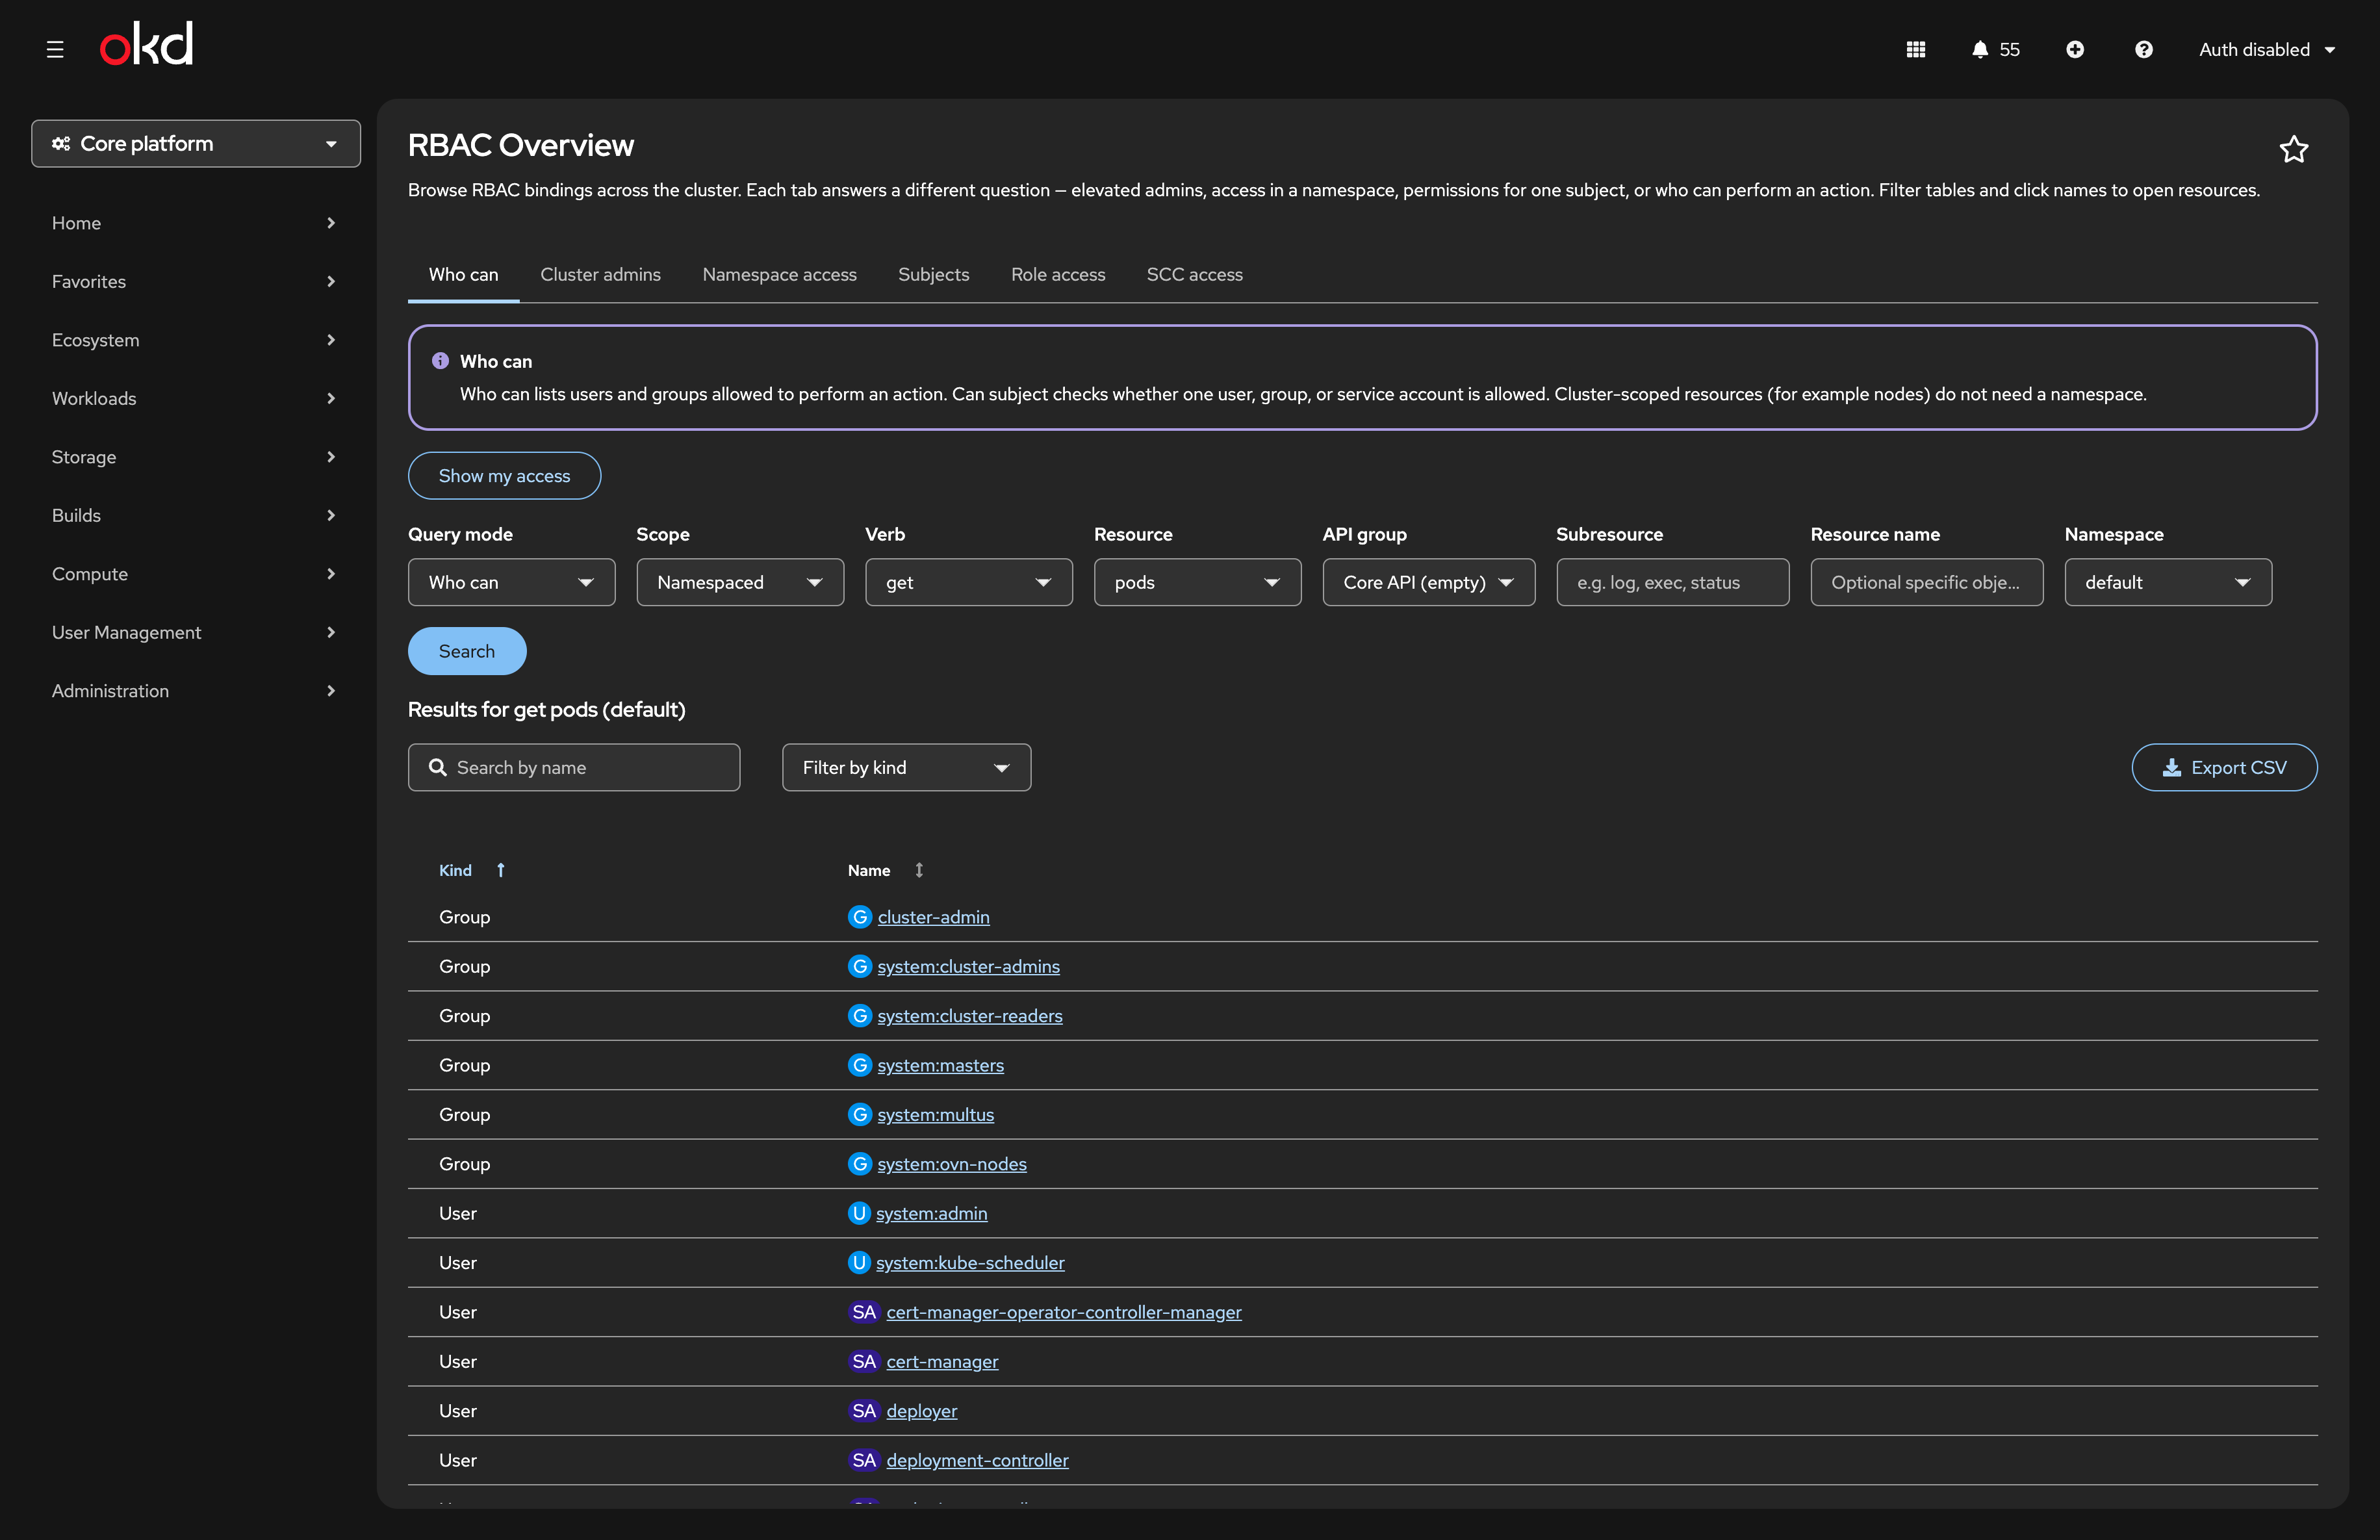
The button Show my access lists groups, visible namespaces, and role bindings for the logged-in user. This becomes handy when someone asks what can I actually see on this cluster?
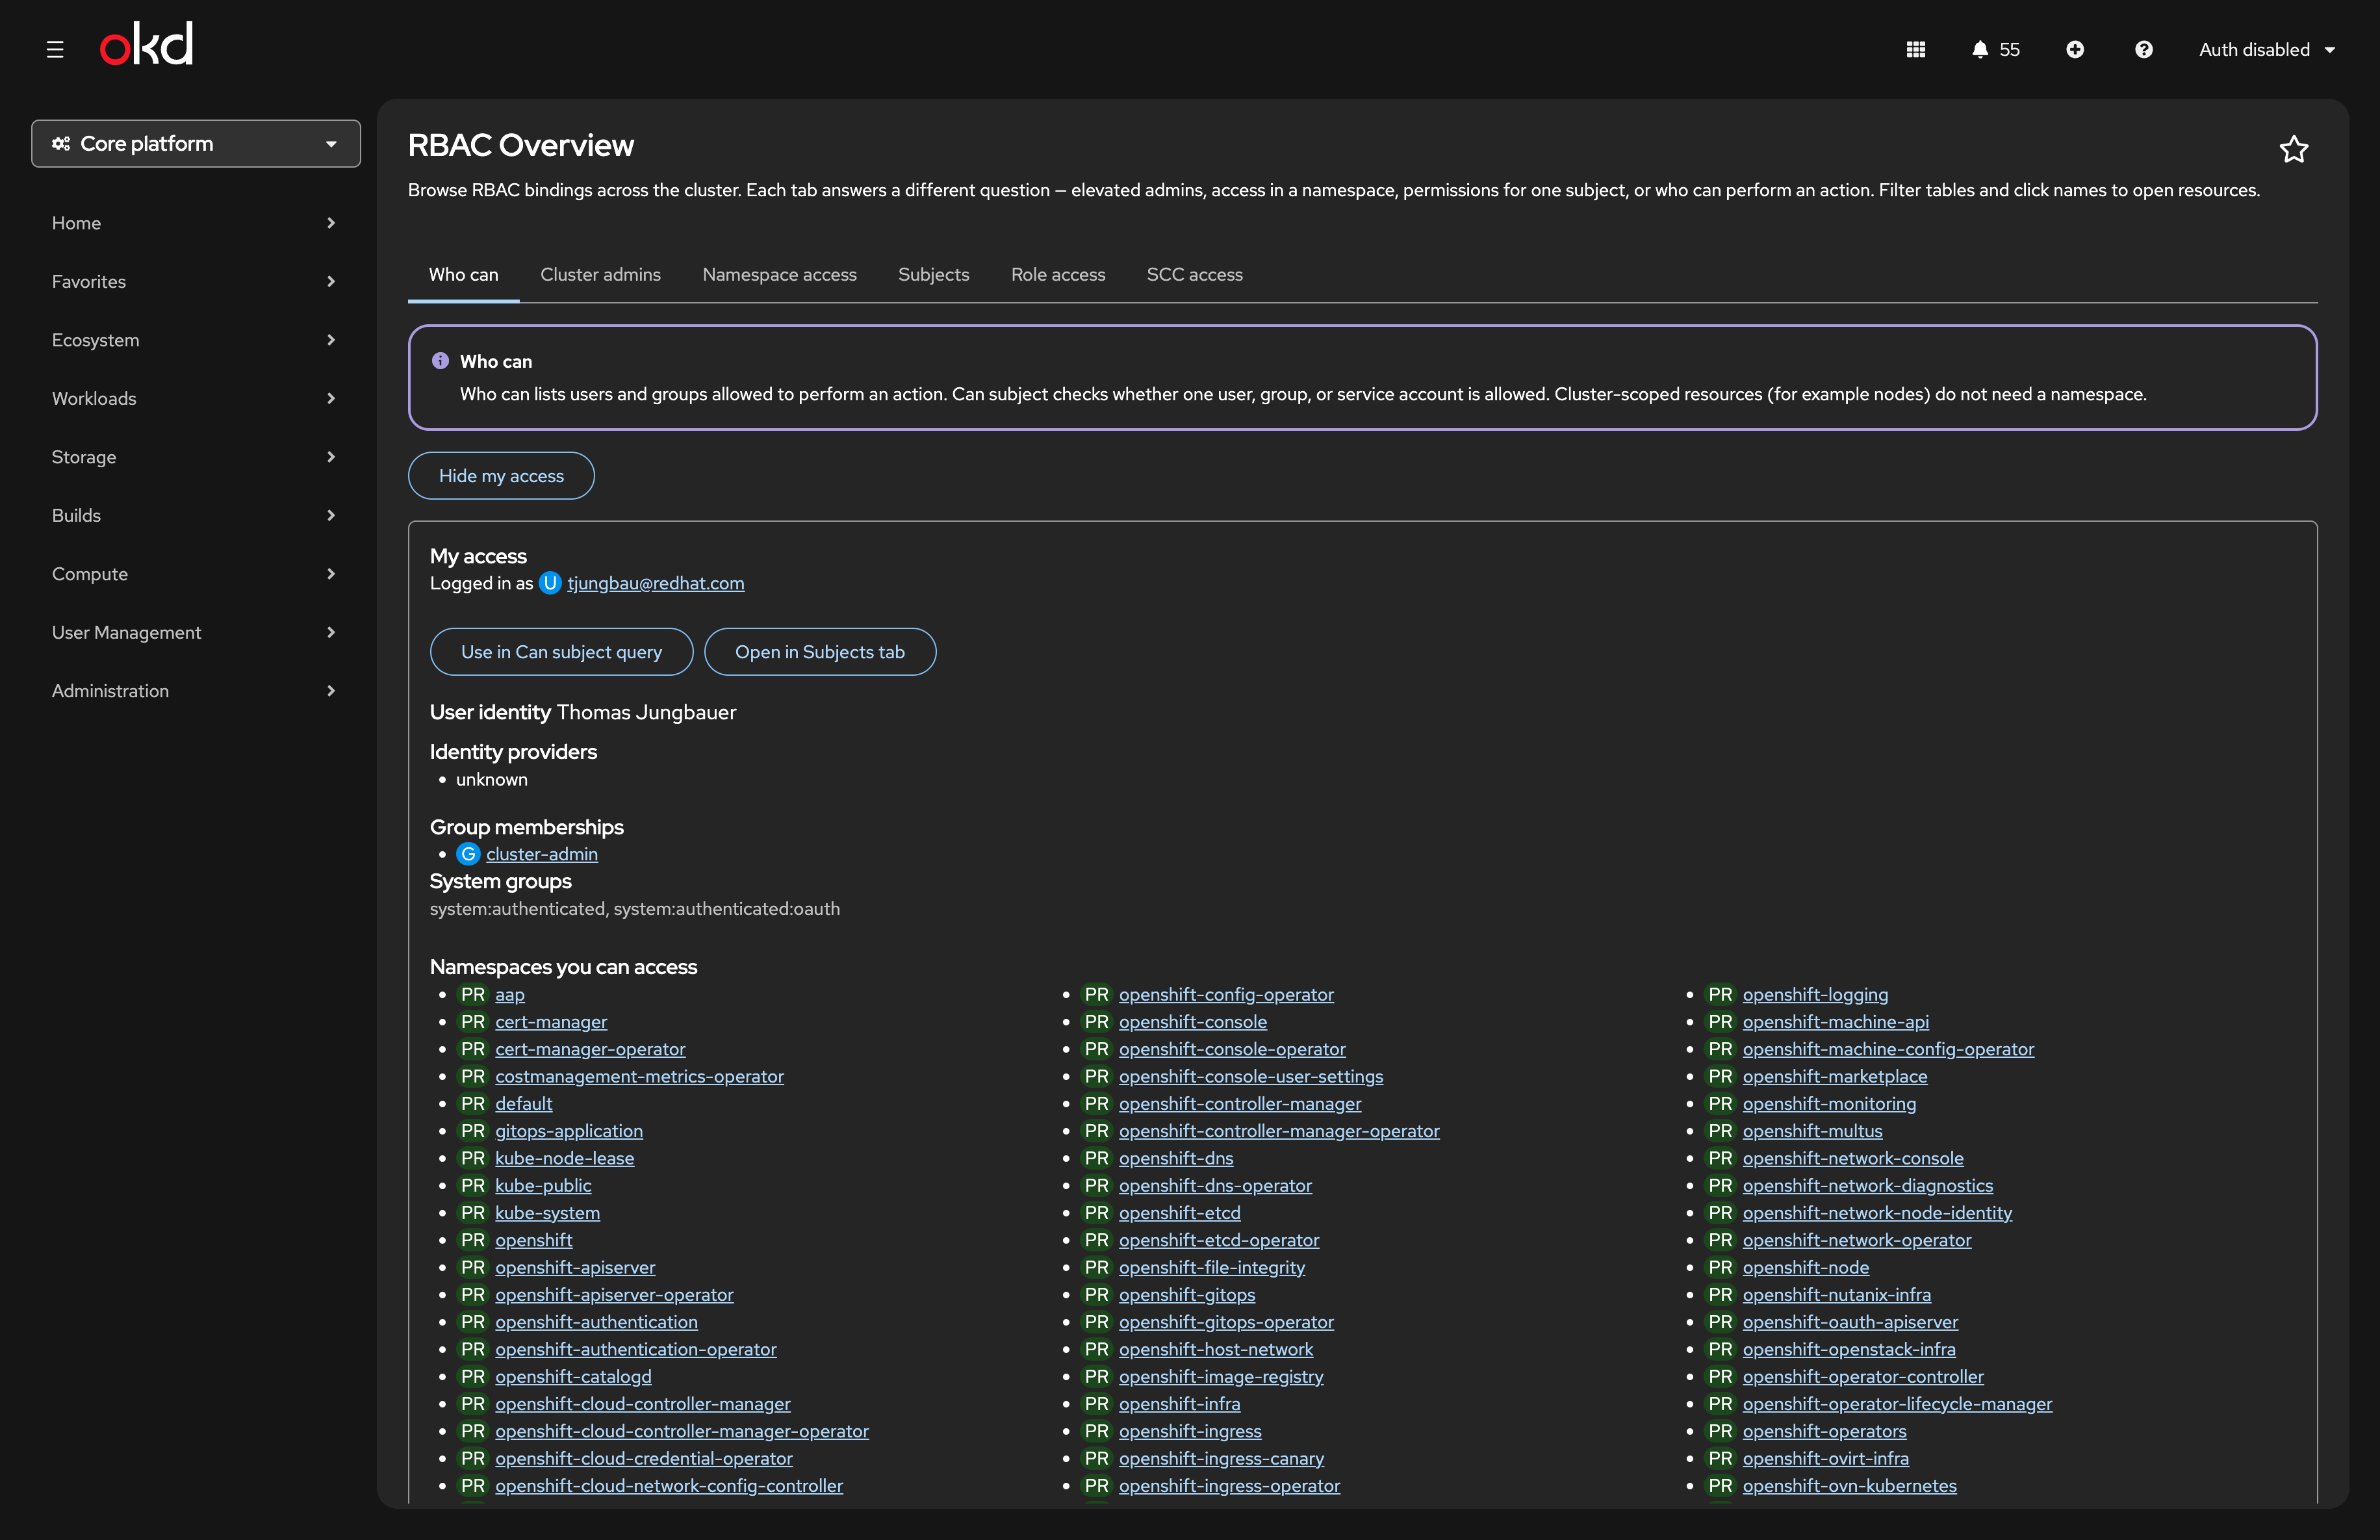
From My access you can jump to Can subject with your user pre-filled, or open the Subjects tab on yourself.
Cluster admins
This tab highlights bindings to roles you treat as elevated (configured in plugin-config.json or via the rbac-overview.io/elevated label on ClusterRoles).
Sub tabs:
Cluster-wide admins — ClusterRoleBindings to sensitive ClusterRoles.
Namespace elevated — RoleBindings in any namespace that reference sensitive roles.

Use View rules on a row to expand policy rules below the table.
Namespace access
Select a namespace, then browse:
In namespace — RoleBindings defined in that namespace.
Cluster-wide — ClusterRoleBindings whose ClusterRoles apply there.
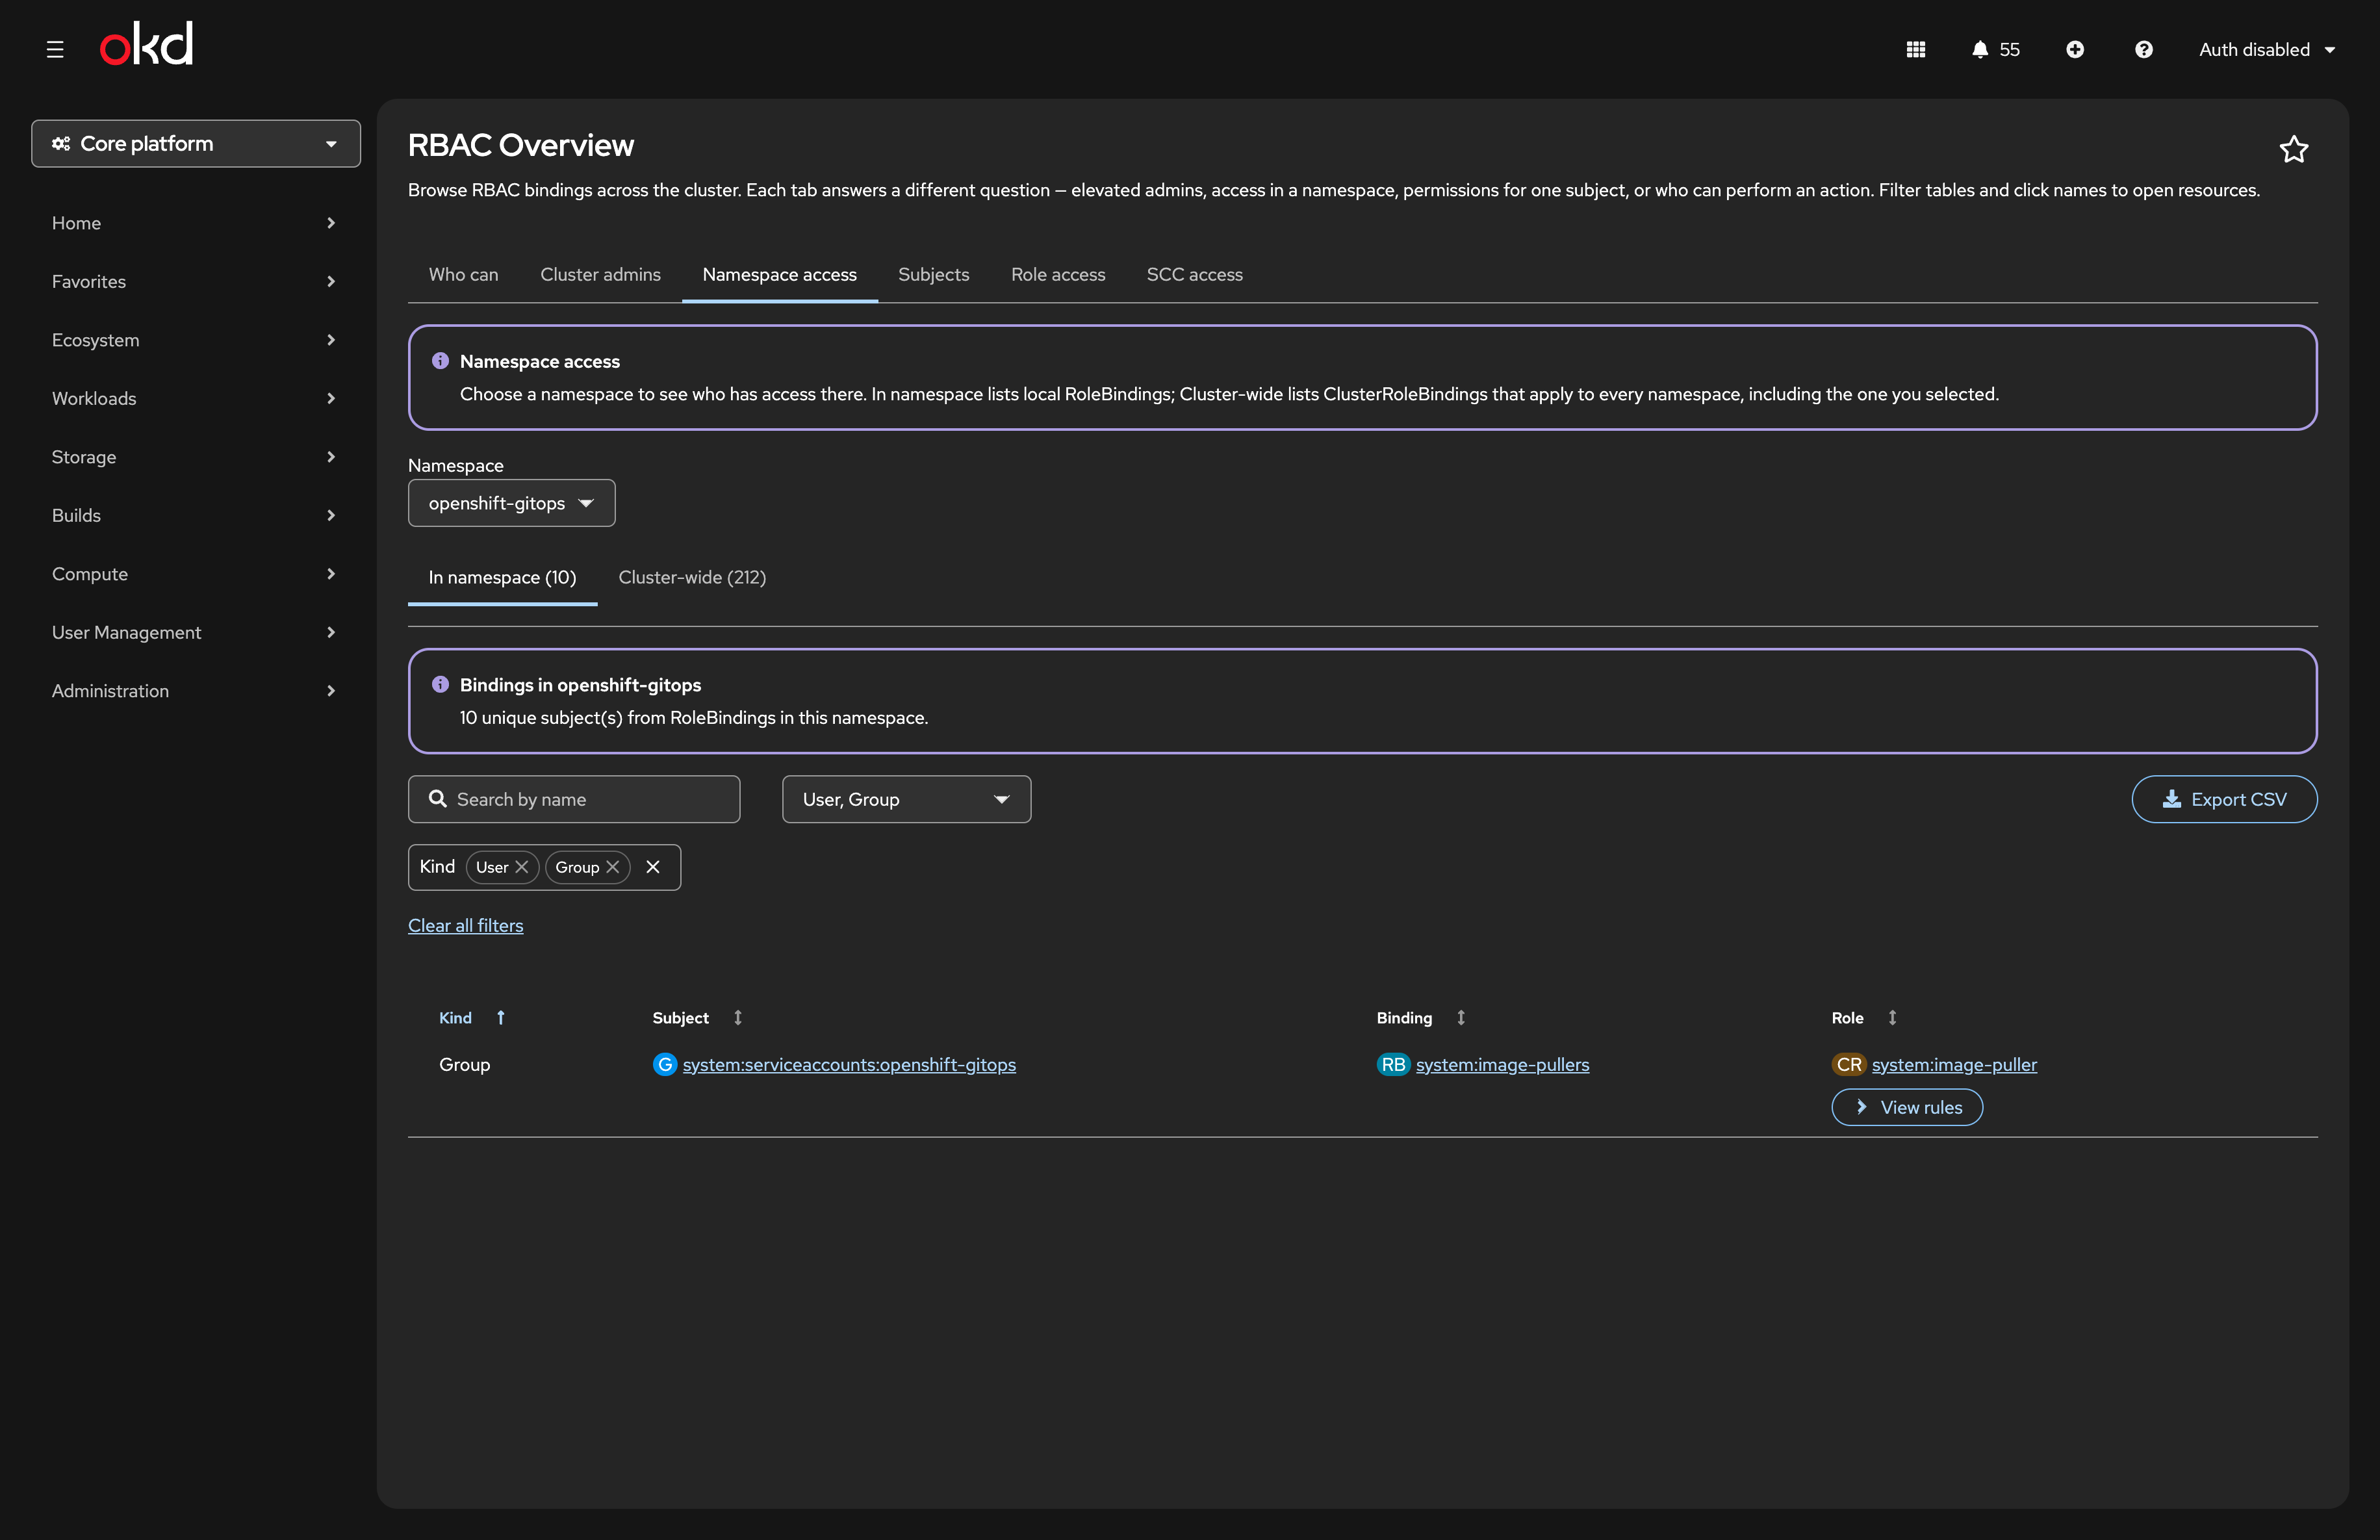
The default filter shows User and Group subjects; add ServiceAccount when you care about workload identities.
Subjects
If you are interested to query a specific subject (user, group etc.) you can use this tab. The list merges:
subjects found in RoleBindings and ClusterRoleBindings across the cluster, and
Users, Groups, and ServiceAccounts returned by the OpenShift user API (where your account may list them).
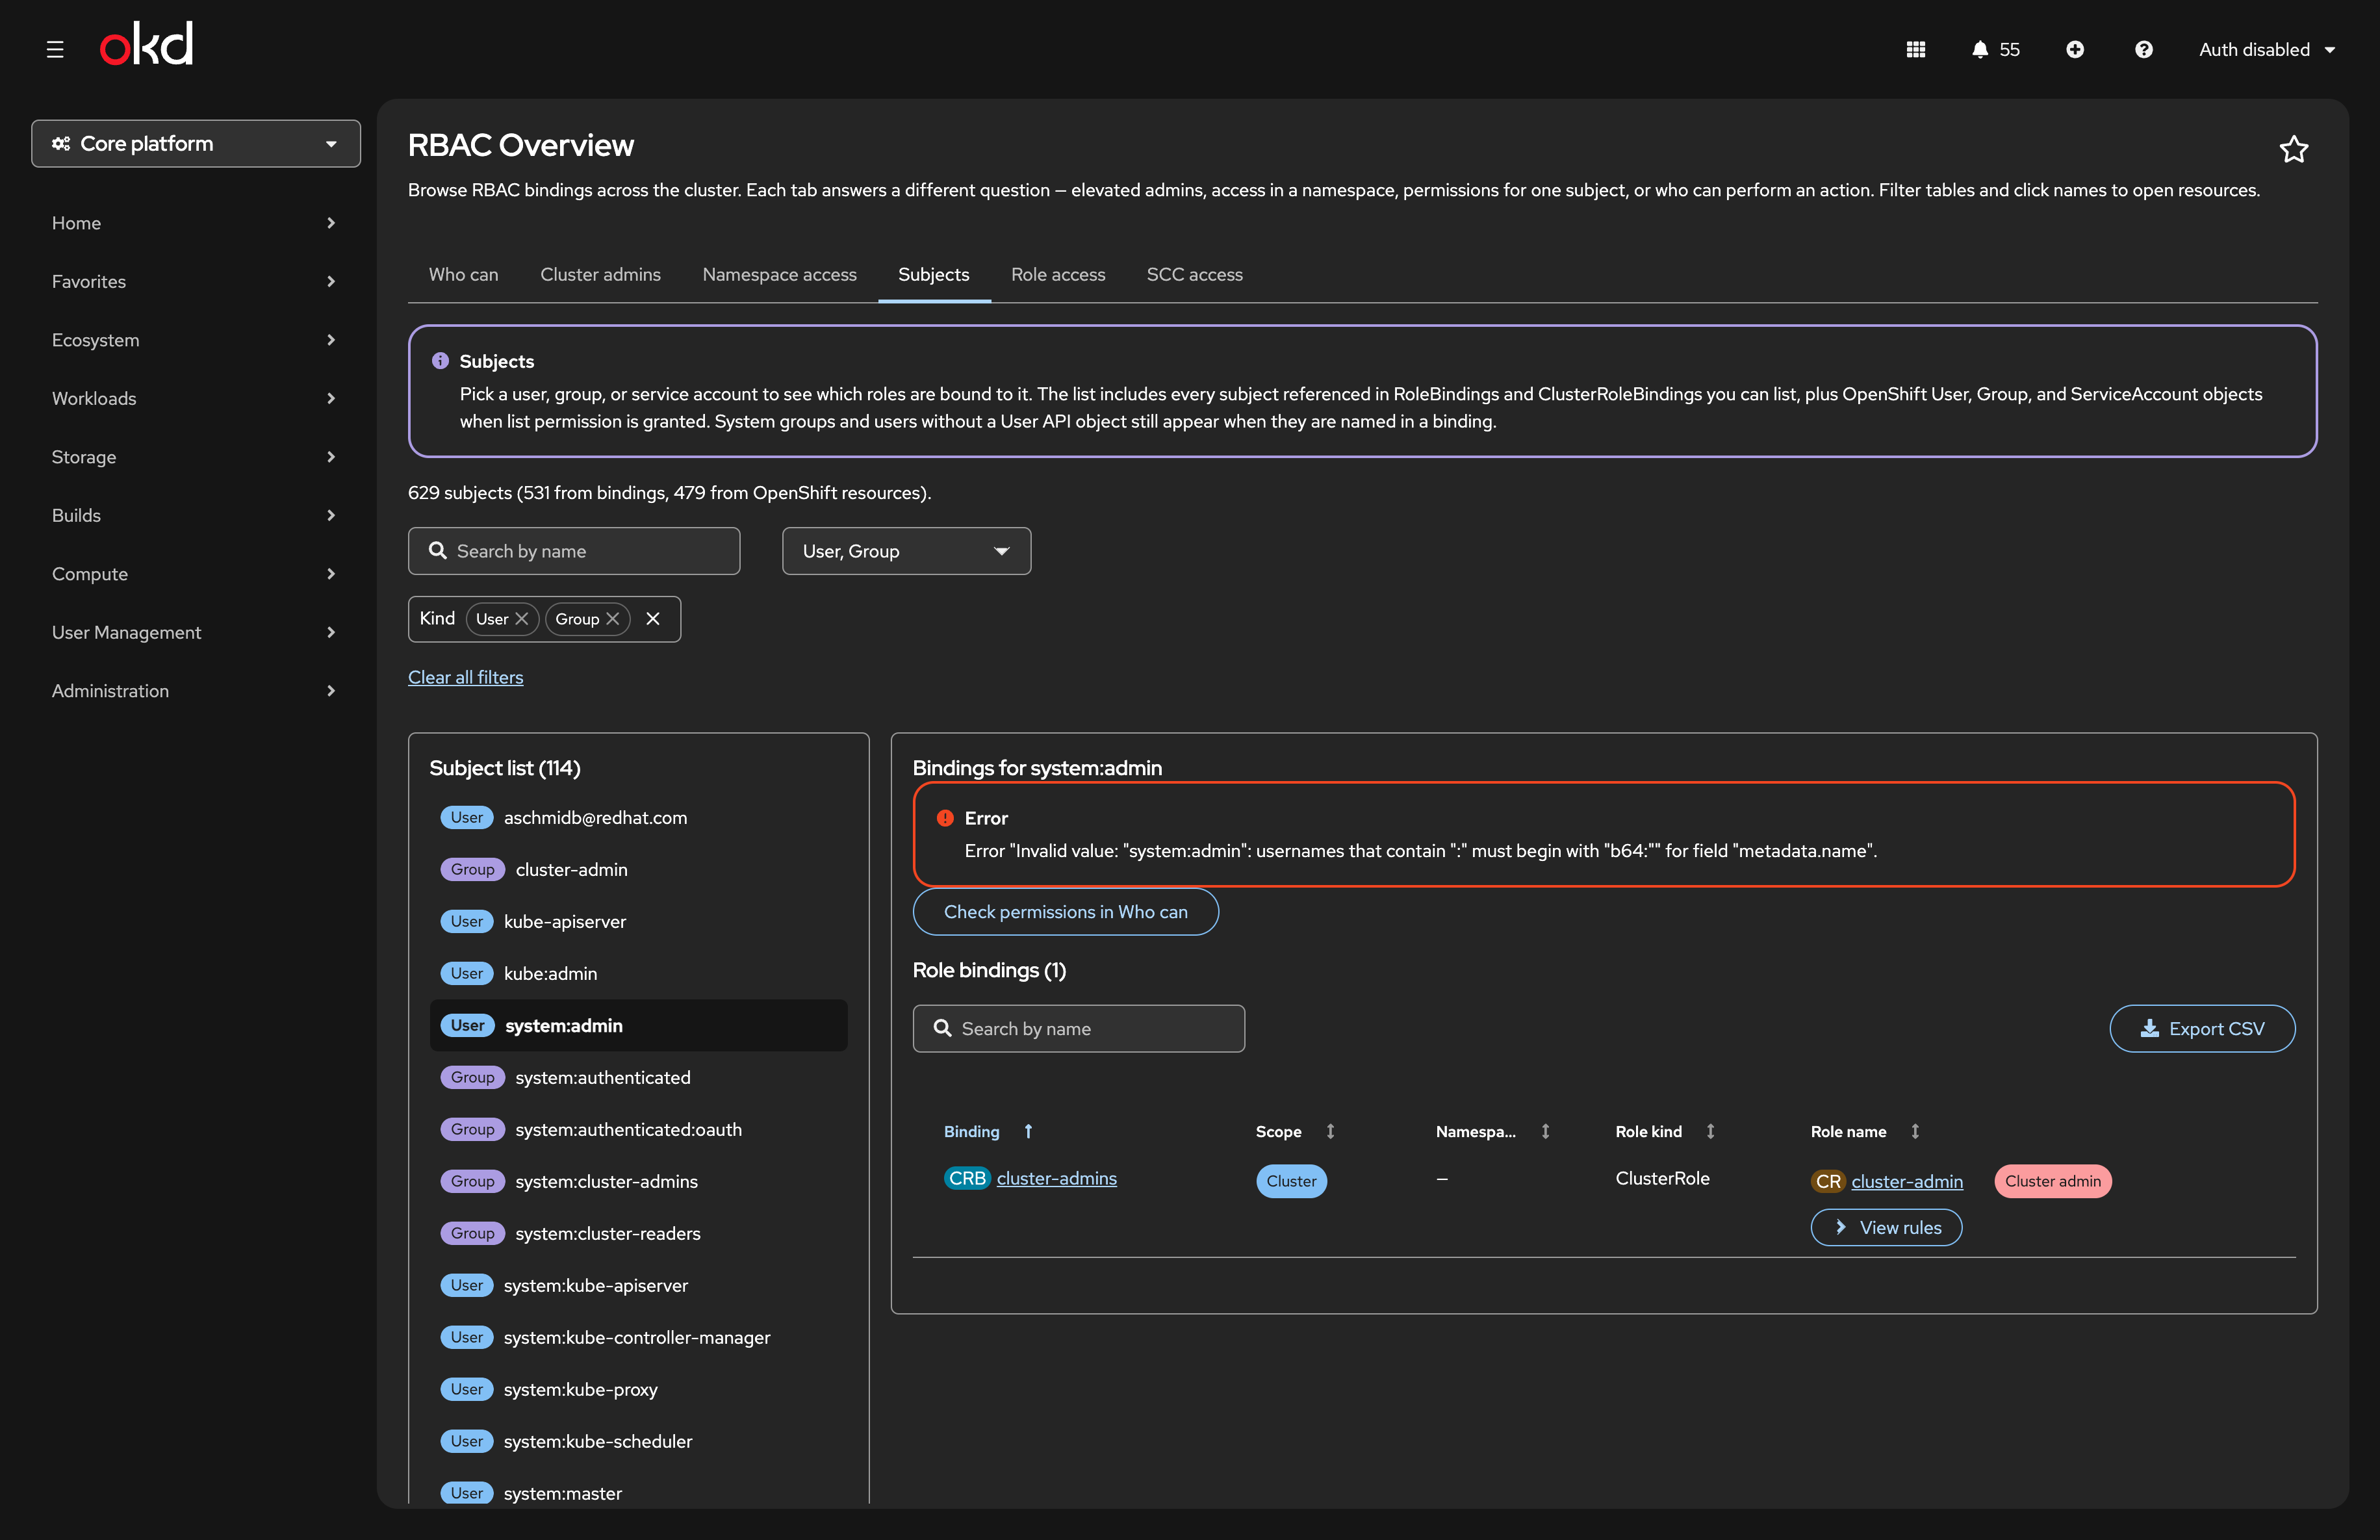
Select an entry to see binding details on the right, open linked resources, or continue in Who can → Can subject.
| The error message that appears in the screenshot for the selected user is due to the fact that there are no bindings for this user. This is normal and expected. |
Role access
The Subjects tab answers who has what bound to them? Role access flips the question: who is bound to this ClusterRole? That is useful when you audit a built-in or custom ClusterRole (view, edit, cluster-admin, or a role you ship with an operator) and need every ClusterRoleBinding and RoleBinding that references it in one table.
Pick a ClusterRole from the dropdown. The table lists matching bindings with scope, namespace (for namespaced RoleBindings), role kind, subjects, and View rules to expand the ClusterRole policy inline.
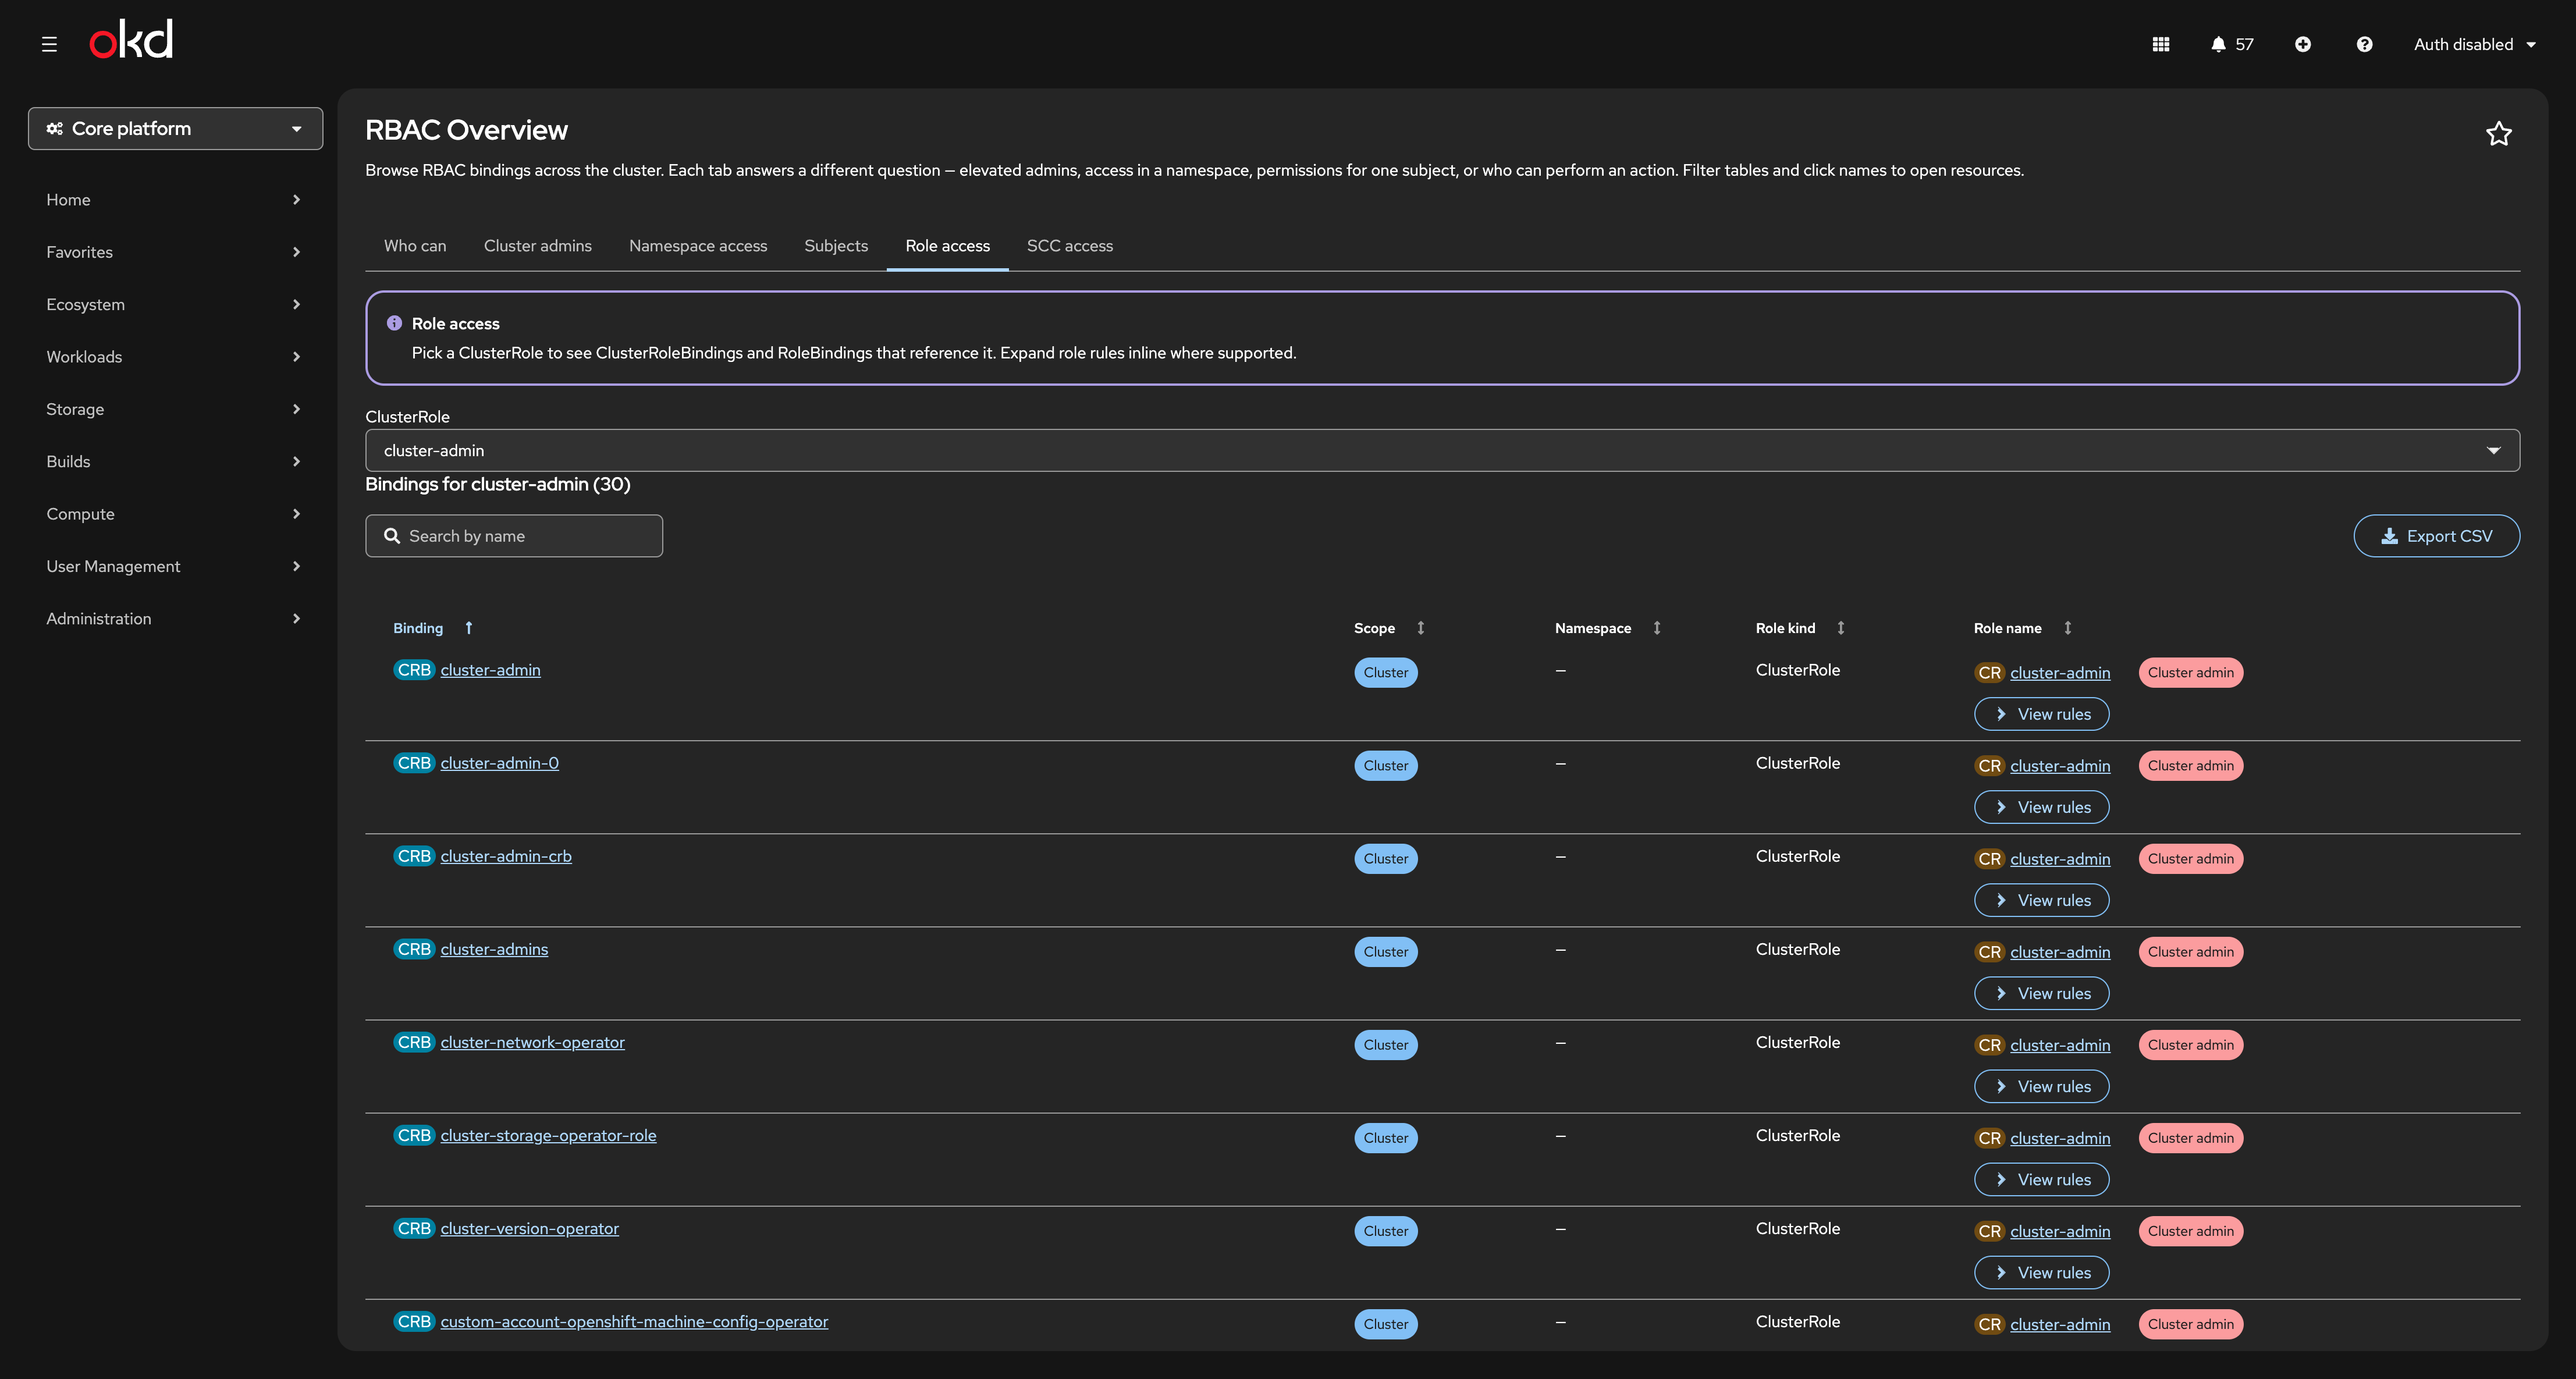
The screenshot shows cluster-admin with 30 bindings — a mix of human users, the cluster-admins group, and OpenShift system groups such as system:openshift:operator:kube-apiserver-operator.
SCC access
To get a quick overview about SCC and who is on which SCC was always tricky.
OpenShift SCCs authorise subjects in two ways:
direct fields on the SCC object
RBAC to
use securitycontextconstraints.
This tab shows every SCC and their configuration.
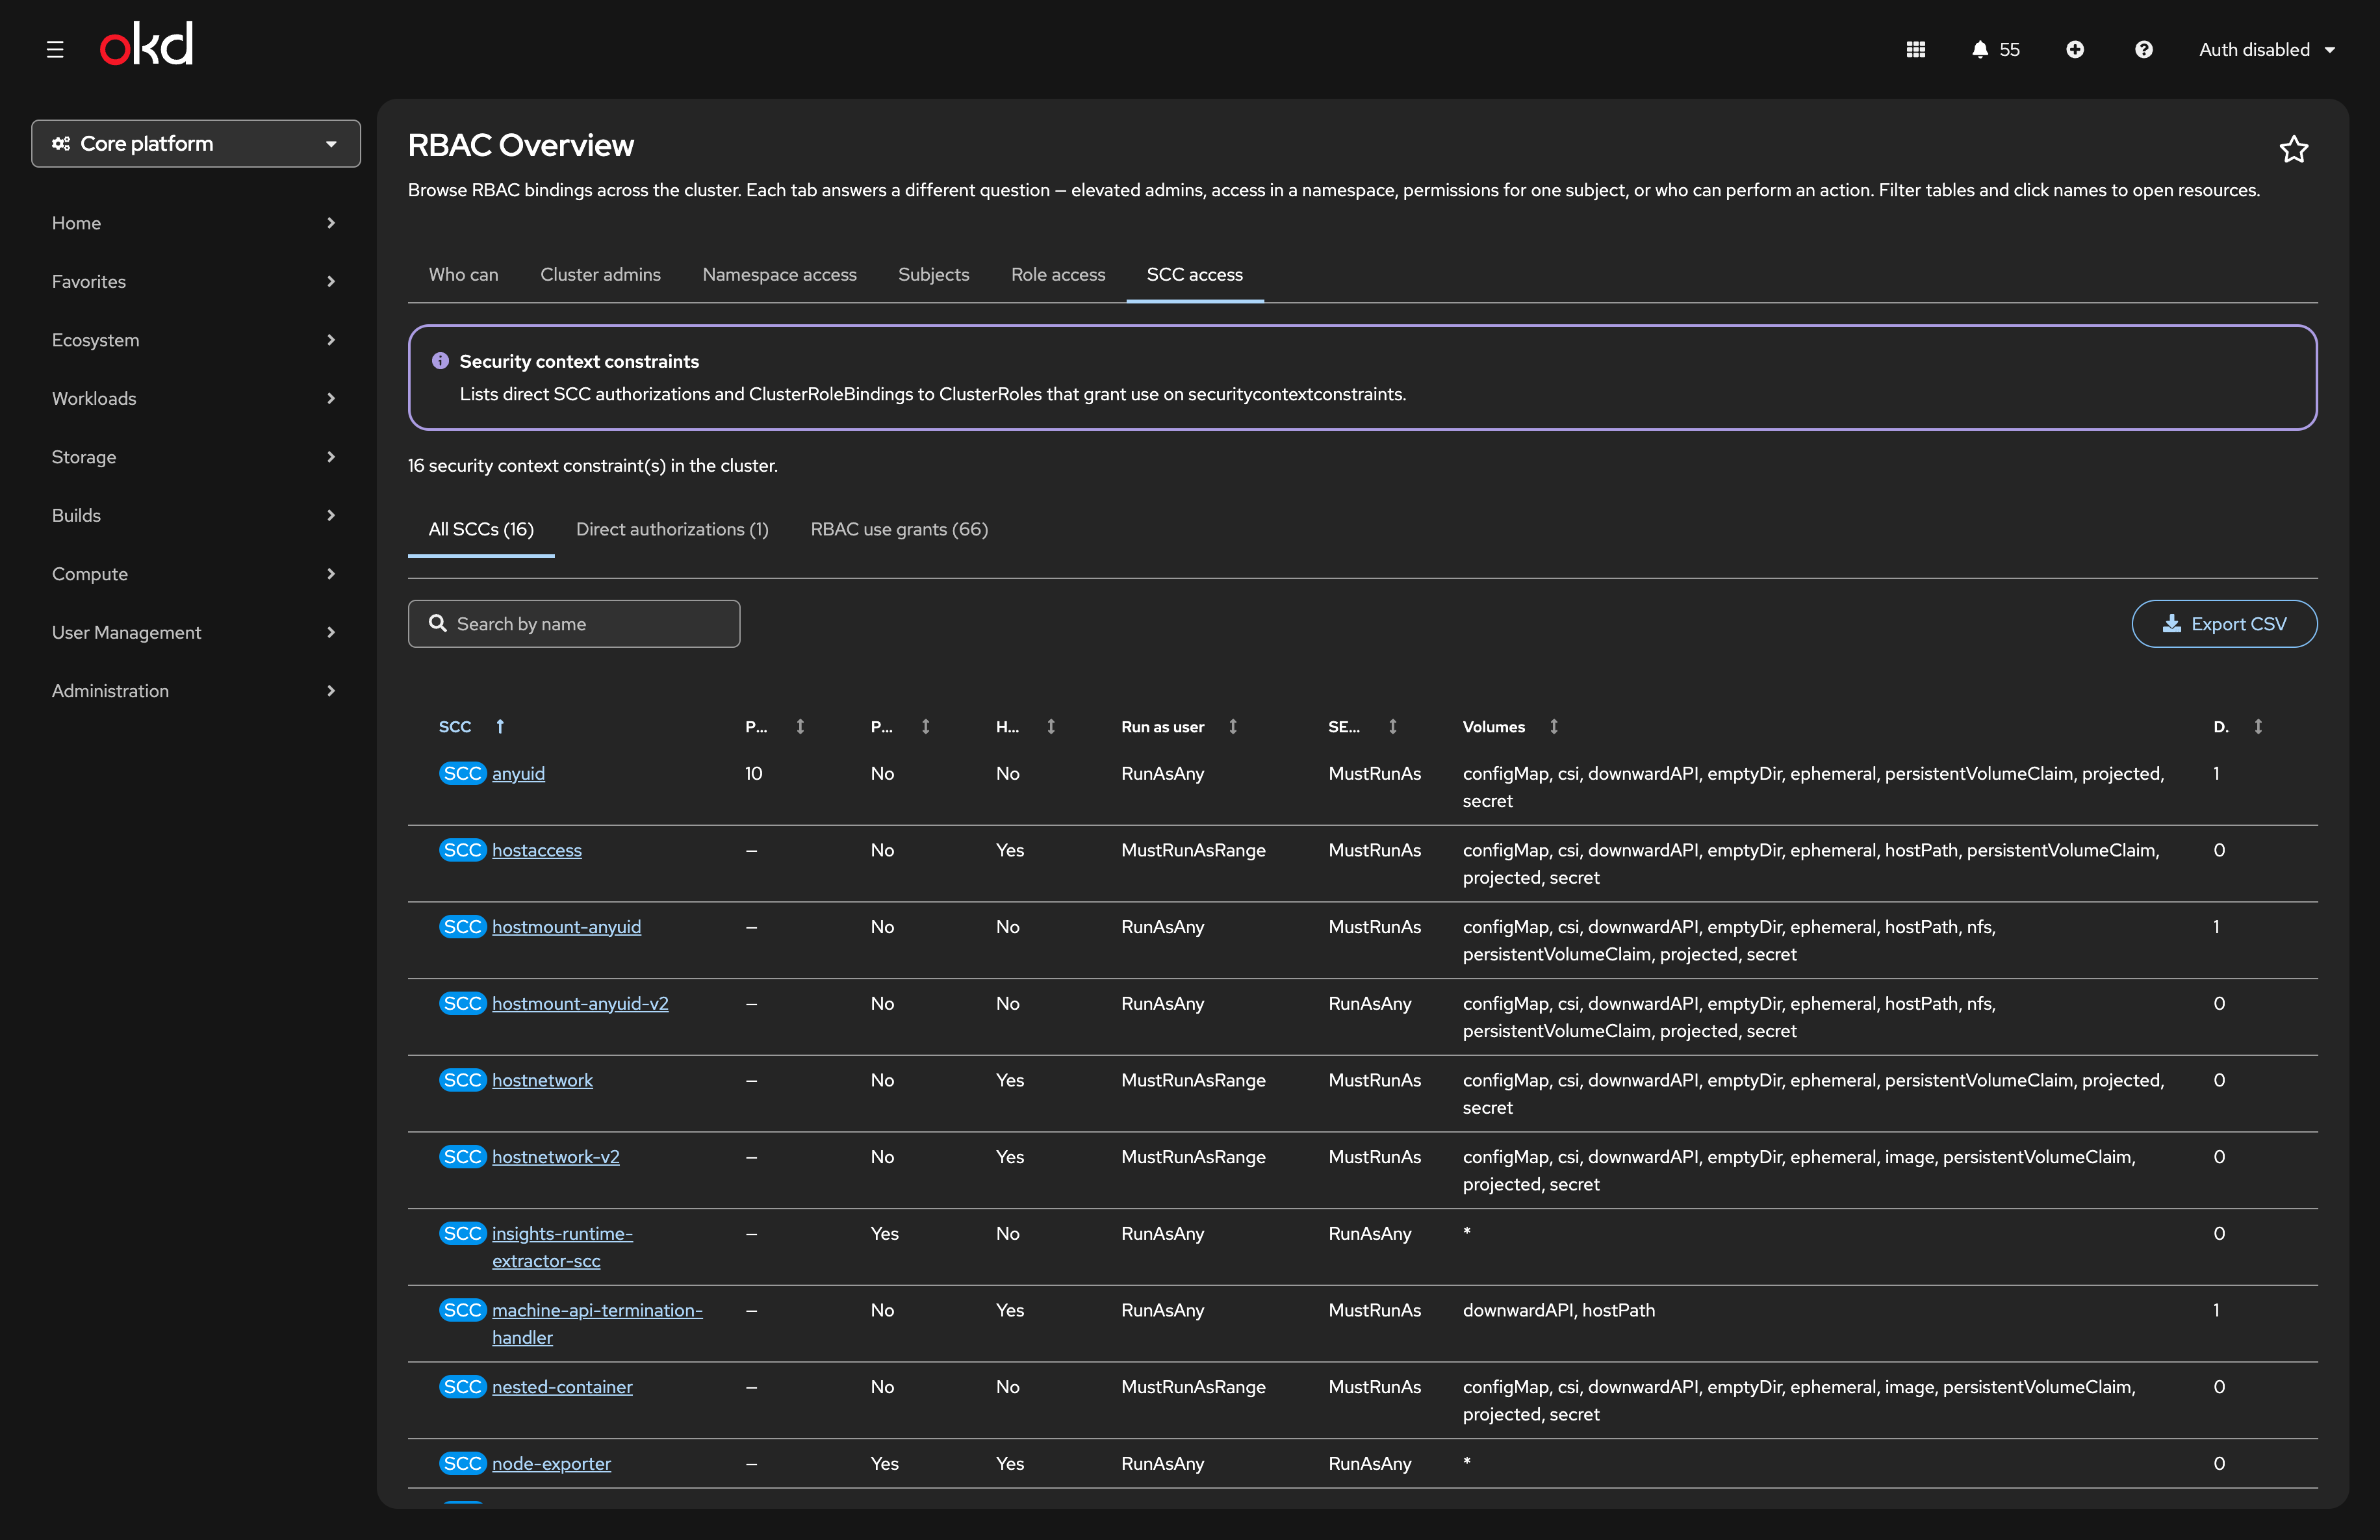
All SCCs — every SCC you can list, with priority, privileged/host settings, run-as-user and SELinux strategy, volumes, and direct subject count.
Direct authorizations — users, groups, and service accounts listed on each SCC.
RBAC use grants — ClusterRoleBindings that grant
useon SCC resources.
This tab does not replace a full SCC compliance review, but it saves time when you are tracing why a pod was allowed a privileged context.
Limitations
Who can requires the same elevated create permissions as
oc adm policy who-can.Large clusters: tables paginate, but initial binding scans can take a moment on first tab open.
Summary
RBAC Overview does not replace oc or your GitOps RBAC manifests. It gives operators and auditors a single console entry point for the questions that come up every week — who is admin, what does this namespace grant, what is bound to this service account, who can touch this verb/resource, and which identities sit on sensitive SCCs.
The plugin was created with the help of AI (I always want to be open about that), especially the initial layout, some styling elements like dropdowns and buttons and the README … which I never want to write.
If you try it, feedback and issues are welcome on the repository.
References
Related Articles
Copyright © 2020 - 2026 Toni Schmidbauer & Thomas Jungbauer
Discussion
Comments are powered by GitHub Discussions. To participate, you'll need a GitHub account.
By loading comments, you agree to GitHub's Privacy Policy. Your data is processed by GitHub, not by this website.