[Ep.8] Installing OpenShift Logging
May 24, 2024
Updated Dec 18, 2025
-
![]() Thomas Jungbauer
-
19 min read
(3876 words)
Thomas Jungbauer
-
19 min read
(3876 words)
OpenShift Logging is one of the more complex things to install and configure on an OpenShift cluster. Not because the service or Operators are so complex to understand, but because of the dependencies logging has. Besides the logging operator itself, the Loki operator is required, the Loki operator requires access to an object storage, that might be configured or is already available.
In this article, I would like to demonstrate the configuration of the full stack using an object storage from OpenShift Data Foundation. This means:
Installing the logging operator into the namespace openshift-logging
Installing the Loki operator into the namespace openshift-operators-redhat
Creating a new BackingStore and BucketClass
Generating the Secret for Loki to authenticate against the object storage
Configuring the LokiStack resource
Configuring the ClusterLogging resource
All steps will be done automatically. In case you have S3 storage available, or you are not using OpenShift Data Foundation, the setup will be a bit different. For example, you do not need to create a BackingStore or the Loki authentication Secret.
Prerequisites
OpenShift 4
Argo CD (OpenShift GitOps) deployed
OpenShift Data Foundation (ODF) deployed and ready to provide object storage.
Enough available compute resources to deploy LokiStack. Verify the official OpenShift Logging documentation to see which option might need which resources.
| For ODF it would be enough to deploy object storage only, instead of the full storage stack based on Ceph. In this case, the so-called MultiCloudObjectGateway option is used, which creates (virtualizes) object storage on top of an existing StorageClass |
| If ODF object storage based on Noobaa should be used, then it makes sense to think about the data retention process, which will take care of removing old data from the storage. It is recommended to configure this directly on the object storage, because this is much more compute-friendly, then letting OpenShift Logging take care of that. The configuration depends on the object storage vendor. In the case of Noobaa, I have prepared a separate article: Noobaa Bucket Data Retention Lifecycle |
Introduction
The main resources of OpenShift Logging are the three custom resources: ClusterLogging, ClusterLogForwarder and LokiStack. The first two are provided by the OpenShift Logging Operator, the last one is provided by the Loki Operator. ClusterLogForwarder is an optional configuration. It allows us to forward logs to external destinations, such as Splunk, or to forward the OpenShift audit logs to Loki. (They are not stored by default). The LokiStack resource requires an available object storage to be able to start its workloads.
In my case, I would like to configure everything automatically. This means, that I also want to configure the object or S3 storage and create the required authentication secret for Loki without manual intervention. This can be easily done using ODF.
The Configure App-of-Apps installed an Argo CD Application called in-cluster-setup-openshift-logging:
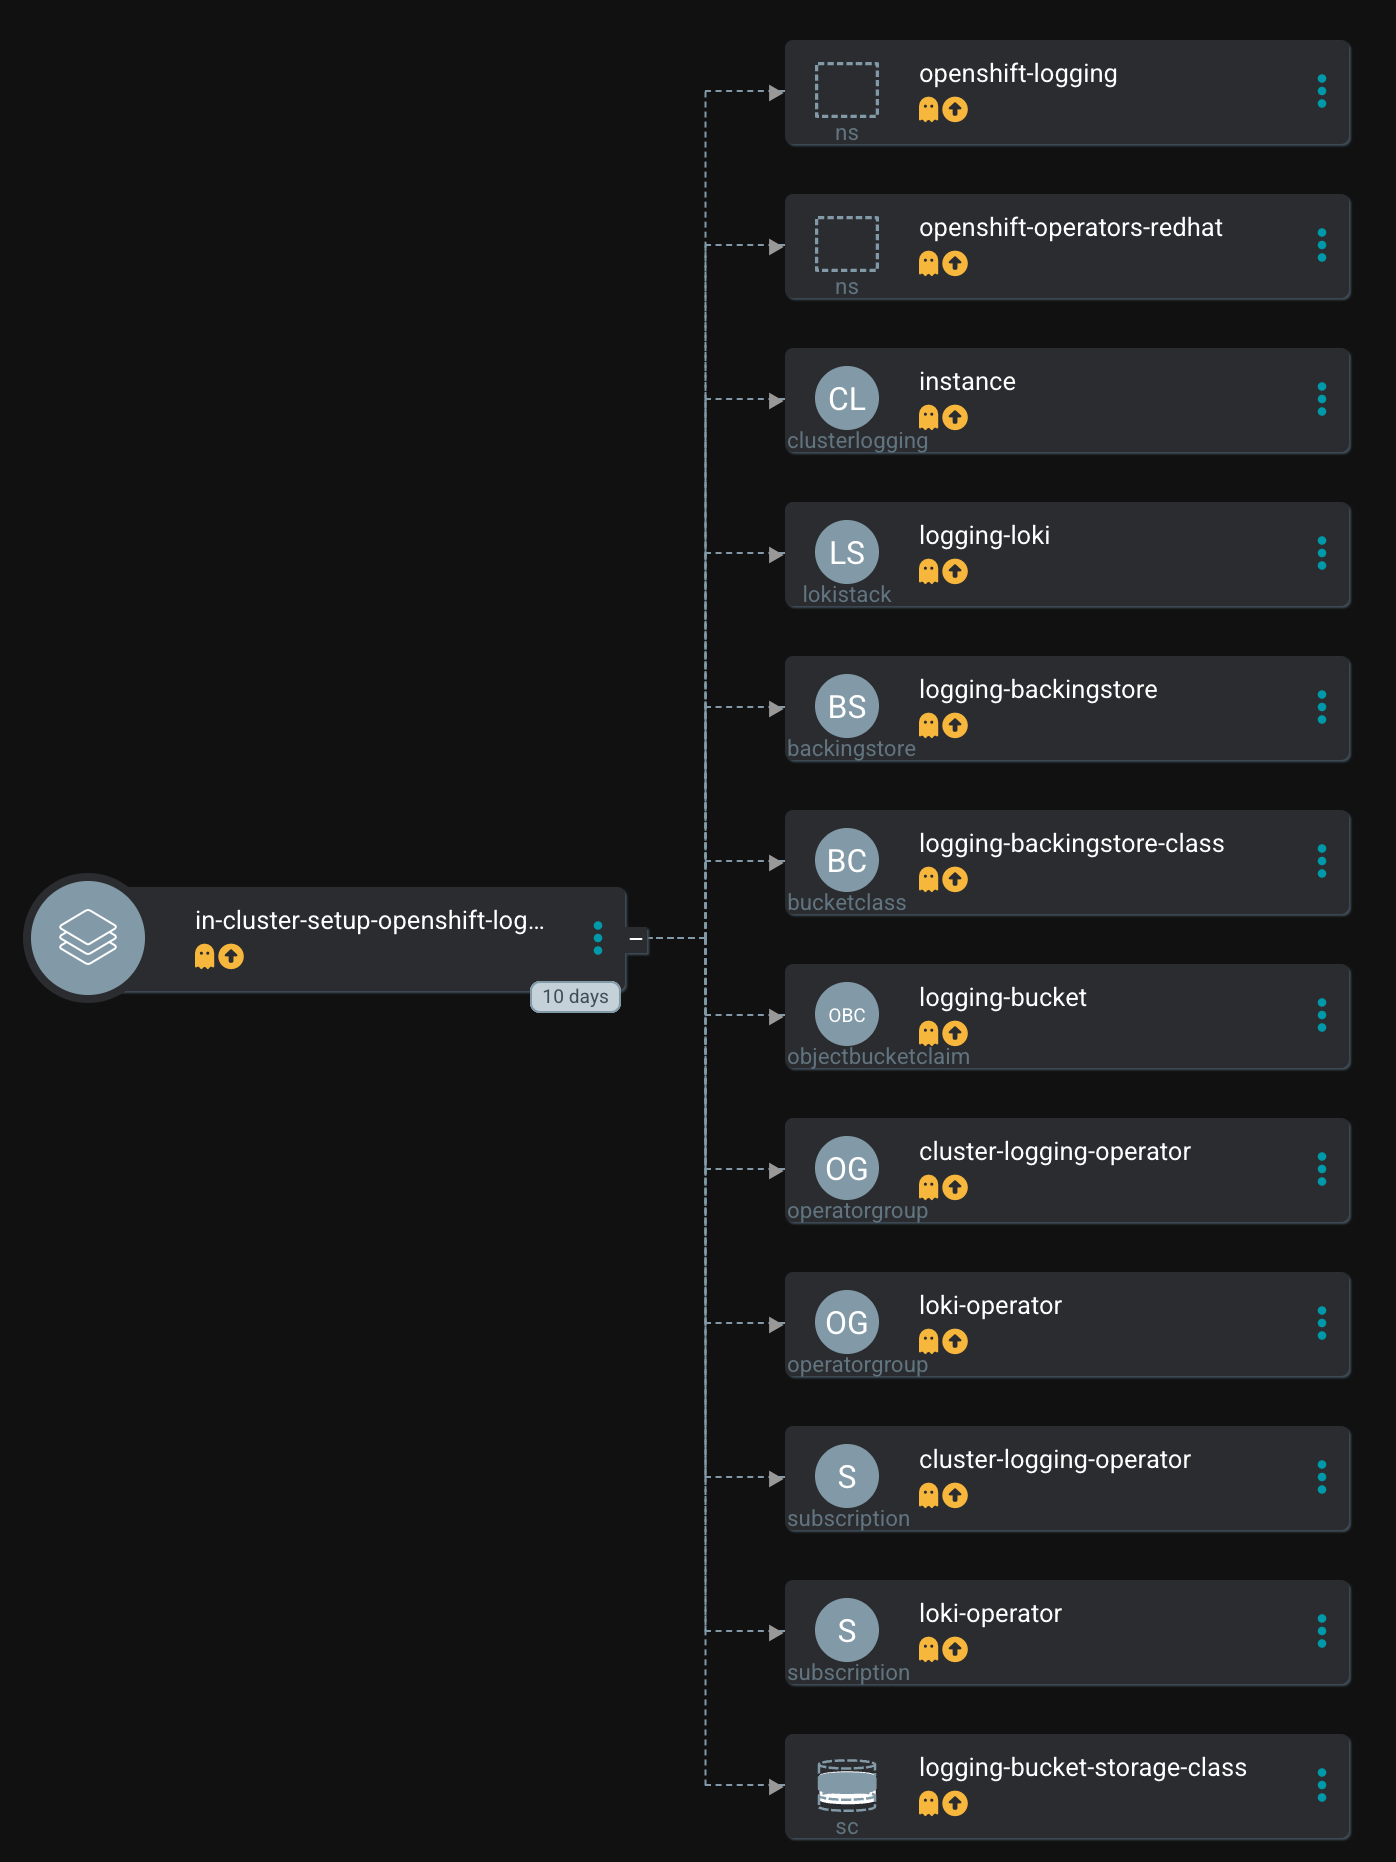
This Argo CD Application uses the following path to find the Helm Chart: setup-openshift-logging
This Helm chart is a wrapper chart that uses sub-charts as dependencies to install and configure the operator as well as to do some OpenShift Jobs on top, for example, creating the required Secret for LokiStack.
The deployment workflow will go through the sub-charts and look like the following:

While this looks quite huge and complex, the idea of the sub-charts is quite simple: Do a small specific task, that can be reused by other charts. For example, the NetworkObservability Operator also required an object storage and Loki. I can easily reuse the sub-charts without repeating the logic behind them.
Installing OpenShift Logging Stack
Analyzing Chart.yaml
Let’s examine the Chart.yaml file to see which dependencies are used:
The file looks like the following. The Chart has a lot of dependencies on sub-charts, that have been created to make specific, small and defined operations re-useable for multiple Charts. A total number of 6 sub-charts are used:
dependencies:
  - name: helper-operator (1)
    version: ~1.0.18
    repository: https://charts.stderr.at/
  - name: helper-status-checker (2)
    version: ~4.0.0
    repository: https://charts.stderr.at/
    condition: helper-status-checker.enabled
  - name: openshift-logging (3)
    version: ~2.0.0
    repository: https://charts.stderr.at/
  - name: helper-loki-bucket-secret (4)
    version: ~1.0.0
    repository: https://charts.stderr.at/
    condition: helper-loki-bucket-secret.enabled
  - name: helper-objectstore (5)
    version: ~1.0.0
    repository: https://charts.stderr.at/
    condition: helper-objectstore.enabled
  - name: helper-lokistack (6)
    version: ~1.0.0
    repository: https://charts.stderr.at/
condition: helper-lokistack.enabled| 1 | Dependency: Helper Operator |
| 2 | Dependency: Helper Status Checker |
| 3 | Dependency: OpenShift Logging |
| 4 | Dependency: Helper Loki Bucket Secret |
| 5 | Dependency: Helper Objectstore |
| 6 | Dependency: Helper Lokistack |
| Verify the READMEs of the different Charts for detailed information on how to configure them. |
Configuration of the Chart
To configure OpenShift Logging the values file of the wrapper Chart must be prepared accordingly.
| The important thing here is, that any value that should be bypassed to a sub-chart is defined under the name of the sub-chart. For example, everything under helper-operator: will be sent to the helper-operator Chart and is used there for its configuration. |
Let’s walk through the configuration for each sub-chart in the order they are required:
Installing the Operator
The first thing to do is to deploy the Operators themselves. For OpenShift Logging two Operators are required:
OpenShift Logging
Loki
Loki might be installed already due to a different dependency. Maybe you have deployed the Network Observability Operator previously. In that case, OpenShift Logging is required only.
The Helm Chart helper-operator is responsible for deploying the Operators. In the following example, I will deploy both Operators (Logging and Loki) and enable the console plugin for the OpenShift Logging operator:
| The console plugin will only work when the whole stack, this means when Logging itself, has been rolled out. |
helper-operator:
  console_plugins: (1)
    enabled: true
    plugins: (2)
      - logging-view-plugin

  operators:
    cluster-logging-operator: (3)
      enabled: true (4)
      syncwave: '0' (5)

      namespace: (6)
        name: openshift-logging
        create: true
      subscription: (7)
        channel: stable
        source: redhat-operators
        approval: Automatic
        operatorName: cluster-logging
        sourceNamespace: openshift-marketplace
      operatorgroup: (8)
        create: true
        notownnamespace: false

    loki-operator: (9)
      enabled: true
      namespace: (10)
        name: openshift-operators-redhat
        create: true
      subscription: (11)
        channel: stable-5.8
        approval: Automatic
        operatorName: loki-operator
        source: redhat-operators
        sourceNamespace: openshift-marketplace
      operatorgroup: (12)
        create: true
notownnamespace: true| 1 | Activate Console Plugin. This will trigger a Kubernetes Job, that will modify the current list of console plugins and add the new plugin to it. |
| 2 | List of plugins that should be added by the Job. The name of that plugin must be known. In the case of OpenShift Logging it is called logging-view-plugin |
| 3 | Key of the first operator: cluster-logging-operator. Everything below here will define the settings for the Logging Operator. |
| 4 | Is this Operator enabled yes/no. |
| 5 | Syncwave for the Operator deployment. (Subscription and OperatorGroup etc.) This should be early enough for other tasks. |
| 6 | The Namespace where the Operator shall be deployed and if this namespace shall be created. |
| 7 | Configuration of the Subscription resource. This defines the channel (version) that shall be used and whether the approval of the installPlan shall happen automatically or not. |
| 8 | Configuration of the OperatorGroup. Typically, you will need one when you create a new Namespace. Notownnamespace defines whether or not the targetNamespace is configured for this Operator or if the Operator is available in any Namespace. |
| 9 | Key of the second Operator: loki-operator. Everything below here will define the settings for the Logging Operator. |
| 10 | The Namespace where the Operator shall be deployed, must be openshift-operators-redhat and if this namespace shall be created. |
| 11 | Configuration of the Subscription resource. This defines the channel (version) that shall be used and whether the approval of the installPlan shall happen automatically or not. |
| 12 | Configuration of the OperatorGroup |
| The approval setting can either be Automatic or Manual. If the Operator requires approval to be installed, then this must either be done manually (via WebUI or CLI) or using the helper-status-checker chart which automatically can approve existing installPlans (explained in the next section). This is helpful, to automatically deploy the first version of the Operator without the need for manual intervention. |
| Verify the README at Helper Operator to find additional possible configurations. Also, verify the separate article Operator Installation with Argo CD to understand why I am verifying the status of the Operator installation. |
Verifying the Operator Deployment
An Operator deployment can take some time and before you continue to configure the operator’s CRDs you must be sure that the installation finished successfully. Otherwise, the synchronization in Argo CD will fail because the CRD is not ready.
There are mainly two tactics to really verify the status of the Operator:
Simply retry a failed sync in Argo CD. This can be done automatically x-times.
Verify if the Operator installation succeeded by starting a Kubernetes Job that monitors the status.
| (Custom) Health checks in Argo CD proved to be not 100% accurate because sometimes the Operator says it is "Ready" but the CRD still cannot be configured for some seconds. Looking at you Compliance Operator …. |
I chose the second option, simply because I could also add a second Job that approved pending installPlans in case the deployment was set to manual approval.
The Helm Chart helper-status-checker has two main purposes:
Start a Kubernetes Job to verify the status of one or multiple Operator installation(s)
Optional: start a Kubernetes Job to approve the installPlan(s)
An example configuration, that verifies two Operators, looks like the following:
helper-status-checker:
  enabled: true (1)
  approver: false (2)

  # List of checks that shall be performed.
  checks:
    - operatorName: cluster-logging (3)
      # -- OPTIONAL: Name of subscription that shall be approved. In some cases the name of the Subscription is different to the name of the operator.
      # @default --operatorName
      subscriptionName: cluster-logging-operator (4)

      namespace: (5)
        name: openshift-logging

      serviceAccount: (6)
        name: "status-checker-logging"

    - operatorName: loki-operator (7)
      namespace:
        name: openshift-operators-redhat

      serviceAccount:
name: "status-checker-loki"| 1 | Enable the status checker. |
| 2 | Enable the installPlan approver. Only required if the approval strategy for an Operator is set to Manual. |
| 3 | Verify the status of the first Operator cluster-logging |
| 4 | Sometimes the name of the Subscription differs from the Operator name. Logging is such a case. To be able to find which Subscription should be verified, the subscriptionName must be defined here. |
| 5 | Namespace for OpenShift Logging |
| 6 | Name of the ServiceAccount that will be created to verify the status of the logging operator. |
| 7 | Settings for the 2nd operator: Loki. This one is running in a different Namespace and must be verified there. |
| Verify the README at Helper Operator Status Checker to find additional possible configurations. |
At this stage, the Operators have been deployed and they have been verified if the deployment was finished successfully.
Now the real complex part can start…
Creating a new BackingStore for OpenShift Data Foundation
| If you want to use a different storage solution or you have a bucket already, you can skip this section and simply create the LokiStack Secret manually. |
In the case that ODF is used and a BackingStore together with a BucketClass shall be created another sub-chart called Helper ObjectStore can be used.
It will help you to create a:
BackingStore
BucketClass
StorageClass
BucketClaim
This fully automates the creation of the bucket and the required Class when using ODF. As a prerequisite, OpenShift Data Foundation (ODF) must be configured and available of course.
| This is completely optional. If you want to use a different storage solution and have the buckets ready, you can simply create the Secret that Loki requires to authenticate at the storage. In this case, you can ignore this and the next section. |
The following example will create a BackingStore with the size of 700Gi for our OpenShift Logging. A bucket named logging-bucket is created and can be used to store the logs.
helper-objectstore:
  enabled: true
  syncwave: 1 (1)
  backingstore_name: logging-backingstore (2)
  backingstore_size: 700Gi (3)
  limits_cpu: 500m (4)
  limits_memory: 2Gi

  pvPool: (5)
    numOfVolumes: 1
    type: pv-pool

  baseStorageClass: gp3-csi (6)
  storageclass_name: logging-bucket-storage-class (7)

  bucket: (8)
    enabled: true
    name: logging-bucket
    namespace: openshift-logging
    syncwave: 2
storageclass: logging-bucket-storage-class| 1 | Syncwave to create the BackingStore. |
| 2 | Name of the Backingstore. |
| 3 | Size of the BackingStore. 700Gi is good enough for testing Logging. Keep in mind that data retention should be configured separately for Noobaa. |
| 4 | Limit for CPU and Memory for the Noobaa (BackingStore) pod. They might need to be adjusted since the original ones are quite small for bigger buckets. |
| 5 | Pool of Persistent Volumes. Currently pv-pool is supported by the chart only. |
| 6 | The basic storage class that shall be used to virtualize ODF object storage on. |
| 7 | The name of the StorageClass that will be created and used by the BackingStore. |
| 8 | The configuration of the Bucket and its namespace and storageClass (defined at <7>) |
Eventually, the BackingClass and the BucketClaim are created and ready.

Custom Argo CD Health Check for BackingStore
The creation of the BackingStore is a process that will take several minutes. Storage must be prepared, and several services must be started. To let Argo CD wait until the BackingStore is fully operational, instead of blindly continuing with the deployment of Loki and Logging, a custom Health Check in Argo CD might help.
The following health check should be placed into the Argo CD resource. Be aware, that there might be others already defined.
The status of the BackingStore resource inside Argo CD will continue progressing until the status of the resource becomes Ready.
Due to different syncwaves, Argo CD will wait for the Ready-status before it continues deploying Loki and Logging.
  resourceHealthChecks:
    - check: |
        hs = {}
        if obj.status ~= nil then
          if obj.status.phase ~= nil then
            if obj.status.phase == "Ready" then
              hs.status = "Healthy"
              hs.message = obj.status.phase
              return hs
            end
          end
        end
        hs.status = "Progressing"
        hs.message = "Waiting for BackinbgStore to complete"
        return hs
      group: noobaa.io
      kind: BackingStore
Generating Secret for LokiStack
| If you want to use a different storage solution or you have a bucket already, you can skip this section and simply create the LokiStack Secret manually. |
Creating the BackingStore and the BucketClaim will generate a Secret and a ConfigMap inside the target namespace. These hold the information about the connection to the object storage. Both resources are named as the bucket. The Secret contains the keys: AWS_ACCESS_KEY_ID and AWS_SECRET_ACCESS_KEY while the ConfigMap stores the information about the URL, region etc.
While this is all we need to connect to the object store, Loki itself unfortunately requires a different Secret with a specific format. Before Loki can be configured, this Secret must be created, containing the keys: access_key_id, access_key_secret, bucketnames, endpoint and region (could be empty)
To automate the process another Helm Chart Helper Loki Bucket Secret has been created (we have too few charts) that has the only task to wait until the object store has been created, read the ConfigMap and the Secret and create the required Secret for Loki for us. Easy …
helper-loki-bucket-secret:
  enabled: true
  syncwave: 3
  namespace: openshift-logging (1)
  secretname: logging-loki-s3 (2)

  bucket:
name: logging-bucket (3)| 1 | Namespace we are working in |
| 2 | The name of the Secret that shall be created |
| 3 | The name of the bucket that was created in the previous step to find the source information. |
A Kubernetes Job is created, that will mount the created Secret and ConfigMap, read their values and create the Secret we need. It will simply execute the following command:
oc create secret generic {{ .secretname }} --from-literal access_key_id=${bucket_user} \
  --from-literal access_key_secret=${bucket_secret} \
  --from-literal bucketnames=${bucket_name} \
  --from-literal endpoint=https://${bucket_host} \
--from-literal region=${bucket_region} \| This is completely optional. If you want to use a different storage solution and have the buckets ready, you can simply create the Secret (Sealed or inside a Vault) and put it into the wrapper chart. In this case, you can ignore this section. |
Configuring the LokiStack
Up until now, all we did was the deployment of the Operators, verifying if they were ready, creating the object storage and the Secret that will be required by Loki. At this point, we can configure Loki by creating the resource LokiStack. This will start a lot of Pods (depending on your selected size). Loki itself then takes care to push the logs into the object store and to query them etc.
Believe it or not, but there is another Helm Chart called Helper LokiStack this will configure the service as we need. The configuration can become very big and the following example shows the main settings. Please consult the README of the Chart Helper LokiStack or the values file from our wrapper chart setup-openshift-logging. Especially, the pod placement using tolerations might be interesting, as it must be set per component individually.
helper-lokistack:
  enabled: true (1)
  name: logging-loki
  namespace: openshift-logging
  syncwave: 3

  # -- This is for log streams only, not the retention of the object store. Data retention must be configured on the bucket.
  global_retention_days: 4

  storage: (2)
    # -- Size defines one of the supported Loki deployment scale out sizes.
    # Can be either:
    #   - 1x.demo
    #   - 1x.extra-small (Default)
    #   - 1x.small
    #   - 1x.medium
    # @default -- 1x.extra-small
    size: 1x.extra-small

    # Secret for object storage authentication. Name of a secret in the same namespace as the LokiStack custom resource.
    secret: (3)
      name: logging-loki-s3

  # -- Storage class name defines the storage class for ingester/querier PVCs.
  # @default -- gp3-csi
  storageclassname: gp3-csi (4)

  # -- Mode defines the mode in which lokistack-gateway component will be configured.
  # Can be either: static (default), dynamic, openshift-logging, openshift-network
  # @default -- static
  mode: openshift-logging (5)

  # -- Control pod placement for LokiStack components. You can define a list of tolerations for the following components:
  # compactor, distributer, gateway, indexGateway, ingester, querier, queryFrontend, ruler
podPlacements: {}| 1 | Basic settings, like Namespace, name of the resource and syncwave. |
| 2 | Size of the LokiStack. Depending on the selected size more or less compute resources will be required. 1x.demo is for testing only and is not supported for production workload. |
| 3 | Name of the Secret that was created in the previous step (or manually) |
| 4 | StorageClass that is required for additional workload. This is NOT the object storage. |
| 5 | Mode for the LokiStack Gateway to store the data. Possible values are static, dynamic, openshift-logging and openshift-network. |
Custom Argo CD Health Check for LokiStack
As for the BackingStore resource, the LokiStack resource can take a couple of minutes before it is ready. Moreover, it can easily break when there are not enough computing resources available in the cluster. Therefore, I suggest creating another custom health check for Argo CD, to let it wait until the resource is ready. Only when it is ready, Argo CD will continue with the synchronization. Add the following to the resourceHealthChecks in your Argo CD resource.
    - check: |
        hs = {}
        if obj.status ~= nil and obj.status.conditions ~= nil then
            for i, condition in ipairs(obj.status.conditions) do
              if condition.type == "Degraded" and condition.reason == "MissingObjectStorageSecret" then (1)
                  hs.status = "Degraded"
                  hs.message = "Missing Bucket Secret"
              end
              if condition.type == "Pending" and condition.reason == "PendingComponents" and condition.status == "True" then (2)
                  hs.status = "Progressing"
                  hs.message = "Some LokiStack components pending on dependencies"
              end
              if condition.type == "Ready" and condition.reason == "ReadyComponents" then (3)
                  hs.status = "Healthy"
                  hs.message = "All components are ready"
              end
            end
            return hs
        end
        hs.status = "Progressing" (4)
        hs.message = "Waiting for LokiStack to deploy."
        return hs
      group: loki.grafana.com
kind: LokiStack| 1 | In LokiStack resources, if the fields 'status.conditions.condition.type' is "Degraded" and 'status.conditions.condition.reason' is MissingObjectStoreSecret then set the synchronization in Argo CD to Degraded. |
| 2 | In LokiStack resources, if the fields 'status.conditions.condition.type' is "Pending" and 'status.conditions.condition.reason' is PendingComponents and 'status.conditions.condition.status' is True then set the synchronization in Argo CD to Progressing. |
| 3 | In LokiStack resources, if the fields 'status.conditions.condition.type' is "Ready" and 'status.conditions.condition.reason' is ReadyComponents then set the synchronization in Argo CD to Healthy. |
| 4 | Per default set the status to Progressing. |
Configuring ClusterLogging
Finally, the time … or should I say syncwave … has come to actually deploy the Logging components. The Operators are deployed, the object storage has been created and LokiStack is running.
The following settings will start the deployment of the ClusterLogging resource. As usual, please read the README of the Chart OpenShift Logging to find additional settings, such as tolerations etc.
openshift-logging:

  loggingConfig:
    enabled: true
    syncwave: '4' (1)

    logStore: (2)
      type: lokistack

      lokistack: logging-loki

      visualization: (3)
        type: ocp-console

      collection: (4)
type: vector| 1 | The next syncwave, should be after LokiStack deployment. |
| 2 | Define the logStore (LokiStack) and its type (Loki or Elasticsearch). Please note that Elasticsearch as storage is deprecated and will be removed in the future. In my chart, I already removed the support for Elasticsearch |
| 3 | Type of virtualisation: should be ocp-console since Kibana and Elasticsearch are deprecated. |
| 4 | Type of collection: should be vector since Fluentd and Elasticsearch are deprecated. |
This will deploy the ClusterLogging resource and OpenShift Logging is finally deployed. In the WebUI of OpenShift, you should now see at Observe > Logs the log files for the cluster.
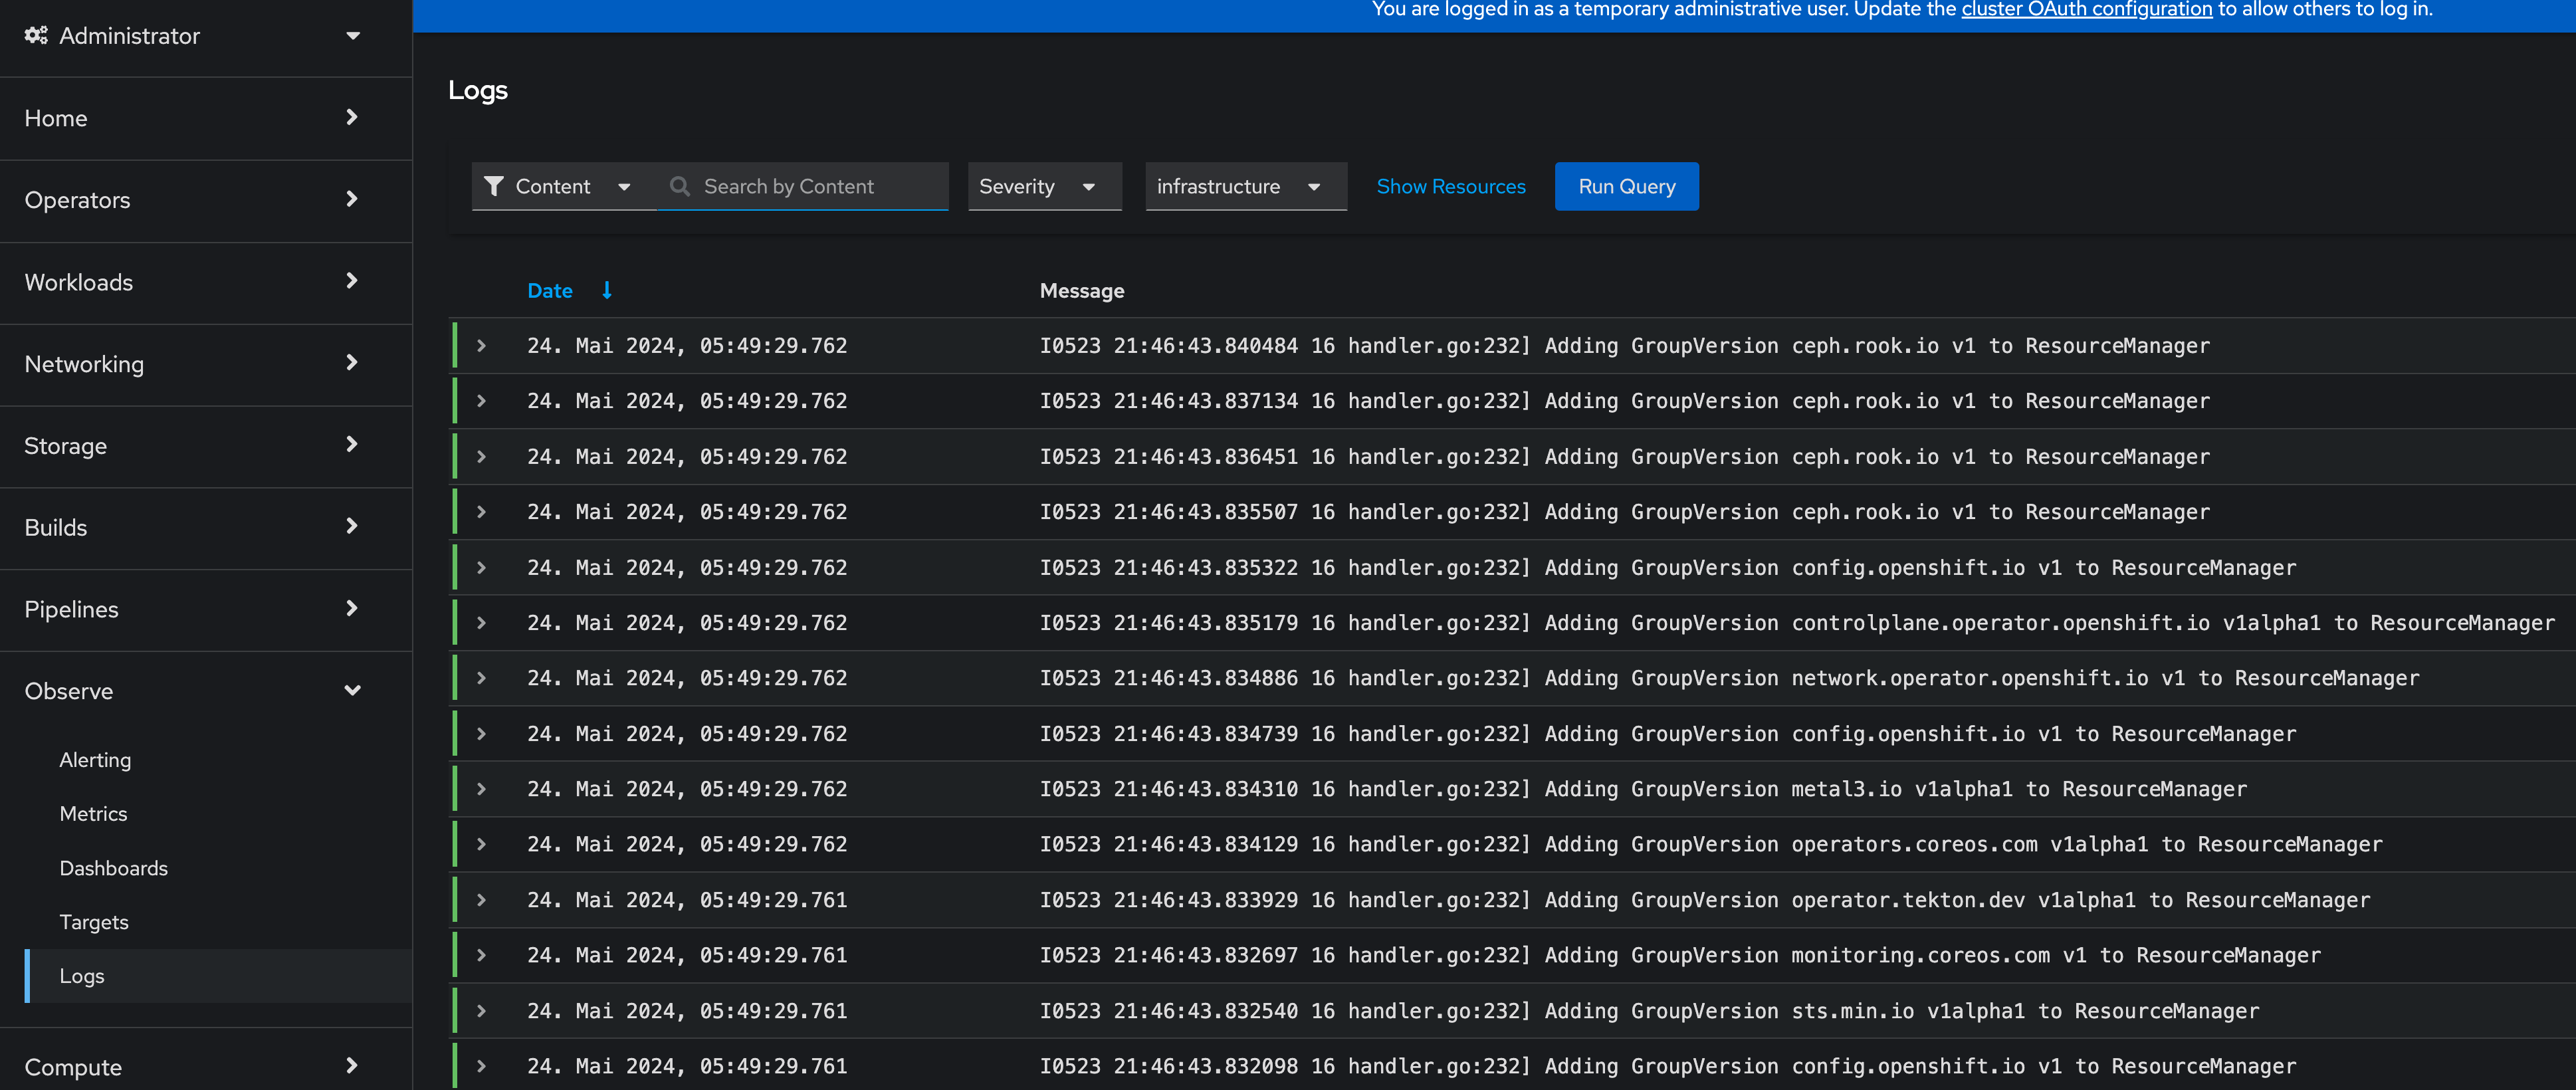
For individual Pods, a new tab called Aggregated Logs is available too:

Custom Argo CD Health Check for ClusterLogging
One last thing to mention is the 3rd health check for Argo CD I usually configure that provides a proper response in the UI when the Logging stack is in a healthy state. The following will verify if the status is "Ready":
    - check: |
        hs = {}
        hs.status = "Progressing"
        hs.message = "Progressing ClusterLogging"
        if obj.status ~= nil and obj.status.conditions ~= nil then
            for i, condition in ipairs(obj.status.conditions) do
              if condition.type == "Ready" then
                  hs.status = "Healthy"
                  hs.message = "ClusterLogging is ready"
              end
            end
            return hs
        end
        return hs
      group: logging.openshift.io
      kind: ClusterLogging
Tips and Tricks
Anchors in yaml files: Several parameters in the values file will repeat themselves. For example, the name of the LokiStack resource. Typically, I define this as an anchor on the top of the yaml files and then reference it inside the file. This way I see these anchors at the top and can easily change them there:
For example:
lokistack: &lokistackname logging-loki

[...]

helper-lokistack:
  [...]
  name: *lokistackname

openshift-logging:

  loggingConfig:
   [...]
    logStore:
      lokistack: *lokistackname
Object Storage Data Retention: The object storage is configured with a size of 700Gi, but without any lifecycle management. For object storage, the lifecycle (or data retention) is done on the bucket itself, not by the service. Please read the article Noobaa Bucket Data Retention Lifecycle to find out how to configure the data retention.
Conclusion
OpenShift Logging with all its dependencies, especially when you also want to use OpenShift Data Foundation and automate the bucket creation, is for sure one of the most complex Argo CD Applications I have created. I wanted to create one Application that completely deploys Logging for me, without manual interference. It will become much easier when you do not need to create the ODF bucket and the Secret for Loki. However, in such a case you define the Bucket somewhere else and must create the Secret manually (and put it into the wrapper Helm Chart for example). So probably the effort just shifts to somewhere else.
I hope this article was somehow understandable. I am always happy for Feedback, GitHub issues or Pull Requests.
One last thing, OpenShift Logging also supports the forwarding of logs. This is currently not supported by the Helm Chart per se. I would suggest creating such a resource and storing it in the wrapper Chart. Just be sure that the syncwave is after the ClusterLogging deployment and it will install the resource accordingly.
Copyright © 2020 - 2026 Toni Schmidbauer & Thomas Jungbauer
Discussion
Comments are powered by GitHub Discussions. To participate, you'll need a GitHub account.
By loading comments, you agree to GitHub's Privacy Policy. Your data is processed by GitHub, not by this website.