[Ep.6] Setup & Configure Advanced Cluster Security
April 28, 2024
Updated Dec 18, 2025
-
![]() Thomas Jungbauer
-
11 min read
(2264 words)
Thomas Jungbauer
-
11 min read
(2264 words)
Today I want to demonstrate the deployment and configuration of Advanced Cluster Security (ACS) using a GitOps approach. The required operator shall be installed, verified if it is running and then ACS shall be initialized. This initialization contains the deployment of several components:
Central - as UI and as a main component of ACS
SecuredClusters - installs a Scanner, Controller pods etc.
Console link into OpenShift UI - to directly access the ACS Central UI
Job to create an initialization bundle to install the Secured Cluster
Job to configure authentication using OpenShift
Let’s start …
Prerequisites
Argo CD (OpenShift GitOps) deployed
App-Of-Apps deployed
Introduction
The main components of ACS are the two custom resources: Central and SecuredCluster. The recommended way to deploy ACS is to use the Operator (alternatives would be the command line or Helm Chart). When I first came across ACS I thought about how to automate the full deployment. I did not want to install the Operator, then the Central, then manually create a so-called init-bundle, then deploy the Secured Cluster, then find the route that has been used, then find the secret that stores the initial administrator credentials and then, finally, log into ACS and activate OpenShift authentication.
As you can see there are a lot of tasks to do before I can start a customer demo.
At the same time, I started to dig into GitOps and I thought this would be a good option to create my very first Helm Chart.
Long story short, I have now a Helm Chart (actually three, because I outsourced some of the features into sub-charts) that automatically does all these things above. Once I am synchronizing my Argo CD Application everything will happen automatically.
The Configure App-of-Apps installed an Argo CD Application called in-cluster-setup-acs:
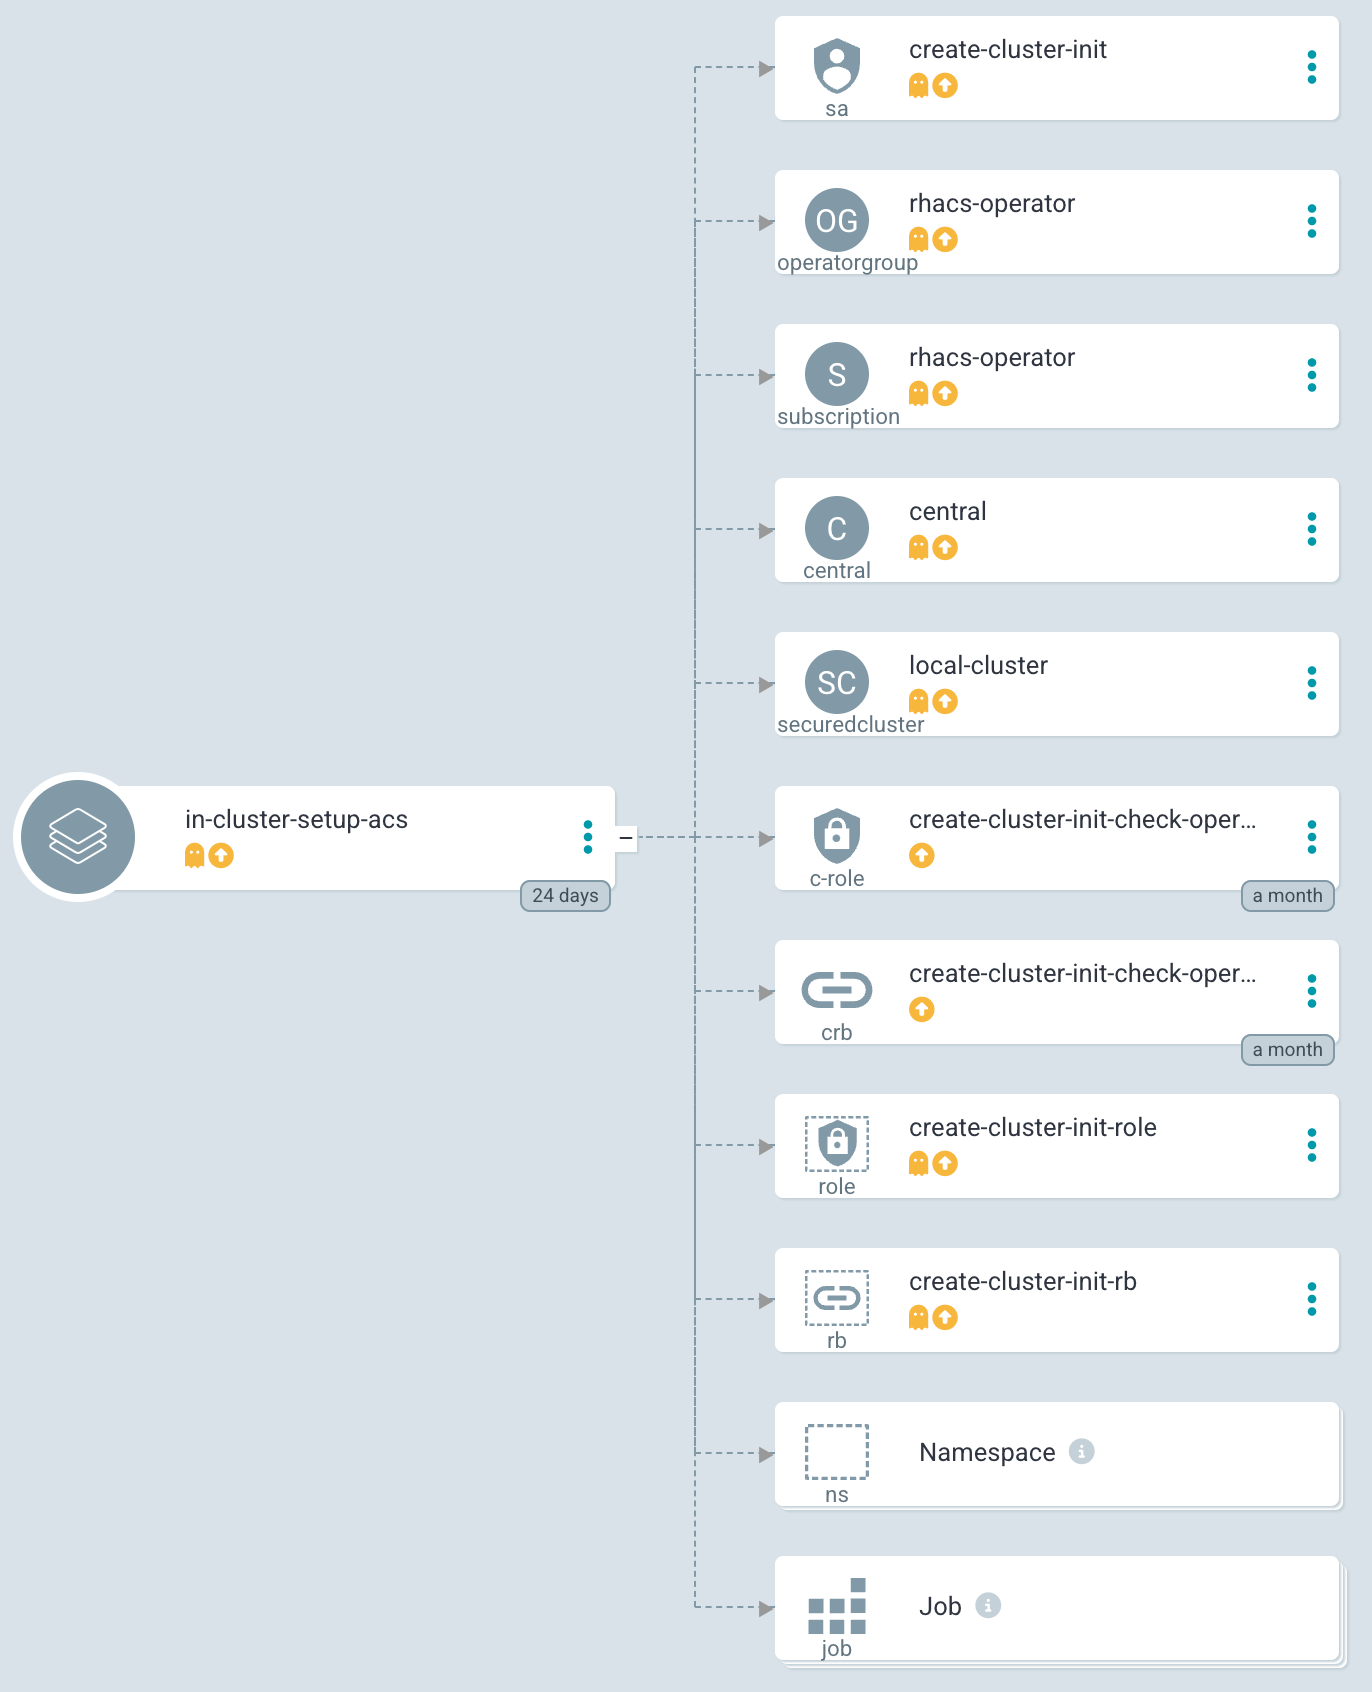
This Argo CD Application used the following path to find the Helm Chart: setup-acs
This Helm chart is a wrapper chart that uses sub-charts as dependencies to install and configure the operator as well as to do some OpenShift Jobs on top, for example, creating a ConsoleLink or creating an init-bundle.
| Please check out the article Setup Compliance Operator on why I am using a wrapper chart. |
Installing Advanced Cluster Security
Analysing Chart.yaml
Let’s examine the Chart.yaml file to see which dependencies are used:
The file looks like the following. Three sub-charts are defined as required to deploy and configure the ACS. This is pretty much the same as it was for the Setup Compliance Operator.
apiVersion: v2
name: setup-acs
description: Deploys Advanced Cluster Security (ACS) on target cluster. If enabled Central will be deployed too.
version: 1.0.0
dependencies:
  - name: rhacs-setup (1)
    version: ~1.0.0 (2)
    repository: https://charts.stderr.at/
  - name: helper-operator (3)
    version: ~1.0.23
    repository: https://charts.stderr.at/
  - name: helper-status-checker (4)
    version: ~4.0.0
    repository: https://charts.stderr.at/
condition: helper-status-checker.enabled (5)| 1 | Dependency: RHACS Setup |
| 2 | Version that will be used. The "~" means that the latest version of 1.0.X will be used. |
| 3 | Dependency: Helper Operator |
| 4 | Dependency: Helper Status Checker |
| 5 | Only use this dependency when "enabled" is set |
| Verify the READMEs of the different Charts for detailed information on how to configure them. |
Configuration of the Chart
To configure Advanced Cluster Security the values file of the wrapper Chart must be prepared accordingly.
| The important thing here is, that any value that should be bypassed to a sub-chart is defined under the name of the sub-chart. For example, everything under helper-operator: will be sent to the helper-operator Chart and is used there for its configuration. |
Check out the example values file I use to configure ACS and the README to find further information about the possible settings that can be done.
Let’s check the main example, to quickly start:
Installing and verifying the Operator
The first thing to do is to deploy the Operator and to verify if the Operator installation finished successfully.
The two Helm Charts helper-operator and helper-status-checker are responsible to do so.
They are configured as follows:
helper-operator:
  operators:
    rhacs-operator: (1)
      enabled: true (2)
      syncwave: '0' (3)
      namespace:
        name: rhacs-operator (4)
        create: true
      subscription:
        channel: stable (5)
        approval: Automatic
        operatorName: rhacs-operator
        source: redhat-operators
        sourceNamespace: openshift-marketplace
      operatorgroup: (6)
        create: true
        # rhacs does not support to monitor own namespace,
        # therefore the spec in the OperatorGroup must be empty
        notownnamespace: true

# Subchart helper-status-checker
# checks if ACS operator is ready
helper-status-checker:
  enabled: true (7)

  checks: (8)

    - operatorName: rhacs-operator (9)
      namespace:
        name: rhacs-operator (10)
      syncwave: 3

      serviceAccount:
name: "status-checker-acs" (11)| 1 | Key that can be freely defined. Theoretically, you can deploy multiple operators at once. |
| 2 | Is this Operator enabled yes/no. |
| 3 | Syncwave for the Operator deployment. (Subscription and OperatorGroup etc.) |
| 4 | The Namespace where the Operator shall be deployed and if this namespace shall be created. |
| 5 | Configuration of the Subscription resource. |
| 6 | Configuration of the OperatorGroup |
| 7 | Enable status checker or not. Default: false |
| 8 | List of operators to check. Typically, only one is checked, but there could be more. |
| 9 | Name of the Operator to check (same as for helper-operator) |
| 10 | Namespace where the Operator has been installed (same as for helper-operator) |
| 11 | Name of the ServiceAccount that will be created to check the status. |
| Verify the READMEs at Helper Operator and Helper Operator Status Checker to find additional possible configurations. |
| Also verify the separate article Operator Installation with Argo CD to understand why I am verifying the status of the Operator installation. |
Configuring Advanced Cluster Security
Besides the deployment of the Operator, the configuration of ACS is the most important part here. The ACS Operator provides two custom resources: Central and SecuredCluster. On the Central cluster both CRDs are required. On any other (spoke) cluster, the SecuredCluster resource is enough.
In the following example, I am going to configure both Central and SecuredCluster. Since the values file is quite huge I removed most of the additional comments, to keep this article short and readable. You can read the example values file or the README at Advanced Cluster Security Chart to find additional possible configurations. Especially, if you like to add tolerations or set resource limits.
#########################################
# Settings for Advanced Cluster Security
#########################################
rhacs-setup:
  rhacs:

    namespace: (1)
      name: stackrox
      syncwave: '0'
      descr: 'Red Hat Advanced Cluster Security'

    ################
    # CENTRAL of ACS
    ################
    # Settings for the Central of ACS
    central: (2)
      enabled: true
      syncwave: '3'
      egress:
        connectivityPolicy: Online

      ###############
      # CENTRAL DB
      ###############
      # Settings for Central DB, which is responsible for data persistence.
      db: (3)
        # -- Set Central DB resources.requests for a DEMO environment to save resources.
        resources:
          requests:
            cpu: '1'
            memory: '1Gi'

        # -- If you want this component to only run on specific nodes, you can
        # configure tolerations of tainted nodes.
        tolerations: {}
        #   - effect: NoSchedule
        #     key: infra
        #     operator: Equal
        #     value: reserved
        #   - effect: NoSchedule
        #     key: infra
        #     operator: Equal
        #     value: reserved

    ###############
    # SCANNER
    ###############
    scanner: (4)
      enabled: true

      analyzer:
        # The following settings are NOT suitable for a production environment
        autoscaling:
          status: "Disabled"
          max: 1
          min: 1
          # When autoscaling is disabled, the number of replicas will always be
          # configured to match this value.
          replicas: 1
        tolerations: {}

      ###############
      # SCANNER DB
      ###############
      db:
        tolerations: {}

    #################
    # SECURED CLUSTER
    #################
    secured_cluster: (5)
      enabled: true
      syncwave: '4'
      clustername: local-cluster

      sensor:
        tolerations: {}

      admissioncontrol:
        listenOn:
          creates: true
          events: true
          updates: true
        tolerations: {}

    # -- Basic settings for ACS authentication
    # This configuration is done by a Job, that will configure the OpenShift oauth for ACS.
    basic_acs_settings: (6)
      auth_provider: 'OpenShift'
      auth_provider_type: 'openshift'
      min_access_role: 'None'
      syncwave: 5

    ####################################################
    # Additional settings for Central and possible Jobs
    ####################################################
    job_vars: (7)
      max_attempts: 20

    job_init_bundle: (8)
      enabled: true
      syncwave: '3'

    consolelink: (9)
      enabled: true
      syncwave: '3'
      location: ApplicationMenu
      text: Advanced Cluster Security
section: Observability| 1 | Create the Namespace stackrox and install the ACS resources there. |
| 2 | Enable the Central during Syncwave 3 and set the connectivityPolicy to Online |
| 3 | The Central DB and its configuration. Here the resource requests are modified to allow a small installation on the DEMO environment. Also, tolerations might be set here, as well a PVCs etc. |
| 4 | Settings for the Scanner and its databases. Again, tolerations might be configurated here, but also, not shown in this example, resource limits and requests and other settings. Since I am configuring for a DEMO environment, I disabled the autoscaler and set the replica to 1. |
| 5 | The SecuredCluster is the 2nd CRD that is provided by ACS Operator. It is installed after the Central (thus a higher Syncwave). The most important setting here is the clustername. In our "local" example, the name is set to local-cluster. |
| 6 | Some basic settings, that will configure the OpenShift authentication and the minimum role for authenticated users (None) |
| 7 | Some default settings for Jobs that are started by this Helm chart. |
| 8 | The Job that initializes the creation of the init-bundle |
| 9 | The Job and its configuration to generate a direct link to ACS in the OpenShift UI. |
With this ACS is about to be installed on the cluster. Let’s see what will happen during the synchronization.
Deploying Advanced Cluster Security (ACS)
Let’s hit the sync button inside OpenShift GitOps. This will start the whole process, walking through the syncwaves and the hooks that have been defined.
| Since hooks are used, you must sync the whole Argo CD Application. As you can see inside Argo CD, the hooks are not shown, because they will only appear when their time has come (and will disappear afterward again). This means, that if you perform a selective sync, Argo CD does not know when it should start such a hook and they are never triggered. |
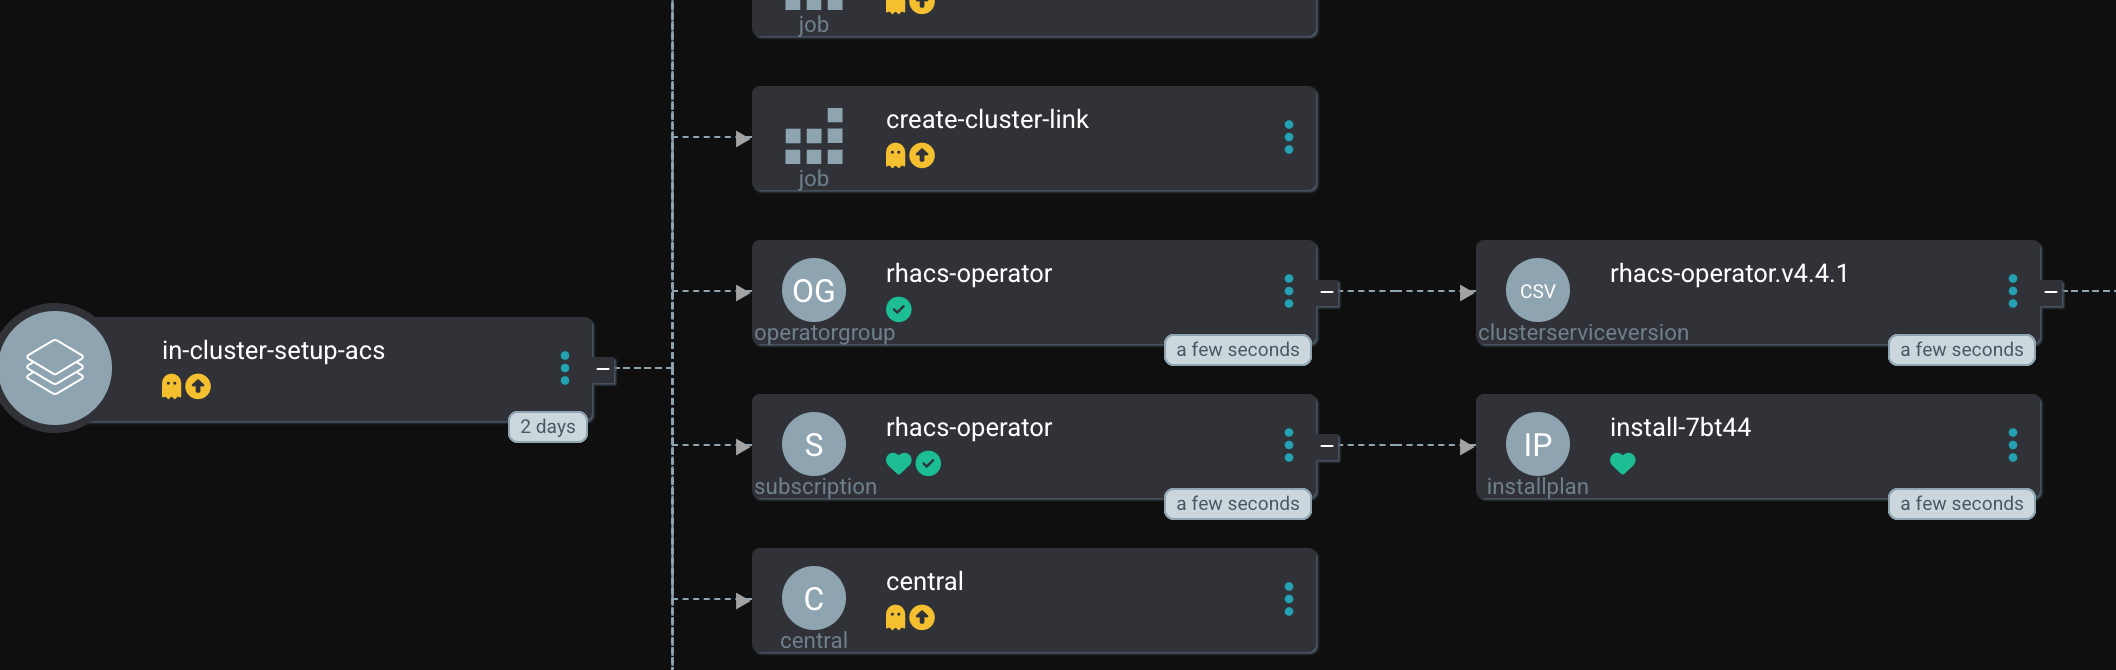
The Operator installation is now started. At the moment the Operator has the status Installing. Currently, no CRDs (Central or SecuredCluster) are available yet. If we would just let Argo CD continue, it would try to create the Central configuration, based on a CRD which does not yet exist. Thus, the syncing process will fail and therefore the status-checker is going to verify if the installation was truly successful.

The Status Checker is a simple Pod that is triggered by a Kubernetes Job. If waits until the status of the Operator is Succeeded. Until this is the case, Argo CD waits before it continues with the synchronization. (It waits until the hook ends the Job)

In the logs file of the Pod, we can see that the Operator is ready.
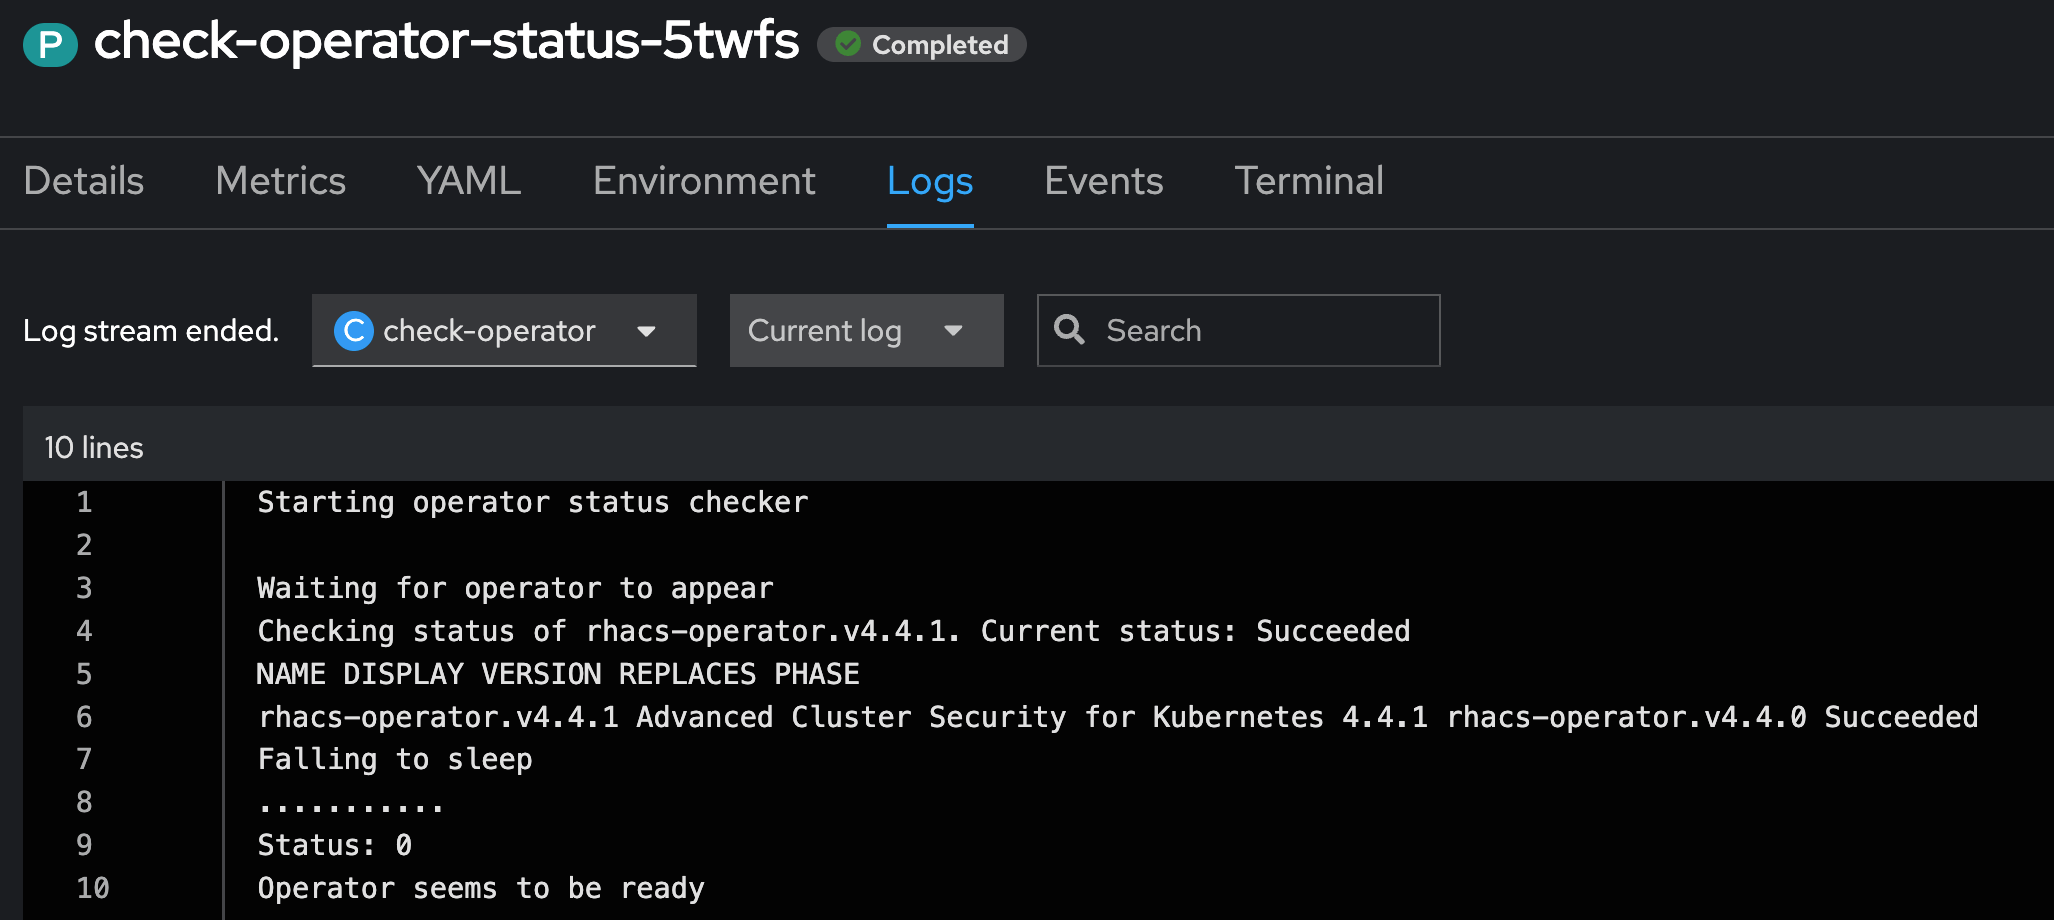
And indeed, the status of the Operator is now Succeeded. Now it is time for Argo CD to continue the synchronization.

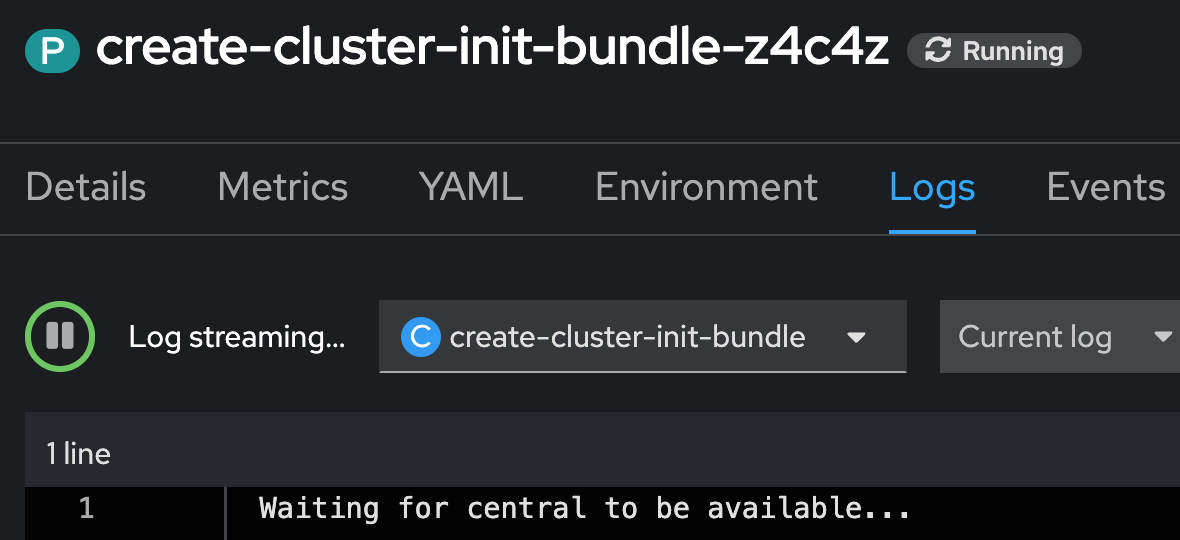
The next step is to create the Central CRD. This will deploy the UI of ACS and the local Scanner. You can also see two other Jobs that have been created by the Helm Charts create_cluster_link and create_cluster_init_bundle. They will finish when the Central becomes ready.
| Until the Central becomes ready, these two additional Jobs may show errors. Do not worry, OpenShift will reschedule them. |
You can also see two other Jobs that have been created by the Helm Charts create_cluster_link and create_cluster_init_bundle. They will finish when the Central becomes ready.
| Until the Central becomes ready, these two additional Jobs may show errors. Do not worry, OpenShift will reschedule them. |
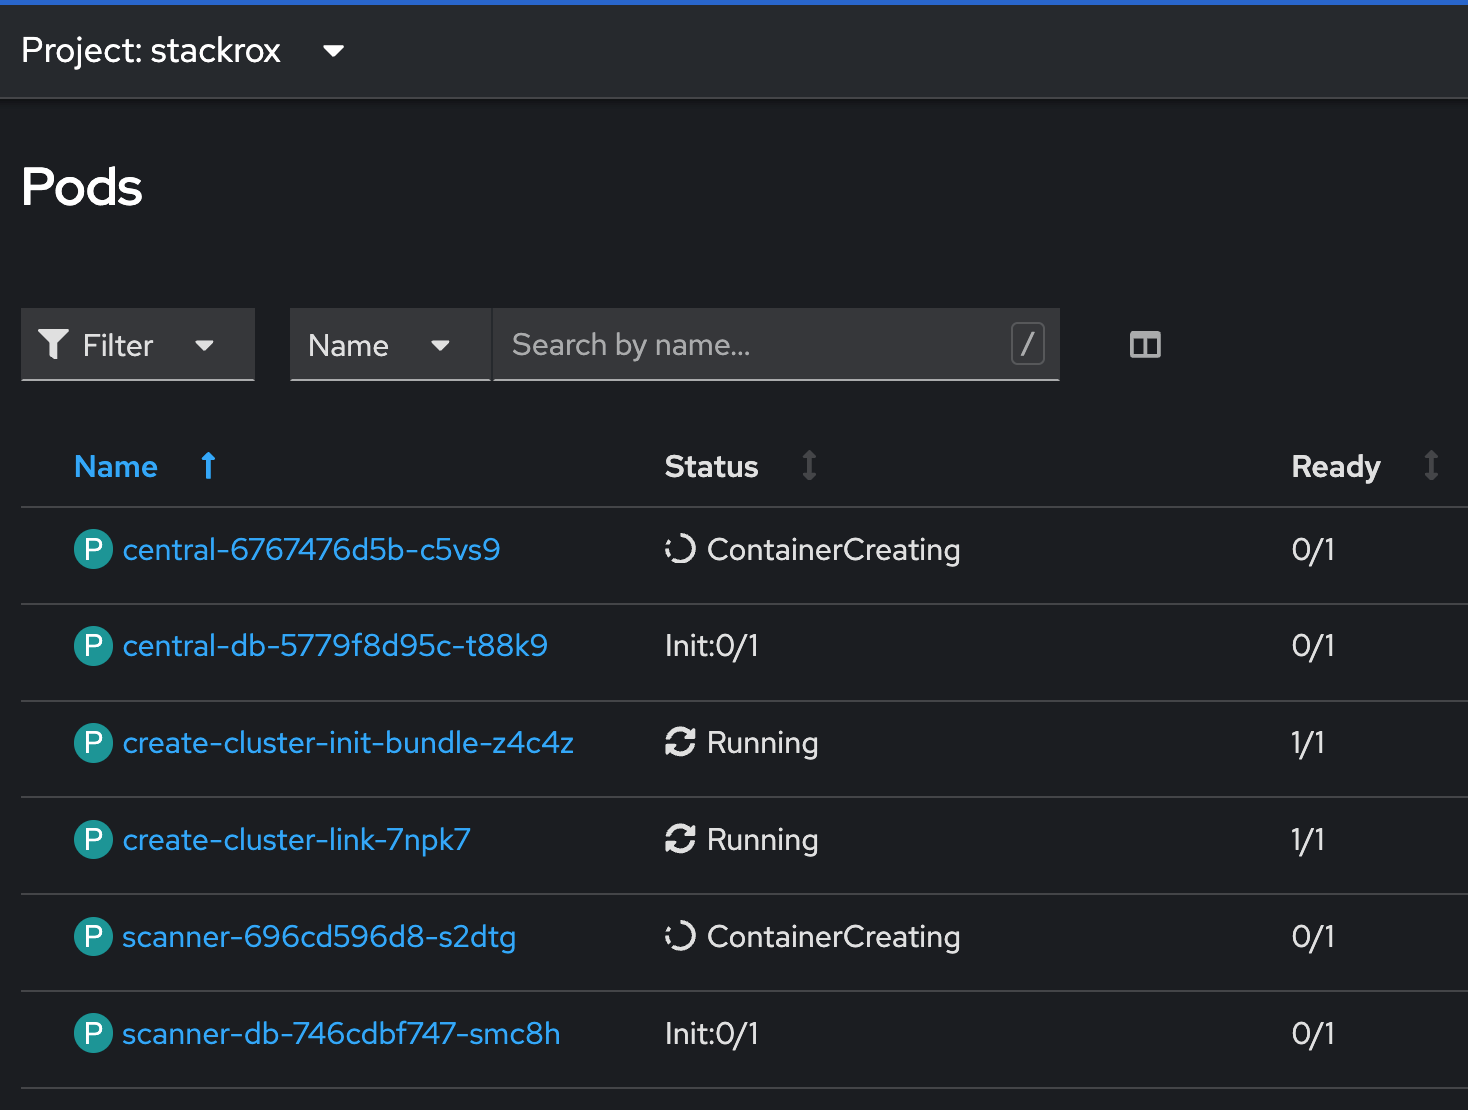
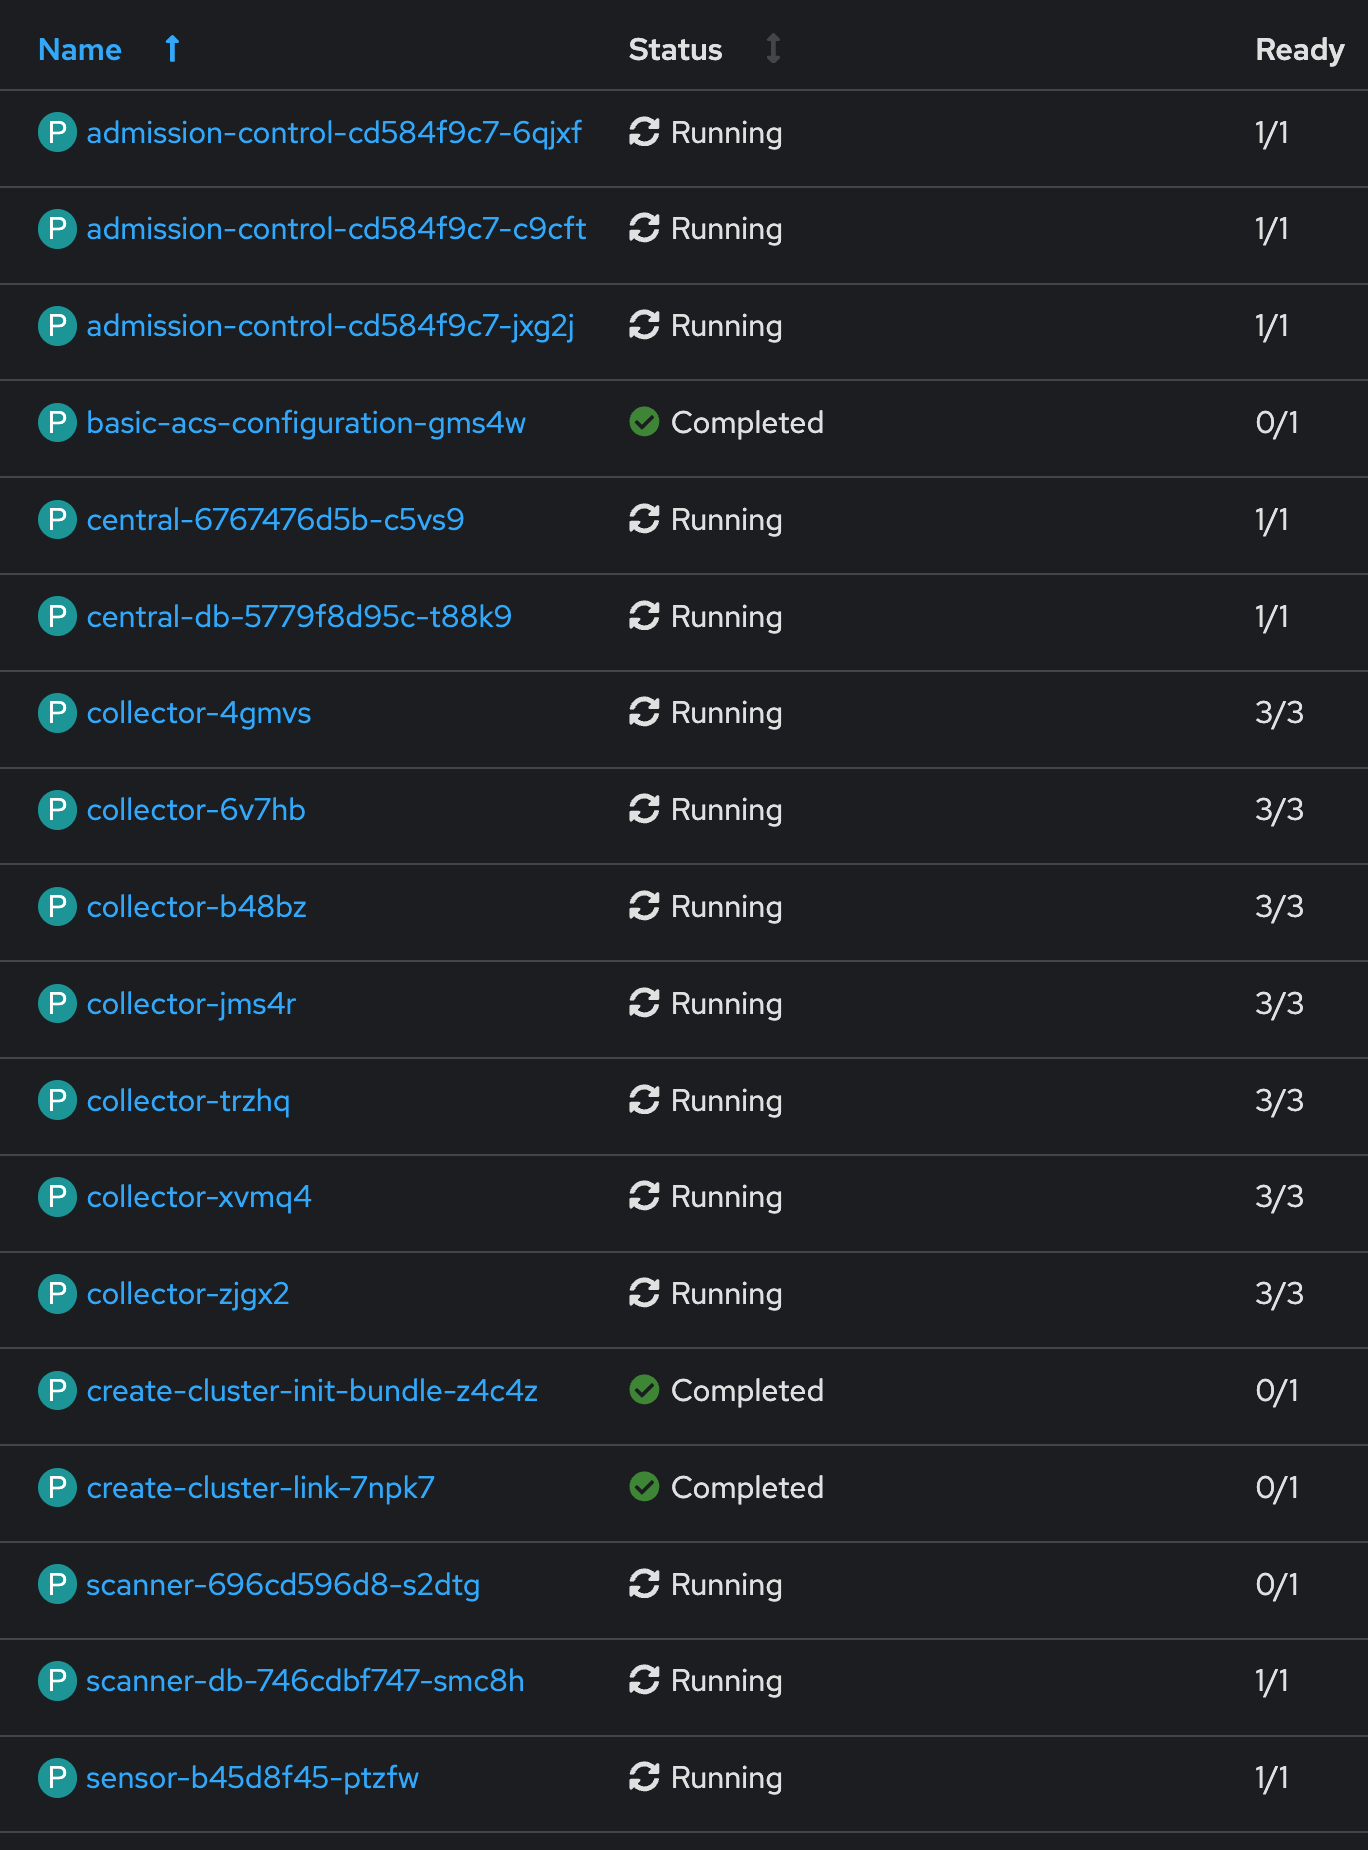
Once the Central has been deployed, the second CRD SecuredCluster will be added. This will trigger the installation of the Collectors and other components.

Eventually, all Pods are running at the end. The additional Jobs are completed and ACS is ready to take care of the cluster security.
We can now use the console link that was created.
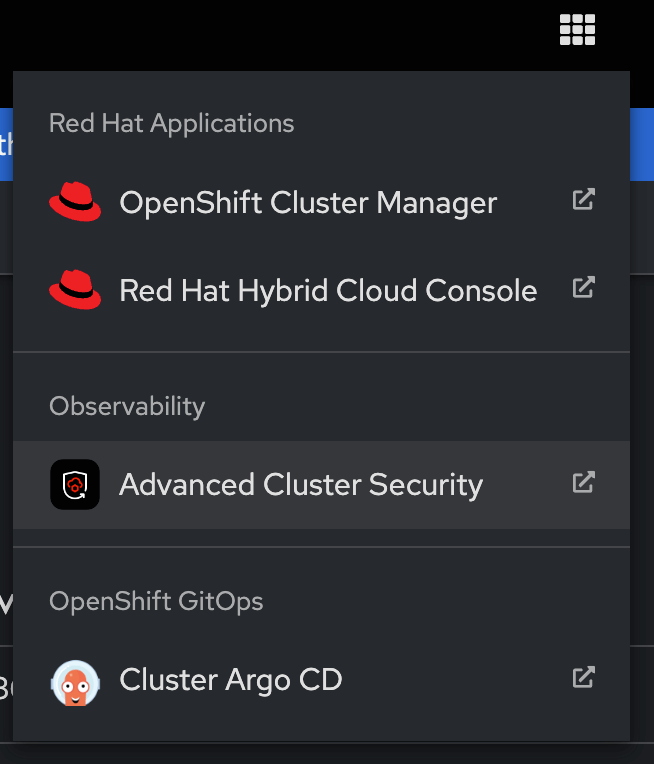
| If you disabled the creation of the ConsoleLink you would need to find the Route that ACS Operator created. Honestly, I do not know why the Operator does not create such ConsoleLink out of the box. |
Since I am lazy I created another Job that automatically configures authentication via OpenShift for ACS. This way, we can simply use our OpenShift credentials to login.
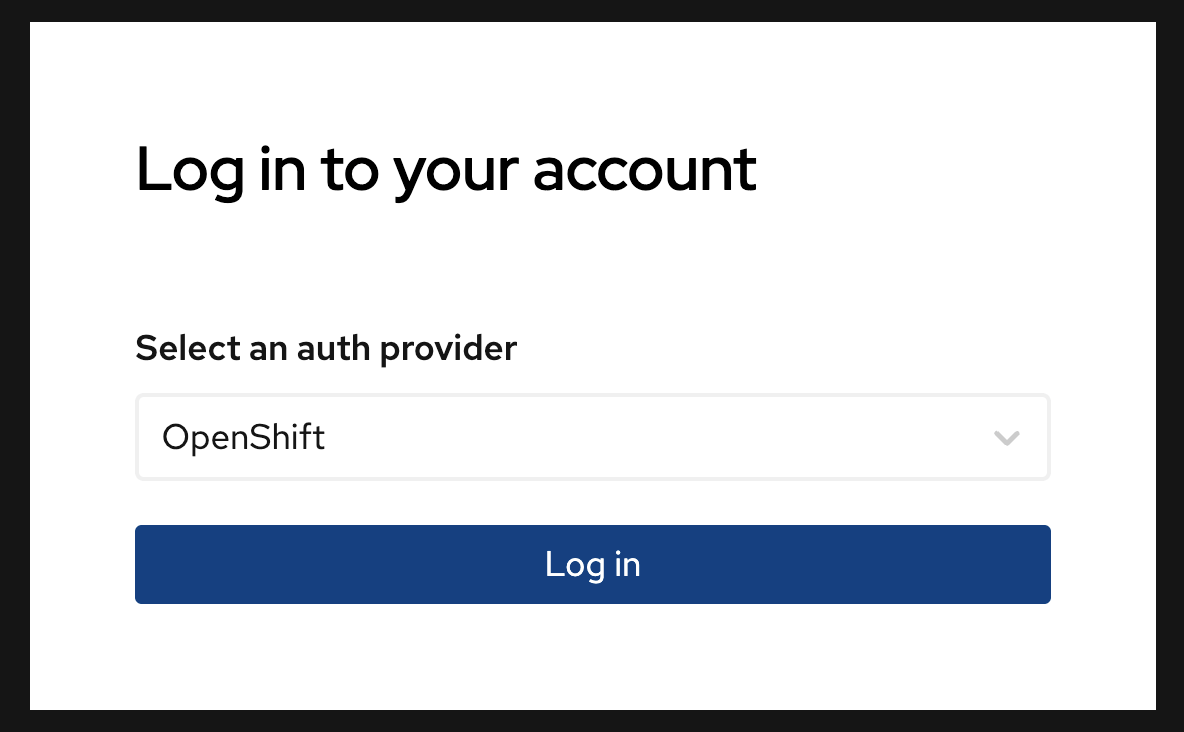
And that’s it, we can now use ACS, which was deployed fully automatically.
Conclusion
As you can see Advanced Cluster Security was completely installed. This included the Operator, the Central, the creation and installation of an init-bundle, the creation of a ConsoleLink, the configuration of the SecuredCluster CRD and the initial configuration of the auth provider inside ACS. You can now start using ACS or add additional clusters.
| Speaking of additional clusters: The create-cluster-init-bundle created three certificates: collector-tls, sensor-tls and admission-control-tls. They are required so that the SecuredClusters can communicate with the Central. You could now create a separate init-bundle for each SecuredCluster, which is not really easy to automate, or you simply take these created secrets and put them into your GitOps and re-use them for any other SecuredCluster. |
All these steps and configurations seem quite complicated but honestly, it is straightforward. I install any Operator using Helper Operator and in most cases. I also use Helper Operator Status Checker to find additional possible configurations. Both require simple configuration only, which you would need to know anyway when you create the Subscription object manually. Once done, you can repeat this for any other Operator.
The real magic happens when the Operator is configured at the same time because this is very individual to the Operator.
Copyright © 2020 - 2026 Toni Schmidbauer & Thomas Jungbauer
Discussion
Comments are powered by GitHub Discussions. To participate, you'll need a GitHub account.
By loading comments, you agree to GitHub's Privacy Policy. Your data is processed by GitHub, not by this website.