Basic usage of git
-
 Toni Schmidbauer
( Lastmod: 2024-05-05 )
-
11 min read
Toni Schmidbauer
( Lastmod: 2024-05-05 )
-
11 min read
This is a very short and hopefully simple introduction on how to use Git when you would like to contribute to projects hosted on github.com. The same workflow should also work for projects on gitlab.com.
Introduction
There is this fancy mega application hosted on github called megaapp that you would like to contribute to. It’s perfect but there’s just this little feature missing to make it even more perfect.
This is how we would tackle this.
| rocket science ahead |
Glossary
| Term | Definition |
|---|---|
fork | A (personal) copy of a repository you created on github or gitlab. |
upstream | When creating forks of repositories on github or gitlab, the original repository hosting the project |
index | The staging area git uses before you can commit to a repository |
remote repository | A repository hosted on a server shared by developers |
local repository | A local copy of a repository stored on you machine. |
Step 1: Fork the repository on github.com
Login to you Github account and navigate to the project you would like to fork, megaapp in our example.
Click on the the fork button, as depicted in the image below:

If you are a member of several projects on github.com, github is going to ask you into which project you would like to clone this repository.
After selecting the project or your personal account, github is going to clone the repository into the project you selected. For this example I’m going to use my personal github account "tosmi".
Step 2: Clone the repository to you workstation
Next we are going to clone our fork from Step 1: Fork the repository on github.com to our workstation and start working on the new feature.
After forking the upstream project you are redirect to your personal copy of the project. Click on the "Clone or download" button and select the link. You can choose between SSH and HTTPS protocols for downloading the project. We are going to use SSH.
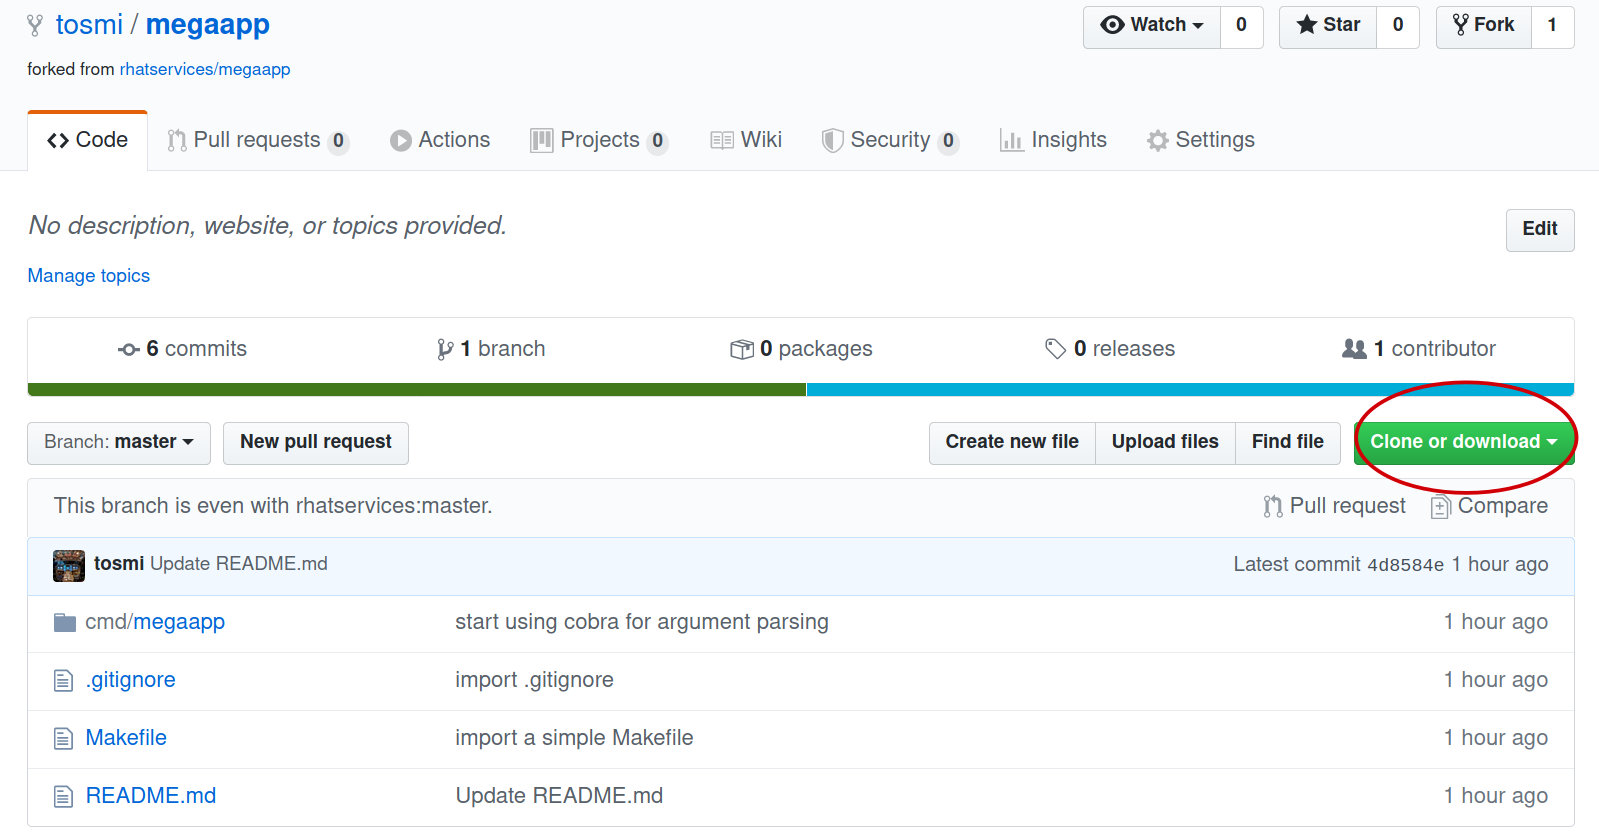
Copy the link into a terminal and execute the git clone command:
$ git clone git@github.com:tosmi/megaapp.gitStep 3: Create a feature branch for your new fancy feature
Change into the directory of the project you downloaded in Step 2: Clone the repository to you workstation
cd megaappNow we create a feature branch with a short name that describes our new feature:
git checkout -b tosmi/addoptionBecause we would like to add a new option to megaapp we call this feature branch addoption.
We are also prefixing the feature branch with our github username so that it is clear for the upstream project maintainer(s) who is contributing this.
How you name you branches is opinionated, so we would search for upstream project guidelines and if there are none maybe look at some existing pull request how other people are naming there branches. If we find no clue upstream we sticking with <github username>/<branch name>.
We can now start adding our mega feature to the project.
Step 4: Add you changes to the Git index
Before we can commit our changes, we have to place the changes made in the so called index or staging area:
$ git add <path to file you have changed>If we would like to place all of our changes onto the index we could execute
$ git add -AStep 5: Commit your changes
After adding our changes to the Git index we can commit with
$ git commitThis will open our favorite editor and we can type a commit message. The first line should be a short description of our change, probably not longer than 70 to 80 characters. After two newlines we can enter a detailed explanation of your changes.
This is an example commit message
Added a `version` option to output the current version of megaapp

This change introduces a `version` option to megaapp. The purpose is
to output the current version of megaapp for users. This might be
helpful when users open a bug report so we can see what version is
affected.
After saving the message and we have successfully created a commit.
| Remember this is now only stored in the local copy of the repository! We still have to push our changes to github. |
There is also the option to add the commit comment directly on the command line
$ git commit -m 'Added a `version` option to output the current version of megaapp

This change introduces a `version` option to megaapp. The purpose is
to output the current version of megaapp for users. This might be
helpful when users open a bug report so we can see what version is
affected.'
Step 6: Pushing our local changes to our forked repo on github.com
We execute
$ git pushto push our local changes to the forked repository hosted on github.com.
Step 7: Creating a pull request on github.com
We navigate to our personal project page of the forked repository on github. For the fork we are using in this example this is http://github.com/tosmi/megaapp.
Github is going to show us a button "Compare & pull request":
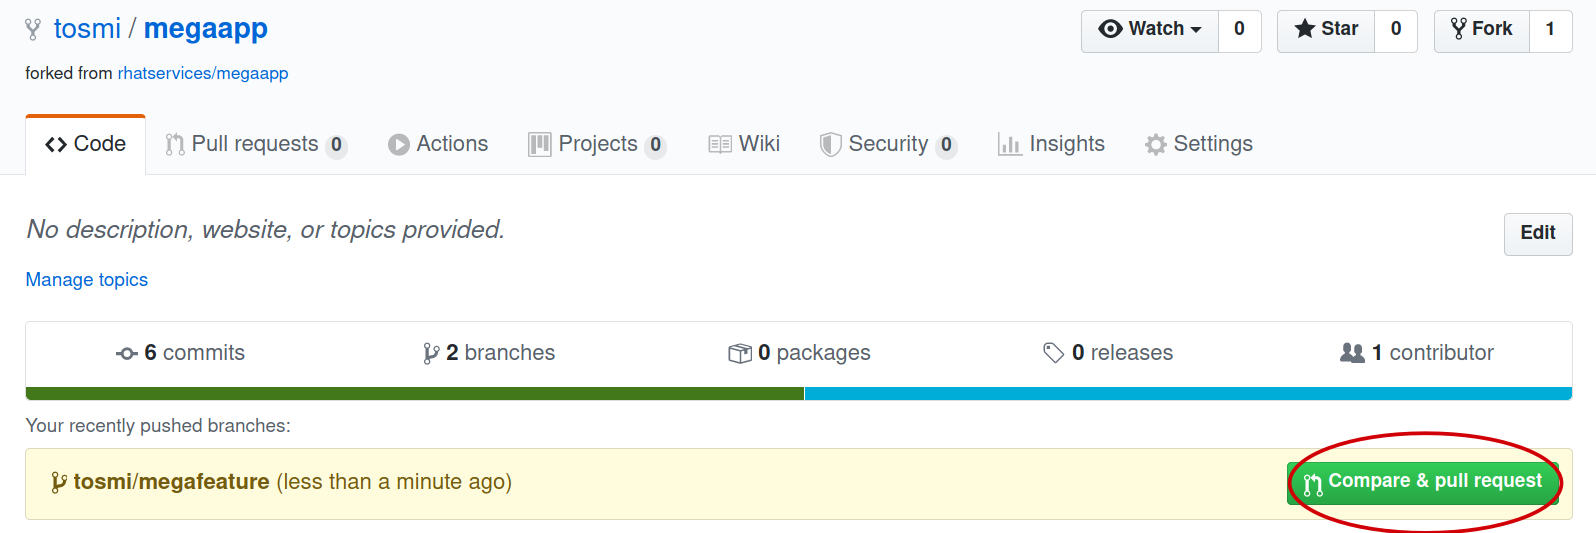
After clicking on that button we are able to review the changes we would like to include in this pull request.
If we are happy with our changes we click on "Create pull request". The upstream owner of the repository will get notified and we can see our open pull request on the upstream project page under "Pull requests".
If there are CI test configured for that project they will start to run and we can see if our pull request is going to pass all test configured.
Rebasing to current upstream if required
Sometimes a upstream project maintainer asks you to rebase your work on the current upstream master branch. The following steps explain the basic workflow.
First we are going to create a new remote location of our repository called upstream. Upstream points to the upstream project repository. We will not push to this location, in most cases this is not possible because you do not have write access to a remote upstream repository. It is just used for pulling upstream changes in our forked repository.
Execute the following commands to add the upstream repository as a new remote location and display all remote locations currently defined.
$ git remote add upstream https://github.com/rhatservices/megaapp.git
$ git remote -v origin
git@github.com:tosmi/megaapp.git (fetch) origin
git@github.com:tosmi/megaapp.git (push) upstream
https://github.com/rhatservices/megaapp.git (fetch) upstream
https://github.com/rhatservices/megaapp.git (push)
As we hopefully implemented our new feature in feature branch, we can pull changes from the upstream master branch into our local copy of the master branch. Remember we are using a feature branch and master should be kept clean from local changes.
$ git checkout master
Switched to branch 'master'
Your branch is up to date with 'origin/master'.
So now we have this older copy of the upstream master branch checked out and we would like to update it to the latest and greatest from the upstream master branch.
$ git pull upstream master
remote: Enumerating objects: 10, done.
remote: Counting objects: 100% (10/10), done.
remote: Compressing objects: 100% (3/3), done.
remote: Total 6 (delta 2), reused 6 (delta 2), pack-reused 0
Unpacking objects: 100% (6/6), 630 bytes | 157.00 KiB/s, done.
From https://github.com/rhatservices/megaapp
 * branch            master     -> FETCH_HEAD
 * [new branch]      master     -> upstream/master
Updating 4d8584e..ddfd077
Fast-forward
 cmd/megaapp/main.go |  2 ++
 cmd/megaapp/rule.go | 20 ++++++++++++++++++++
 2 files changed, 22 insertions(+)
 create mode 100644 cmd/megaapp/rule.go
With the pull command above you pulled all changes from the upstream master branch into you local copy of master. Just to be sure let’s display all available branches, local and remote ones.
Branches with a name remote/<remote name>/<branch name> are remote branches that git knows about. Origin points to our forked repository and is also the default location for push operations.
$ git branch -a
  master
* tosmi/megafeature
  remotes/origin/HEAD -> origin/master
  remotes/origin/master
  remotes/origin/tosmi/megafeature
  remotes/upstream/master
So finally to rebase our feature branch to the upstream master branch we first need to checkout our feature branch via
$ git checkout tosmi/megafeatureNow we are able to rebase our changes to upstream master. Git basically pulls in all changes from the master branch and re-applies the changes we did in our feature branch.
git rebase upstream/master
Successfully rebased and updated refs/heads/tosmi/megafeature.
There might be merge conflicts when git tries to apply you changes from your feature branch. You have to fix those changes, git add the fixed files and execute git rebase continue. Luckily this is not the case for your megafeature.
As we have successfully rebased our feature branch to upstream master we can now try to push changes made to our forked github repository.
$ git push
To github.com:tosmi/megaapp.git
 ! [rejected]        tosmi/megafeature -> tosmi/megafeature (non-fast-forward)
error: failed to push some refs to 'git@github.com:tosmi/megaapp.git'
hint: Updates were rejected because the tip of your current branch is behind
hint: its remote counterpart. Integrate the remote changes (e.g.
hint: 'git pull ...') before pushing again.
hint: See the 'Note about fast-forwards' in 'git push --help' for details.
Oh, this fails of course! The reason is that our local feature branch and the remote feature branch have a different commit history. The remote feature branch is missing the commits from master that we applied when rebasing on the current master branch.
So let’s try again, this time using the --force-with-lease option. You could also use -f or --force but --force-with-lease will stop you if someone else (our you) has modified the remote feature branch meanwhile. If you push with -f or --force anyways you might loose changes.
$ git push --force-with-lease
Enumerating objects: 5, done.
Counting objects: 100% (5/5), done.
Delta compression using up to 8 threads
Compressing objects: 100% (3/3), done.
Writing objects: 100% (3/3), 295 bytes | 295.00 KiB/s, done.
Total 3 (delta 2), reused 0 (delta 0), pack-reused 0
remote: Resolving deltas: 100% (2/2), completed with 2 local objects.
To github.com:tosmi/megaapp.git
 + acf66a3...39357b2 tosmi/megafeature -> tosmi/megafeature (forced update)
But as no one modified the remote feature branch while we did our rebase the force push goes through.
Our merge request (if we opened one already) is now updated to the latest upstream master branch and merging our feature should be a breeze. You might notify the upstream project maintainer that you feature branch is up to date and ready for merging
Using git’s interactive rebase to change you commit history
When working with upstream projects it might be that a project maintainer requests that you rework your git history before he is willing to merge your changes. For example this could be that case if you have plenty of commits with very small changes (e.g. fixed typos).
The general rule is that one commit should implement one change. This is not a hard rule, but usually works.
Let’s look at an example. For the implementation of our new feature that we would like to bring upstream we have the following commit history
$ git log --oneline
0a5221d (HEAD -> tosmi/megafeature) fixed typo
0e60d12 update README
bf2ef3c update
We have updated README.md in the repository but there a three commits for this little change. Before bringing this upstream in our pull request, we would like to convert those three commits into a single one and also make the commit message a little more meaningful.
We execute the following command to start reworking our commit history
$ git rebase -iGit will drop us into our beloved editor (vi in this case), under Linux you could change the editor git uses by modifying the $EDITOR environment variable. We are going to see the following output:
pick bf2ef3c update
pick 0e60d12 update README
pick 0a5221d fixed typo

# Rebase 39357b2..0a5221d onto 39357b2 (3 commands)
#
# Commands:
# p, pick <commit> = use commit
# r, reword <commit> = use commit, but edit the commit message
# e, edit <commit> = use commit, but stop for amending
# s, squash <commit> = use commit, but meld into previous commit
# f, fixup <commit> = like "squash", but discard this commit's log message
# x, exec <command> = run command (the rest of the line) using shell
# b, break = stop here (continue rebase later with 'git rebase --continue')
# d, drop <commit> = remove commit
# l, label <label> = label current HEAD with a name
# t, reset <label> = reset HEAD to a label
# m, merge [-C <commit> | -c <commit>] <label> [# <oneline>]
# .       create a merge commit using the original merge commit's
# .       message (or the oneline, if no original merge commit was
# .       specified). Use -c <commit> to reword the commit message.
#
# These lines can be re-ordered; they are executed from top to bottom.
#
# If you remove a line here THAT COMMIT WILL BE LOST.
#
# However, if you remove everything, the rebase will be aborted.
#
Git automatically selected commit id bf2ef3c as the basis for our rebase. We could also have specified the commit id where we would like to start our rebase operation e.g.
git rebase -i bf2ef3cIn our editor of choice we can now tell git what it should do with the selected commits. Please go ahead and read the helpfull explanation text in comments (prefixed with '#') to get a better understanding of the operations supported.
In our case we would like to squash the last commits. So we change the lines with pick to squash until it looks like the following:
pick bf2ef3c update
squash 0e60d12 update README
squash 0a5221d fixed typo
We would like to squash commits 0a5221d and 0e60d12 onto commit bf2ef3c. Keep in mind that git actually reverses the order of commits. So 0a5221d is the last commit we added.
If we save the file and quit our editor (I’m using vi here), git drops us into another buffer where we can finally modify the commits
 This is a combination of 3 commits.
# This is the 1st commit message:

update

# This is the commit message #2:

update README

# This is the commit message #3:

fixed typo

# Please enter the commit message for your changes. Lines starting
# with '#' will be ignored, and an empty message aborts the commit.
#
# Date:      Mon May 18 15:46:37 2020 +0200
#
# interactive rebase in progress; onto 39357b2
# Last commands done (3 commands done):
#    squash 0e60d12 update README
#    squash 0a5221d fixed typo
# No commands remaining.
# You are currently rebasing branch 'tosmi/megafeature' on '39357b2'.
#
# Changes to be committed:
#       modified:   README.md
#
We can see all three commit message and we are going to modify those messages until we are happy
# This is a combination of 3 commits.
# This is the 1st commit message:

updated README.md to megafeature

as we added megafeature, it makes sense to include a short note about it also in README.md

# Please enter the commit message for your changes. Lines starting
# with '#' will be ignored, and an empty message aborts the commit.
#
# Date:      Mon May 18 15:46:37 2020 +0200
#
# interactive rebase in progress; onto 39357b2
# Last commands done (3 commands done):
#    squash 0e60d12 update README
#    squash 0a5221d fixed typo
# No commands remaining.
# You are currently rebasing branch 'tosmi/megafeature' on '39357b2'.
#
# Changes to be committed:
#       modified:   README.md
#
When we are happy with new commit message we just save and quit our editor. Git will now rewirte the history and when we take look at the commit history again we will see our changes:
$ git log --oneline
91d1ae2 (HEAD -> tosmi/megafeature) updated README.md to megafeature
39357b2 (origin/tosmi/megafeature) added a mega feature
ddfd077 (upstream/master, master) added rule command
4d8584e (origin/master, origin/HEAD) Update README.md
eb6ccbc Create README.md
60fcabc start using cobra for argument parsing
5140ed0 import .gitignore
d2b55d1 import a simple Makefile
2ecb412 initial import
We only have commit 91d1ae2 now , which includes all three changes from the commits before.
| Rewriting the history of a repository is a dangerous operation. Especially when you are working in a team. It is not advised to change the history of commits that got already pushed to a remote location. Otherwise your teammates will get confused next time they try to push or pull from the shared repository. |
So it’s OK to change the commit history of a feature branch that only you are using, but be careful when working on branches more than one developer is using.
Copyright © 2020 - 2025 Toni Schmidbauer & Thomas Jungbauer